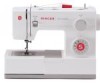
Singer 5511 SCHOLASTIC Support Question
Singer 5511 SCHOLASTIC Support Question
Find answers below for this question about Singer 5511 SCHOLASTIC.Need a Singer 5511 SCHOLASTIC manual? We have 1 online manual for this item!
Question posted by kimborland on March 16th, 2014
Stitch Selection
I've just taken my machine out of the box, I can't get it to make the stitfch labeled "J" in the manual.
Current Answers
Related Singer 5511 SCHOLASTIC Manual Pages
Instruction Manual - Page 2
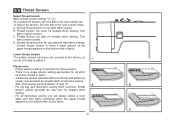
... while stitching. Do not use of experience and knowledge, unless they do not play with any adjustments
in the needle area, such as a toy. The sound pressure level under normal operating conditions is required around the sewing machine needle. 6. Never drop or insert any other user servicing adjustments mentioned in the instruction manual. 11...
Instruction Manual - Page 6
... Pressure 8 Accessories ...10
Threading the Machine Winding the Bobbin ...12 Inserting the Bobbin ...14 Threading the Upper Thread ...16 Raising the Bobbin Thread ...18 Thread Tension...20
Sewing How to Choose Your Pattern ...22 Three Needle Position Dial...24 Stitch Width Dial & Stitch Length Dial ...26 Sewing Straight Stitch ...28 Reverse Sewing/ Removing the Work/ Cutting the...
Instruction Manual - Page 9
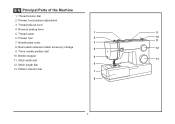
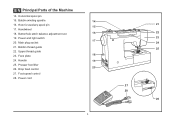
Presser foot
2
10
11
7. Removable extension table/ accessory storage
4
12
9. Stitch width dial
13
12. Bobbin stopper
5
11. Reverse sewing lever
5. Thread cutter
1
9
6. EN Principal Parts of the Machine
1. Needle plate cover
3
8. Three needle position dial
10. Pattern selector dial 7
8
2 Presser foot pressure adjustment
3. Thread tension dial
2. ...
Instruction Manual - Page 11
...
23. Hole for auxiliary spool pin 15
17. Drop feed control
27. Main plug socket
21. Bobbin thread guide
22. Horizontal spool pin
15. Buttonhole stitch balance adjustment slot
16
19. Foot speed control 28. Face plate
18
24. Power cord
4
21 22 23 24 25
27 28
26 Handle
19...
Instruction Manual - Page 13
... than the other). Do not modify the plug in use .
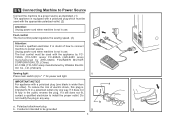
Co., Ltd. (Vietnam)
Sewing light
1
Press main switch (A) to install the proper outlet. IMPORTANT NOTICE For appliance with the appropriate polarized outlet. (2)
Attention: Unplug power cord when machine is not in doubt of electric shock, this plug is intended to power source...
Instruction Manual - Page 15
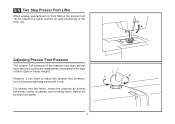
...presser foot pressure, turn the presser adjusting screw with a coin. EN Two Step Presser Foot Lifter
When sewing several layers or thick fabrics, the presser foot can be raised to a higher position for heavy fabric,...
A
Adjusting Presser Foot Pressure
The presser foot pressure of the machine has been pre-set and requires no particular readjustment according to the type of fabric (light-or-heavy ...
Instruction Manual - Page 17
....)
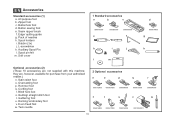
n. Even Feed foot w. Blind hem foot s. Hemmer foot q. Gathering foot u. Auxiliary Spool Pin l. Satin stitch foot o. Quilting/ straight stitch foot t. Darning/ embroidery foot v. Zipper foot c. Edge/ quilting guide g. L-screwdriver k. Button sewing foot e. Seam ripper/ brush f. Overcasting foot p. Spool holders i. Bobbin (3x) j. Twin needle
2 Optional accessories...
Instruction Manual - Page 19

... the left (10) and remove.
Please Note:
When the bobbin winder spindle is in "bobbin winding"
position, the machine will not sew and the handwheel turn. To start sewing, push the bobbin winder spindle to left
(sewing position).
4
3
5
6
7
8
9
10
12 Thread bobbin as illustrated and place on foot control pedal. (8)
- EN Winding the Bobbin...
Instruction Manual - Page 27
... thread tension
The bobbin tension has been set correctly at the factory, so you will be less than for straight stitch
sewing.
- A balanced tension (identical stitches both top and bottom) is important for straight stitch sewing. D. C
D
20 C. EN Thread Tension
Upper thread tension Basic thread tension setting: "4". (1) To increase the tension, turn the dial to...
Instruction Manual - Page 29
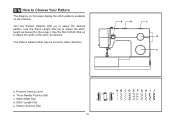
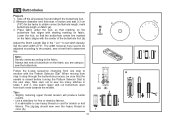
... Dial (c) to select the desired pattern. Reverse Sewing Lever b. Pattern Selector Dial
ABCDE FGH I J
3
4
2
1
22 Turn the Pattern Selector Dial (e) to adjust the width of the stitch as desired for the project.
Three Needle Position Dial c.
a
b
c d e
a. Stitch Length Dial e. The Pattern Selector Dial may be turned in either direction. Use the Stitch Length Dial (d) to...
Instruction Manual - Page 31
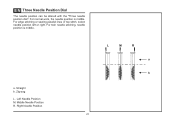
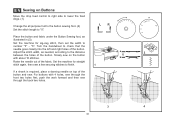
... position is middle. Straight b. For normal work, the needle position is middle. For edge stitching or sewing parallel lines of top stitch, select needle position left or right. Left Needle Position M.
Zig-zag L. Right Needle Position
24
L
M
R
a b EN Three Needle Position Dial
The needle position can be altered ...
Instruction Manual - Page 33

... usually achieved at "3" or below. (2) Dense zig-zag stitches are called satin stitches. (2)
Function of stitch width dial The maximum zigzag stitch width for when straight stitching
For straight stitch sewing, turn the Pattern Selector Dial to zig-zag. Use a shorter stitch
length when sewing lighter weight fabrics or when using a thicker needle or thread. The length of the...
Instruction Manual - Page 35

EN Sewing Straight Stitch
To begin sewing, set the machine for straight stitch. (1) Place the fabric under the presser foot with the fabric edge lined up with the desired seam guide line on the needle plate. (2) Lower the presser foot lifter, and then step on the foot controller to start sewing. (3)
1
2
3
28
Instruction Manual - Page 37
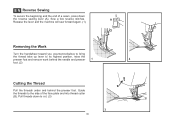
A
Release the lever and the machine will sew forward again. (1)
Removing the Work
Turn the handwheel toward you (counterclockwise) to bring
the thread take up lever to the side of...behind the needle and presser 1
2
foot. (2)
Cutting the Thread
Pull the threads under and behind the presser foot. EN Reverse Sewing
To secure the beginning and the end of the face plate and into thread cutter...
Instruction Manual - Page 39

... for lighter weight
fabrics, and a wider stitch is completed and press.
2 Note: To make sure the machine settings are normally sewn
with
the top edge of the hem extending about 7 mm (1/4") to the
right side of the
page. Blind Hem:
Turn up the hem to make blind hem sewing even easier, use a blind hem foot...
Instruction Manual - Page 41
... fabric under the foot, so that the needle is advisable to determine this.
Always test sew a buttonhole on fabric.
The zig-zag should sew over the heavy thread or cord. (A)
34
M (a) (b) Note: Density varies according to sew too many stitches in the " " to the next step. Use seam ripper and cut buttonhole open from...
Instruction Manual - Page 43
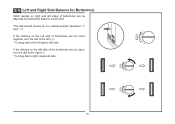
... (-). * Turning dial to the left opens left side.
36 EN Left and Right Side Balance for Buttonhole
Stitch density on right and left sides of buttonhole can be in a neutral position (between "+" and "-") If the stitches on the left side of buttonhole are too open, turn the dial to the left (+). * Turning...
Instruction Manual - Page 45
...
Move the drop feed control to right side to lower the feed dogs. (1)
Change the all purpose foot to the button sewing foot. (2) Set the stitch length to number "3" -
Set the machine for straight
a
2
ba b
stitch again, then sew a few securing stitches to finish.
1
If a shank is required, place a darning needle on the button with 4 holes...
Instruction Manual - Page 51
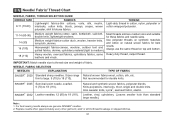
...sewing results always use the same thread on natural woven fabrics for double knits.
Heavy woolen, overcoat fabrics, upholstery fabrics, some Heavy duty thread, carpet thread. NEEDLE, FABRIC SELECTION... often (approximately every other garment ) and/ or at first thread breakage or skipped stitches.
44 Always use genuine SINGER® needles. 2.
Sizes range Natural woven fabrics-wool...
Instruction Manual - Page 60
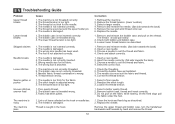
... the thread tension.
1. Readjust the stitch length. 3. Remove bobbin case, thread and insert correctly. 3. Replace the needle.
The foot is threaded wrong. 3. Needle/ fabric/ thread combination is too thick for the fabric. 2. The needle is wrong. 4. The thread tension is noisy
The machine jams
1. The machine is too tight.
1. Select a larger needle. 4. Insert the...
Similar Questions

Needle Won't Go All The Way Up In Slot After Replacing It.
(Posted by lgardner064 9 months ago)

Jammed Sewing Machine
How can i unjam my machine the manual wheel will not turn foward or backward
How can i unjam my machine the manual wheel will not turn foward or backward
(Posted by msdebra3 4 years ago)

Stitch Selection Dial Will Not 'seat' On Straight-stitch.
The selection dial will "seat" on corresponding special stitches, but not in the "gray" selections w...
The selection dial will "seat" on corresponding special stitches, but not in the "gray" selections w...
(Posted by lynnebennett 8 years ago)

Beeping From Singer Sewing Machine Stylist Ii 5625
My sewing machine will beep and stop sewing after three inches of sewing. I have taken it to be repa...
My sewing machine will beep and stop sewing after three inches of sewing. I have taken it to be repa...
(Posted by arusheria 9 years ago)

How To Thread The Serger On A 5511
Singer Sewing Machine
cannot find information on how to thread the serger that ispart of the sewing machine
cannot find information on how to thread the serger that ispart of the sewing machine
(Posted by Anonymous-93910 11 years ago)