Singer 5511 SCHOLASTIC Support Question
Singer 5511 SCHOLASTIC Support Question
Find answers below for this question about Singer 5511 SCHOLASTIC.Need a Singer 5511 SCHOLASTIC manual? We have 1 online manual for this item!
Question posted by lgardner064 on June 27th, 2023
Needle Won't Go All The Way Up In Slot After Replacing It.
The person who posted this question about this Singer product did not include a detailed explanation. Please use the "Request More Information" button to the right if more details would help you to answer this question.
Current Answers
Answer #1: Posted by SonuKumar on June 27th, 2023 9:01 PM
SonuKumar

Member since:
May 9th, 2021 Points: 16,609,800

Member since:
May 9th, 2021 Points: 16,609,800
If the needle on your Singer 5511 SCHOLASTIC sewing machine is not going all the way up in the slot after replacing it, there are a few potential causes and solutions to consider:
- Check the needle compatibility: Ensure that you have installed the correct needle type and size for your machine. The Singer 5511 SCHOLASTIC typically uses standard sewing machine needles, but it's essential to double-check the compatibility. Make sure the needle is fully inserted and tightened according to the machine's instructions.
- Verify the needle positioning: Examine the needle position and make sure it is inserted correctly. The flat side of the needle shaft should be facing the back of the machine, and the needle should be pushed up as far as it will go. If the needle is not fully inserted, it may not reach the highest position.
- Inspect for any obstructions or debris: Examine the needle area and the throat plate for any thread, lint, or other debris that might be obstructing the needle's movement. Use a small brush or a vacuum cleaner with a narrow nozzle to remove any debris. Cleaning the machine regularly is important to prevent build-up that can affect needle movement.
- Check for a bent needle or damaged needle clamp: Inspect the needle to ensure it is not bent or damaged. A bent needle can cause interference with the upward movement. Similarly, check the needle clamp or holder to ensure it is not bent or misaligned. If there is any damage, it may need to be repaired or replaced.
Please respond to my effort to provide you with the best possible solution by using the "Acceptable Solution" and/or the "Helpful" buttons when the answer has proven to be helpful.
Regards,
Sonu
Your search handyman for all e-support needs!!
Related Singer 5511 SCHOLASTIC Manual Pages
Instruction Manual - Page 2
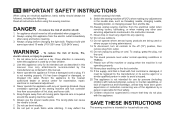
... controller. 19. The wrong plate can cause the needle to persons: 1. It may deflect the
needle causing it must be replaced by the manufacturer or its intended use as contained in...safety. 21. Always use bent needles. 8. Do not use the proper needle plate. Switch the sewing machine off ("O") when making any other user servicing adjustments mentioned in the needle area, such as a toy...
Instruction Manual - Page 6
... Step Presser Foot Lifter/ Adjusting Presser Foot Pressure 8 Accessories ...10
Threading the Machine Winding the Bobbin ...12 Inserting the Bobbin ...14 Threading the Upper Thread ...16 Raising the Bobbin Thread ...18 Thread Tension...20
Sewing How to Choose Your Pattern ...22 Three Needle Position Dial...24 Stitch Width Dial & Stitch Length Dial ...26...
Instruction Manual - Page 9
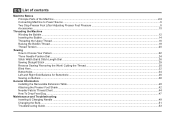
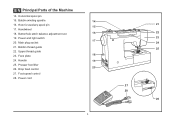
EN Principal Parts of the Machine
1. Removable extension table/ accessory storage
4
12
9. Three needle position dial
10. Bobbin stopper
5
11. Reverse sewing lever
5. Needle plate cover
3
8. Thread tension dial
2. Stitch width dial
13
12. Pattern selector dial 7
8
2 Presser foot pressure adjustment
3. Stitch length dial
6
13. Thread take-up lever
4. ...
Instruction Manual - Page 11
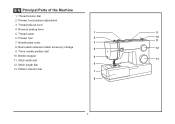
EN Principal Parts of the Machine
14. Drop feed control
27. Hole for auxiliary spool pin 15
17. Power and light switch 17
20. Face plate
18
24. Handle
19
25. Bobbin winding spindle
14
16. Buttonhole stitch balance adjustment slot
16
19. Presser foot lifter 20
26. Handwheel
18. Power cord
4
21...
Instruction Manual - Page 13
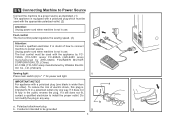
...how to connect machine to install the proper outlet. Do not modify the plug in the outlet, reverse the plug. If it does not fit fully in any way. IMPORTANT NOTICE ... not fit, contact a qualified electrician to power source. Foot control The foot control pedal regulates the sewing speed. (3)
Attention: Consult a qualified electrician if in a polarized outlet only one blade is intended to...
Instruction Manual - Page 15
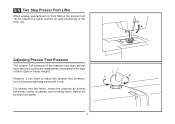
...the type of the machine has been pre-set and requires no particular readjustment according to adjust the presser foot pressure, turn the presser adjusting screw with a coin. For sewing very thin fabric, ... pressure of fabric (light-or-heavy weight). EN Two Step Presser Foot Lifter
When sewing several layers or thick fabrics, the presser foot can be raised to a higher position for heavy fabric,...
Instruction Manual - Page 17
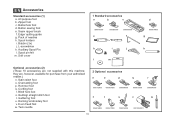
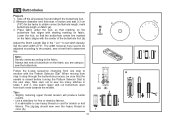
... Cording foot r. Even Feed foot w. Button sewing foot e. Bobbin (3x) j. they are not supplied with this machine; Seam ripper/ brush f. Pack of needles h. Spool holders i. Spool pin felt m. ... from your authorized retailer.)
n. Overcasting foot p. Gathering foot u. Twin needle
2 Optional accessories
n
o
p
q
r
006172008 006907008
006900008
006813008
006904008...
Instruction Manual - Page 19

Step on spindle. (5)
-
EN Winding the Bobbin
- Hold thread end. (7) 1
- Please Note:
When the bobbin winder spindle is in "bobbin winding"
position, the machine will not sew and the handwheel turn. Snap thread into thread guide. (3)
- Push bobbin spindle to spool pin. (1/2)
-
Thread bobbin as illustrated and place on foot control pedal. (8)
- ...
Instruction Manual - Page 23
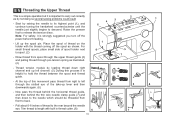
... the upper thread guide (3) and pulling thread through the slotted eye of thread to spool. (2)
- Place the spool of spool holder next to the rear beyond the needle
eye. Draw thread from front to carry out correctly as by not doing so several sewing problems could result.
- Trim thread to descend. Note: For...
Instruction Manual - Page 29
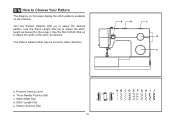
... adjust the width of the stitch as desired for the project.
Stitch Width Dial d. EN How to select the desired pattern. Stitch Length Dial e.
Reverse Sewing Lever b. Turn the Pattern Selector Dial (e) to Choose Your Pattern
The diagram on this page display the stitch patterns available on the...
Instruction Manual - Page 31
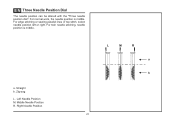
... stitching or sewing parallel lines of top stitch, select needle position left or right. For twin needle stitching, needle position is middle. EN Three Needle Position Dial
The needle position can be altered with the "Three needle position dial". Zig-zag L. Middle Needle Position R. a. Straight b. Right Needle Position
24
L
M
R
a b For normal work, the needle position is middle...
Instruction Manual - Page 33

... the individual stitches will
increase as the dial
approached "0". Use a shorter stitch
length when sewing lighter weight fabrics or when using a thicker needle or thread. Generally speaking, use
a longer stitch length when sewing heavier weight fabrics or
when using a
finer needle or thread.
4 3 2 1 0.5
2
26 "6". (1)
Function of stitch length dial for zigzag stitching is 6mm...
Instruction Manual - Page 35

EN Sewing Straight Stitch
To begin sewing, set the machine for straight stitch. (1) Place the fabric under the presser foot with the fabric edge lined up with the desired seam guide line on the needle plate. (2) Lower the presser foot lifter, and then step on the foot controller to start sewing. (3)
1
2
3
28
Instruction Manual - Page 37
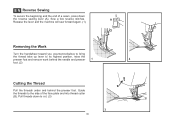
... reverse stitches. A
Release the lever and the machine will sew forward again. (1)
Removing the Work
Turn the handwheel toward you (counterclockwise) to bring
the thread take up lever to its highest position, raise the
presser foot and remove work behind the needle and presser 1
2
foot. (2)
Cutting the Thread
Pull the threads under and...
Instruction Manual - Page 39

...completed and press.
2 Note: To make sure the machine settings are normally sewn
with the range shown on curtains, trousers, skirts, etc.
Blind hem for heavier weight fabrics. Sew a test first to the
right side of the
... on the right of the folded fabric.
1
Start to sew slowly on the fold, making sure the needle touches slightly the folded top to the desired width and press.
Instruction Manual - Page 41
... need to be sure that the needle is advisable to use heavy thread or cord for stretch or knit
fabrics.
When moving from step to step through the buttonhole process, be adjusted according to the project, sew a test first to sew too many stitches in the " " to sew the buttonhole. Measure diameter and thickness...
Instruction Manual - Page 45
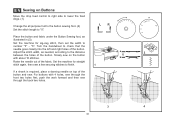
... holes first, push the work forward and then sew through the back two holes.
3
4
38 Raise the needle out of the button. For buttons with about 10 stitches. Set the machine for straight
a
2
ba b
stitch again, then sew a few securing stitches to check that the needle goes cleanly into the left and right holes of...
Instruction Manual - Page 51
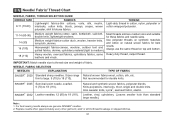
... to 18 (110).
Also sweater knits, Lycra®, swimsuit fabric, elastic. For best sewing results always use the same thread on natural woven fabrics for these fabrics and needle sizes. Replace needle often (approximately every other garment ) and/ or at first thread breakage or skipped stitches.
44 results. Heavy woolen, overcoat fabrics, upholstery fabrics...
Instruction Manual - Page 56
...
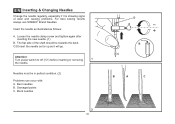
B. Attention:
Turn power switch to off ("O") before inserting or removing
1
the needle. Damaged points C. The flat side of wear and causing problems. For best sewing results always use SINGER® Brand Needles.
Bent needles B. Needles must be towards the back. Blunt needles
2
49
D A
B C
B
A
C Insert the needle as illustrated as it is showing signs of the shaft should...
Instruction Manual - Page 60
... or oil have collected on the fabric while sewing, let the feed dogs pull
the fabric under the foot.
1. Remove and reinsert the bobbin case and pull on the thread. Choose a needle to suit the thread and fabric. 4. Readjust the stitch length. 3. Replace the needle. The machine is wound around the spool holder pin. 6. The...
Similar Questions

Jammed Sewing Machine
How can i unjam my machine the manual wheel will not turn foward or backward
How can i unjam my machine the manual wheel will not turn foward or backward
(Posted by msdebra3 4 years ago)
I Get E7 Error Message On My Singer Model 7258 Sewing Machine. There Is No Refe
Error message E7 is up on my Singer Stylist model 7258 sewing machine. It is not working at all. I t...
Error message E7 is up on my Singer Stylist model 7258 sewing machine. It is not working at all. I t...
(Posted by ebellamybellamy9 5 years ago)

Beeping From Singer Sewing Machine Stylist Ii 5625
My sewing machine will beep and stop sewing after three inches of sewing. I have taken it to be repa...
My sewing machine will beep and stop sewing after three inches of sewing. I have taken it to be repa...
(Posted by arusheria 9 years ago)

Where Do I Get Instructions For Useing My Cutting Too.
I bought the cutting too with the machine but have no instructions for using it. I have a singer 551...
I bought the cutting too with the machine but have no instructions for using it. I have a singer 551...
(Posted by msbingo 10 years ago)

How To Thread The Serger On A 5511
Singer Sewing Machine
cannot find information on how to thread the serger that ispart of the sewing machine
cannot find information on how to thread the serger that ispart of the sewing machine
(Posted by Anonymous-93910 11 years ago)