Singer 4432 Heavy Duty Support Question
Singer 4432 Heavy Duty Support Question
Find answers below for this question about Singer 4432 Heavy Duty.Need a Singer 4432 Heavy Duty manual? We have 1 online manual for this item!
Question posted by cjonesanding on September 15th, 2013
How Do I Adjust The Needle Position?
The needle has been slowly moving to the left. So when I have it to be in the middle it is left of middle. How do i get it back the way it was when i got the machine? Thanks, Chris
Current Answers
Related Singer 4432 Heavy Duty Manual Pages
Instruction Manual - Page 2
...or instruction concerning use of the sewing machine and foot controller free from all moving parts. Children should be supervised ...sewing machine needle. 6. Do not use the proper needle plate. To unplug, grasp the plug, not
the cord. 16. Always unplug sewing machine from outlet. 15. To reduce the risk of experience and knowledge, unless they do not play with any adjustments...
Instruction Manual - Page 6

... Source...6 Two Step Presser Foot Lifter/ Adjusting Presser Foot Pressure...8 Accessories...10
Threading the Machine Winding the Bobbin...12 Inserting the Bobbin ...14 Threading the Upper Thread...16 Automatic Needle Threader ...18 Raising the Bobbin Thread ...20 Thread Tension ...22
Sewing How to Choose Your Pattern...24 Three Needle Position Dial ...26 Stitch Width Dial & Stitch...
Instruction Manual - Page 9

... 2
10
4. Removable extension table/ accessory storage
5
13
9. Reverse sewing lever
11
3
5. Presser foot pressure adjustment
1
9
3. Pattern selector dial
8
14. Automatic threader 15. EN Principal Parts of the Machine
1. Presser foot
4
12
7. Three needle position dial
6
10. Thread cutter
6. Needle plate cover
8. Stitch length dial
13. Stitch width dial...
Instruction Manual - Page 11

Main plug socket
23. Buttonhole stitch balance adjustment slot
18
21. Handle
21
27. Presser foot lifter 22
28. Power cord
4
23 24 25 26 27
29 30
28 Handwheel
20. Foot ...thread guide
25. Hole for auxiliary spool pin
17
19. Power and light switch 19
22. Drop feed control
29. EN Principal Parts of the Machine
16. Horizontal spool pin
17. Bobbin thread guide
24.
Instruction Manual - Page 15
... a coin.
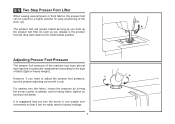
As soon as you hold up the presser foot lifter.
Adjusting Presser Foot Pressure
The presser foot pressure of fabric (light-or-heavy weight). For sewing very thin fabric, loosen the pressure by turning the screw counter clockwise, and for easy positioning of the work. (A)
A The presser foot will remain raised as long...
Instruction Manual - Page 17

... available for purchase from your authorized retailer.) n. they are not supplied with this machine; Gathering foot u. Twin needle
2 Optional accessories
n
o
p
q
r
006172008 006907008
006900008
006813008
006904008
s
t
u
v
w
006916008 006917008
006016008
0061850081
10 Button sewing foot e. Cording foot r. Quilting/ straight stitch foot t. All purpose foot b. Pack of...
Instruction Manual - Page 19

..., push bobbin spindle to the bobbin & then continue winding
until bobbin is in "bobbin winding" position, the machine will not sew and the handwheel turn. Please Note: When the bobbin winder spindle is full. (9)
2
- Trim thread close to left 4 (sewing position).
3
5
6
7
8
9
10
12 Push bobbin spindle to spool pin. (1/2)
- Step on to right. (6)
-
Place thread and...
Instruction Manual - Page 25
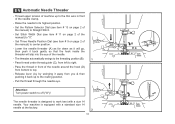
... 2 of the needle.
-
Release lever (A), by swinging it away from left to work best with a standard size 14 needle at the factory.
2
18
A C
B D
A Attention: Turn power switch to its highest position.
- EN Automatic Needle Threader
- Raise the needle to off ("O")! Pass the thread in front of the manual) to the threading position (B).
1
-
Your machine is designed...
Instruction Manual - Page 29

... correctly.
For all decorative sewing you
do not need to adjust it. C
D
22 To... reduce the tension, turn the dial to the next number up. Normal thread tension for straight stitch sewing. Turn dial
to
lower number.
Please note:
- If the thread is looping or birdnesting on the bottom side of the fabric, this is an indication that the upper machine...
Instruction Manual - Page 31

... to between 1 and 5. - Set the Three Needle Position Dial (b) to 6.
a. Reverse sewing lever b. Stitch width dial d.
You can adjust the density by moving the Stitch Length Dial to 1 to make the ... JK
S2 Set the Three Needle Position Dial (b) to Choose Your Pattern
The diagram on this page display the stitch patterns available on the machine.
The pattern selector dial may ...
Instruction Manual - Page 33
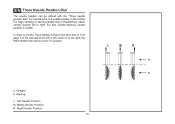
...". In order to set to "0" position. Zig-zag L. Left Needle Position M.
Middle Needle Position R. EN Three Needle Position Dial
The needle position can be set the Three Needle Position Dial (See item # 9 on page 2 of topstitching, select needle position left , in the middle. a. Right Needle Position
26
L
M
R
a b For edge stitching or sewing parallel lines of the manual) to...
Instruction Manual - Page 35

...of your manual) is also the control for sewing a seam is positioned to 6. The standard setting for the straight stitch infinite needle position. For basting purposes, set at "3" or ...moving the stitch width dial between 2 and 3.
-
Generally speaking, use this function your Pattern Selector Dial (see item # 11 on page 2 in the manual) must be set the stitch length all the way...
Instruction Manual - Page 37

EN Sewing Straight Stitch
To begin sewing, set the machine for straight stitch. (1)
Set the stitch length to start sewing. (3)
1
2
3
30 Place the fabric under the presser foot with the fabric edge lined up with the desired seam guide line on the needle plate. (2)
Lower the presser foot lifter, and then step on the foot controller to between 2 and 3.
Instruction Manual - Page 39
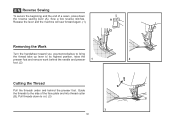
Pull threads down
the reverse sewing lever (A). Guide the threads to its highest position, raise the
presser foot and remove work behind the needle and presser 1
2
foot. (2)
Cutting the Thread
Pull the threads under and behind the presser foot. Sew a few reverse stitches.
A
Release the lever and the machine will sew forward again. (1)
Removing the Work
Turn...
Instruction Manual - Page 41
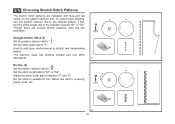
... "S1" or "S2".
Adjust the stitch width dial to " ". Though there are several stretch patterns, here are indicated with blue and red colors on the pattern selector dial. Used to add triple reinforcement to "S1" or "S2". Set the stitch length dial to stretch and hardwearing seams. The machine sews two stitches forward...
Instruction Manual - Page 43

...sewing even easier, use a blind hem
foot, available from your SINGER® retailer. (See page 10
for the fabric. Set the stitch width dial at the right.
Note:
2
To make sure the machine... wider stitch is completed and press.
Blind Hem:
Turn up the hem to sew slowly along the fold, so that the needle drops through the edge of the fold. (2)
Unfold the fabric when hemming is...
Instruction Manual - Page 45

.... EN Sew 1-step Buttonholes
Buttonhole sewing is completed, gently pull the heavy thread to
E
remove any slack, then trim off the excess.
38
3 4
2
1
D Using tailor's chalk, mark the position of the gimp thread.
4. The width however may need to be adjusted according to " ".
2. Open the button plate and insert the button (B). 5. Stop the machine when the...
Instruction Manual - Page 49

... a darning needle on top of the button. For buttons with about 10 stitches. Set the machine for zig-zag stitch, then set the width to "0". Slowly sew on Buttons
Move the drop feed... and sew.
Adjust the stitch width, as illustrated in (3).
LR
Place the button and fabric under the Button Sewing foot, as needed, according to check that the
needle goes cleanly into the left and ...
Instruction Manual - Page 55

... to large. 9 (70) to medium).
18 (110)
Heavy woolen, overcoat fabrics, upholstery fabrics, some Heavy duty thread in the bobbin. Replace needle often (approximately every other garment ) and/ or at first thread breakage or skipped stitches.
48
Natural and synthetic woven fabrics, polyester blends. For best sewing results always use the same thread in the...
Instruction Manual - Page 62
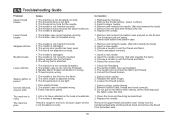
...Cause
1. The machine is adjusted wrong. 3. Skipped stitches
Needle breaks
Loose stitches
Seams gather or pucker Uneven stitches, uneven feed
1. Wrong needle size for ...sewing, let the feed dogs pull
the fabric under the foot.
1.
Check the threading. 2. Readjust the stitch length. 3. Thread tension wrong.
1. Select a larger needle. 4. Replace the needle.
1. The needle...
Similar Questions

Singer Futura Quartet Seqs 6700 Sewing Machine
how to set my singer futura quartet seqs 6700 sewing machine to sew. A distance more than one inch a...
how to set my singer futura quartet seqs 6700 sewing machine to sew. A distance more than one inch a...
(Posted by johour2194 3 years ago)

Singer Heavy Duty 4432
I am unable to keep the bobbin spinner engaged to the right hand side so that i can use the bobbin.
I am unable to keep the bobbin spinner engaged to the right hand side so that i can use the bobbin.
(Posted by garner6389 8 years ago)

Singer 4432 Needle Dial
I just got anew Singer heavy-duty 4432. It came with the needle positioned to the left and the posit...
I just got anew Singer heavy-duty 4432. It came with the needle positioned to the left and the posit...
(Posted by sherrimartin27 8 years ago)

I Have A Heavy Duty Singer Sewing Machine (model 4432)
stopped sewing after bobbin replacement?
stopped sewing after bobbin replacement?
(Posted by sueisforme 9 years ago)

Beeping From Singer Sewing Machine Stylist Ii 5625
My sewing machine will beep and stop sewing after three inches of sewing. I have taken it to be repa...
My sewing machine will beep and stop sewing after three inches of sewing. I have taken it to be repa...
(Posted by arusheria 9 years ago)