Singer 4423 Heavy Duty Support Question
Singer 4423 Heavy Duty Support Question
Find answers below for this question about Singer 4423 Heavy Duty.Need a Singer 4423 Heavy Duty manual? We have 1 online manual for this item!
Question posted by Bellaluna07 on October 4th, 2013
Bobbin Not Threading
I am having an issue with the bobbin not threading to meet the upper thread. I have threaded it on the machine correctly but when I start to sew the bobbin will not thread through. Also when I purchased the machine there was not a clearcover for the bobbin.
Current Answers
Related Singer 4423 Heavy Duty Manual Pages
Instruction Manual - Page 2

...
same type rated 15 watts (110-120V area / 220-240V area). Keep ventilation openings of the sewing machine and foot controller free from the electric outlet immediately
after using this
manual. Always use as threading needle, changing needle, threading bobbin, or changing presser foot, and the like. 10. Children should be supervised to avoid a hazard...
Instruction Manual - Page 6

... to Power Source...6 Two Step Presser Foot Lifter/ Adjusting Presser Foot Pressure...8 Accessories...10
Threading the Machine Winding the Bobbin...12 Inserting the Bobbin ...14 Threading the Upper Thread...16 Automatic Needle Threader ...18 Raising the Bobbin Thread ...20 Thread Tension ...22
Sewing How to Choose Your Pattern...24 Three Needle Position Dial ...26 Stitch Width Dial & Stitch Length...
Instruction Manual - Page 9
... dial
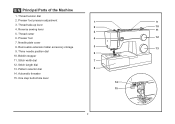
13. Pattern selector dial
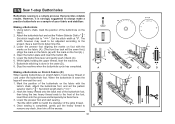
8
14. Three needle position dial
6
10. Automatic threader 15. One step buttonhole lever
14
15
2 EN Principal Parts of the Machine
1. Removable extension table/ accessory storage
5
13
9. Needle plate cover
8. Presser foot pressure adjustment
1
9
3. Bobbin stopper
11. Reverse sewing lever
11
3
5.
Instruction Manual - Page 11
... 27
29 30
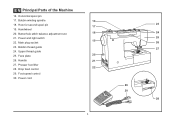
28 Hole for second spool pin
17
19. Face plate
20
26. Foot speed control 30. Upper thread guide
25. EN Principal Parts of the Machine
16. Power and light switch 19
22. Handwheel
20. Main plug socket
23. Bobbin thread guide
24. Presser foot lifter 22
28. Horizontal spool pin
17...
Instruction Manual - Page 13

.... To reduce the risk of electric shock, this plug is intended to fit in doubt of how to connect machine to power source. Do not modify the plug in use . Co., Ltd. (Vietnam)
Sewing light
1
Press main switch (A) to install the proper outlet.
IMPORTANT NOTICE For appliance with a polarized plug (one way...
Instruction Manual - Page 15
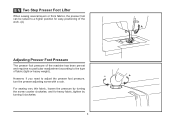
... Step Presser Foot Lifter
When sewing several layers or thick fabrics, the presser foot can be raised to a higher position for heavy fabric, tighten by turning the screw counter clockwise, and for easy positioning of the work. (A)
A
Adjusting Presser Foot Pressure
The presser foot pressure of the machine has been pre-set and...
Instruction Manual - Page 17

All purpose foot b. Buttonhole foot d. Button sewing foot e. Pack of needles h. L-screwdriver k. they are not supplied with this machine; Even Feed foot w. Bobbin (3x) j. Auxiliary Spool Pin l. Spool pin felt m. Overcasting foot p. Quilting/ straight stitch foot t. Darning/ embroidery foot v. Seam ripper/ brush f. Satin stitch foot o. Soft cover
1 Standard ...
Instruction Manual - Page 19

...is in "bobbin winding"
position, the machine will not sew and the handwheel turn. Push bobbin spindle to spool pin. (1/2)
- To start sewing, push the bobbin winder spindle to right. (6)
- Hold thread end. (7) 1
-
Push bobbin spindle to the left (10) and remove.
Snap thread into thread guide. (3)
- Wind thread clockwise around bobbin winder tension discs. (4)
- Thread bobbin as...
Instruction Manual - Page 21
... slit (A).
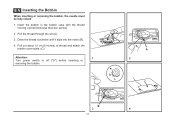
3. Pull out about 15 cm (6 inches) of thread and attach the bobbin cover plate. (C)
Attention:
1
Turn power switch to off ("O") before inserting or
removing the bobbin. Draw the thread clockwise until it slips into the notch (B).
4.
B 3
14
A 2
C
4 EN Inserting the Bobbin
When inserting or removing the bobbin, the needle must be fully raised.
1. Insert the...
Instruction Manual - Page 23

... spring as by leading thread down to the needle which should be threaded from front to descend. Start by raising the needle ...sewing problems could result.
- Trim thread to release the tension discs. Note: For safety, it is helpful to hold the thread between the spool and thread guide.
- EN Threading the Upper Thread
This is a simple operation but it is important to carry out correctly...
Instruction Manual - Page 27

EN Raising the Bobbin Thread
Hold the upper thread with the left hand. Note: If it is difficult to raise the bobbin thread, check to make sure the thread is not trapped by the hinged cover or the Removable Extension Table.
1 Gently pull on the upper thread to bring the bobbin thread up through the needle plate hole. (2) Lay both threads to the...
Instruction Manual - Page 29

... straight stitch sewing. Lower thread tension
The bobbin tension has been set correctly at the factory, so you will be less than for strong seams.
- A balanced tension (identical stitches both top and bottom) is no single tension setting appropriate for all sewing will always obtain a nicer
stitch and less fabric puckering when the upper thread
appears on...
Instruction Manual - Page 31

... Pattern
The diagram on this page display the stitch patterns available on the machine. a
b
c d e
a. Stitch Length Dial e. Stitches in the bottom row of the stitch as desired for the project. Reverse Sewing Lever b. Use the Stitch Width Dial (c) to sew these stretch patterns is a stretch stitch pattern, and information on the Pattern Selector...
Instruction Manual - Page 35

... and between "2" and "3" is also the control for the straight stitch infinite needle position. Generally speaking, use a longer stitch length when sewing heavier weight fabrics or when using a finer needle or thread.
2
28
4 3 2 1 0.5
The density of the individual stitches will increase as you move zigzag dial from "0" - Standard zigzag stitches are usually...
Instruction Manual - Page 37

EN Sewing Straight Stitch
To begin sewing, set the machine for straight stitch. (1) Place the fabric under the presser foot with the fabric edge lined up with the desired seam guide line on the needle plate. (2) Lower the presser foot lifter, and then step on the foot controller to start sewing. (3)
1
2
3
30
Instruction Manual - Page 39

... stitches. Pull threads down
the reverse sewing lever (A). A
Release the lever and the machine will sew forward again. (1)
Removing the Work
Turn the handwheel toward you (counterclockwise) to bring
the thread take up lever to cut. (3)
32
B 3 Guide the threads to the side of a seam, press down to its highest position, raise the
presser foot and...
Instruction Manual - Page 43

...or two fabric threads. (2)
Unfold the fabric when hemming is used for lighter weight
fabrics, and a wider stitch is completed and press.
2 Note: To make sure the machine settings are ...,
within the range shown in Fig. 1) against the right side of the folded fabric.
1
Start to sew slowly on curtains, trousers, skirts, etc. Blind hems, however, are
appropriate for stretch fabrics.
...
Instruction Manual - Page 45
...Lower the presser foot and start the machine. 7. Once sewing is completed, gently pull the heavy thread to determine this. 3. ...upper thread, start sewing.
*Set the stitch width to always make a
M
practice buttonhole on the foot (b).) 4.
Making a Buttonhole 1. Set stitch length dial to " ".
2. Lower the presser foot aligning the marks on stretch fabric, hook heavy thread...
Instruction Manual - Page 55

... fabrics, some Heavy duty thread, carpet thread. Not recommended for these fabrics and needle sizes.
for double knits.
Always use genuine SINGER® needles. 2.
Sizes range Natural woven fabrics-wool, cotton, silk, etc. thin to large. 9 (70) to thread size and weight of fabric.
Natural and synthetic woven fabrics, polyester blends.
For best sewing results always...
Instruction Manual - Page 64

... tension. (lower number) 3. Remove and reinsert the bobbin case and pull on the thread. Check both bobbin and bobbin case. 3. Choose a needle to suit the thread and fabric. 4. The needle is threaded wrong. 3. The bobbin case is not inserted correctly. 5. Rethread the machine. 2. Remove the upper thread and bobbin case, turn the handwheel backwards and forwards by hand...
Similar Questions

Bringing Up Bobbin Thread.
I have watched the online video tutorial for the Singer 3333, and when demonstrating winding the bob...
I have watched the online video tutorial for the Singer 3333, and when demonstrating winding the bob...
(Posted by croswords 7 years ago)

Singer Heavy Duty 4423 Sewing Cabinet Mounting Instructions
How do I mount the Singer Heavy Duty 4423 in a sewing cabinet or on a table?
How do I mount the Singer Heavy Duty 4423 in a sewing cabinet or on a table?
(Posted by pamjdeg 8 years ago)

Thread When Sewing Doesn't Catch Bobbin Thread, What Do I Do?
How do I fix this problem? When I pull the thread it was only the spool thread.
How do I fix this problem? When I pull the thread it was only the spool thread.
(Posted by arcand1772 9 years ago)

How Do I Oil My Singer 4423 Heavy Duty
How do I clean and oil my singer 4423 heavy duty sewing machine? It is not in the manual. Thanks!
How do I clean and oil my singer 4423 heavy duty sewing machine? It is not in the manual. Thanks!
(Posted by iochoa69 9 years ago)
Shuttle No Longer Threading Bottom Stitch
bobbin case kept jumping out of shuttle so often I finally just left the screws out. Everything else...
bobbin case kept jumping out of shuttle so often I finally just left the screws out. Everything else...
(Posted by knightmarian 10 years ago)