
Singer 4411 Heavy Duty Support Question
Singer 4411 Heavy Duty Support Question
Find answers below for this question about Singer 4411 Heavy Duty.Need a Singer 4411 Heavy Duty manual? We have 1 online manual for this item!
Question posted by jmdlr10472 on June 29th, 2013
Singer 4411
mi singer 4411 sewing manchine, doesnt pick up thret from this bobbin, because this needs bar need adjustment.
please a nee your help
jose
Bronx NY
Current Answers
Related Singer 4411 Heavy Duty Manual Pages
Instruction Manual - Page 2
... to break. 7. Use only attachments recommended by the manufacturer as threading needle, changing needle, threading bobbin, or changing presser foot, and the like. 10. Always use as described in this
manual. Switch the sewing machine off ("O") when making any adjustments
in the needle area, such as contained in the instruction manual. 11. Always unplug...
Instruction Manual - Page 6
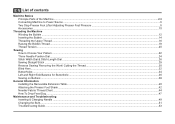
EN List of contents
Machine Basics Principle Parts of the Machine...2/4 Connecting Machine to Power Source ...6 Two Step Presser Foot Lifter/ Adjusting Presser Foot Pressure 8 Accessories ...10
Threading the Machine Winding the Bobbin ...12 Inserting the Bobbin ...14 Threading the Upper Thread ...16 Raising the Bobbin Thread ...18 Thread Tension...20
Sewing How to Choose Your Pattern ...22 Three ...
Instruction Manual - Page 9
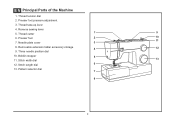
... table/ accessory storage
4
12
9. Bobbin stopper
5
11. Reverse sewing lever
5. Presser foot pressure adjustment
3. Thread take-up lever
4. Stitch width dial
13
12. Pattern selector dial 7
8
2 Thread tension dial
2. Needle plate cover
3
8. Stitch length dial
6
13. Thread cutter
1
9
6. EN Principal Parts of the Machine
1. Presser foot
2
10
11
7. Three...
Instruction Manual - Page 11
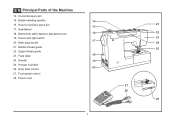
.... Presser foot lifter 20
26. Horizontal spool pin
15. Handle
19
25. Power and light switch 17
20. Bobbin thread guide
22. Handwheel
18. Foot speed control 28. EN Principal Parts of the Machine
14. Face plate
18
24. Buttonhole stitch balance adjustment slot
16
19. Hole for auxiliary spool pin 15
17.
Instruction Manual - Page 13
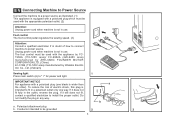
... fit in the outlet, reverse the plug. To reduce the risk of how to connect machine to power source. a b
a.
Conductor intended to be used with the appliance by FC1902A...the appropriate polarized outlet. (2)
Attention: Unplug power cord when machine is not in use . Foot control The foot control pedal regulates the sewing speed. (3)
Attention: Consult a qualified electrician if in any ...
Instruction Manual - Page 15
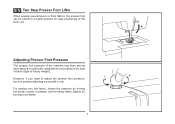
... Two Step Presser Foot Lifter
When sewing several layers or thick fabrics, the presser foot can be raised to a higher position for heavy fabric, tighten by turning the screw counter clockwise, and for easy positioning of the work. (A)
A
Adjusting Presser Foot Pressure
The presser foot pressure of the machine has been pre-set and...
Instruction Manual - Page 17
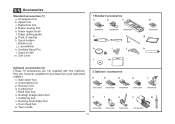
Zipper foot c. Spool pin felt m. they are not supplied with this machine; Overcasting foot p. Cording foot r. Twin needle
2 Optional accessories
n
o
p
q
r
... Pin l. Darning/ embroidery foot v. Quilting/ straight stitch foot t. Bobbin (3x) j. Blind hem foot s. Even Feed foot w. Button sewing foot e. Seam ripper/ brush f. EN Accessories
Standard accessories (1) ...
Instruction Manual - Page 19
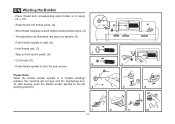
... on foot control pedal. (8)
- Step on spindle. (5)
- Push bobbin spindle to spool pin. (1/2)
- Hold thread end. (7) 1
-
Please Note:
When the bobbin winder spindle is in "bobbin winding"
position, the machine will not sew and the handwheel turn. Push bobbin spindle to the left (10) and remove. To start sewing, push the bobbin winder spindle to right. (6)
- Cut thread...
Instruction Manual - Page 23
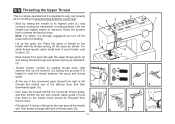
...right channel and up left through pre-tension spring as shown. Start by not doing so several sewing problems could result.
- At the top of the take-up the spool pin. Lift up ...through the upper thread guide (3) and pulling thread through the slotted eye of this process it is helpful to length with the thread coming off the power before threading.
- For small thread spools, place...
Instruction Manual - Page 27
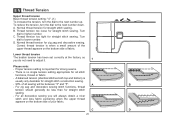
...sewing you do not need to adjust it.
1
Please note:
- For zig zag and decorative sewing stitch functions, thread
tension should generally be between "3" and "5". C
D
20 C. Normal thread tension for straight stitch sewing...number. Lower thread tension
The bobbin tension has been set correctly at the factory, so you will be less than for straight stitch sewing. A.
To reduce the ...
Instruction Manual - Page 29
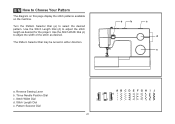
... Your Pattern
The diagram on this page display the stitch patterns available on the machine. Stitch Length Dial e. EN How to select the desired pattern.
Three Needle Position Dial c. Stitch Width Dial d. Reverse Sewing Lever b. a
b
c d e
a. Use the Stitch Width Dial (c) to adjust the stitch length as desired.
Pattern Selector Dial
ABCDE FGH I J
3
4
2
1
22...
Instruction Manual - Page 35
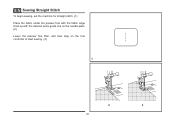
EN Sewing Straight Stitch
To begin sewing, set the machine for straight stitch. (1) Place the fabric under the presser foot with the fabric edge lined up with the desired seam guide line on the needle plate. (2) Lower the presser foot lifter, and then step on the foot controller to start sewing. (3)
1
2
3
28
Instruction Manual - Page 37
A
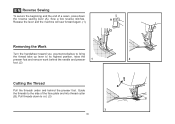
Release the lever and the machine will sew forward again. (1)
Removing the Work
Turn the handwheel toward you (counterclockwise) to bring
the thread take up lever to the side of a seam, press down to cut. (3)
30
B 3 Sew a few reverse stitches. Pull threads down
the reverse sewing lever (A). EN Reverse Sewing
To secure the beginning and the...
Instruction Manual - Page 39
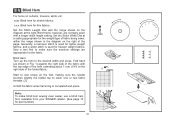
... is used for lighter weight
fabrics, and a wider stitch is completed and press.
2 Note: To make sure the machine settings are normally sewn
with
the top edge of the hem extending about 7 mm (1/4") to the
right side of the folded...
page. Blind Hem:
Turn up the hem to make blind hem sewing even easier, use a blind hem foot, available from your SINGER retailer. (See page 10 for the fabric.
Instruction Manual - Page 41
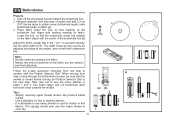
...should sew over the heavy thread or cord. (A)
34
M (a) (b) Measure diameter and thickness of the buttonhole foot (b). When moving from step to step through the buttonhole process, be adjusted according to the project, sew ...marked on the fabric you are using to use heavy thread or cord for stretch or knit
fabrics. The width however may need to be sure that marking on the buttonhole foot...
Instruction Manual - Page 45
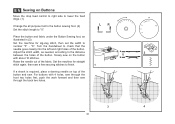
...to the distance between the holes of the button and sew. Set the machine for zig-zag stitch, then set the width to number "3" - Slowly sew on top of the button. Raise the needle out ... the Button Sewing foot, as needed, according to check that the needle goes cleanly into the left and right holes of the fabric. "6". Adjust the stitch width, as illustrated in (3). EN Sewing on Buttons
...
Instruction Manual - Page 51
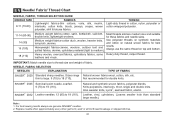
...Heavy duty thread, carpet thread. leathers and vinyls.
Not recommended for best
Heavyweight fabrics-canvas, woolens, outdoor tent and quilted fabrics, denims, upholstery material (light to medium).
Leather, vinyl, upholstery. (Leaves smaller hole than standard large needle.)
Note : 1. For best sewing...
TYPE OF FABRIC
SINGER® 2020 Standard sharp needles. SINGER® 2045 Semi...
Instruction Manual - Page 56
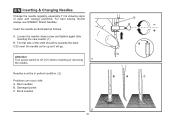
The flat side of wear and causing problems. For best sewing results always use SINGER® Brand Needles. Attention:
Turn power switch to off ("O") before inserting or removing
1
the needle. Bent needles B. Insert the needle as illustrated as it is ...
Instruction Manual - Page 58
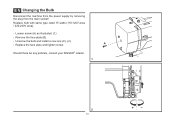
EN Changing the Bulb
Disconnect the machine from the power supply by removing the plug from the main socket! Remove the face plate (B). -
Replace bulb with same type rated 15 watts (110-120V area / 220-240V area).
- B A
Should there be any problem, consult your SINGER® retailer. 1
C
2
51
Unscrew the bulb and install...
Instruction Manual - Page 60

... 2. Remove and reinsert the bobbin case and pull on the fabric while sewing, let the feed dogs pull
the fabric under the foot.
1. Check both bobbin and bobbin case. 3. Choose a needle ...is adjusted wrong. 3.
Wrong needle size for the fabric. 4. The bobbin case is too tight.
1. The thread tension is not correctly threaded. 3. Thread is too thick for the fabric. 2. Rethread the machine....
Similar Questions

The Problem Is Specific To Reverse Stitching, It Is Not A General Machine
question regarding normal operations.
question regarding normal operations.
(Posted by dwdsad 7 years ago)

Handwheel Clicking Loudly
my 4423 singer heavy duty 'had' thread under bobbin & wouldnt move, i removed that & now the...
my 4423 singer heavy duty 'had' thread under bobbin & wouldnt move, i removed that & now the...
(Posted by sreymahsilalm 7 years ago)

How To Tighten Bottom Tension On Heavy Duty 4411 Machine ?
(Posted by Gabyguyer 8 years ago)

Machine Will Not Pick Up Bobbin Thread & Stiff Hard To Move To Pick The Thread.
(Posted by Mparchapr 10 years ago)
