Singer 1004 VIVO Support Question
Singer 1004 VIVO Support Question
Find answers below for this question about Singer 1004 VIVO.Need a Singer 1004 VIVO manual? We have 1 online manual for this item!
Question posted by shibukmani on December 12th, 2021
I Am Looking For Singer Vivo 1004 Model Bobbin Cover Plate
The person who posted this question about this Singer product did not include a detailed explanation. Please use the "Request More Information" button to the right if more details would help you to answer this question.
Current Answers
Answer #1: Posted by SonuKumar on December 13th, 2021 8:18 AM
SonuKumar

Member since:
May 9th, 2021 Points: 16,618,310

Member since:
May 9th, 2021 Points: 16,618,310
https://www.sewingmachine-parts.com/sewingmachine-singer-1004-vivo
https://www.singeronline.com/1004vivoparts.html
https://www.amazon.com/singer-bobbin-cover-plate/s?k=singer+bobbin+cover+plate
Please respond to my effort to provide you with the best possible solution by using the "Acceptable Solution" and/or the "Helpful" buttons when the answer has proven to be helpful.
Regards,
Sonu
Your search handyman for all e-support needs!!
Related Singer 1004 VIVO Manual Pages
Instruction Manual - Page 1
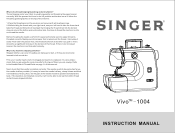
... be positioned towards the back. VivoTM - 1004
INSTRUCTION MANUAL
Why is the thread looping/bunching...needle should be able to pull up the bobbin thread and will cause skipped stitches. Before ... up the other side.Continue to thread the machine, but do not thread the needle. Thread looping... are damaged or dull, or if they are sewing. Refer to the Needle/Fabric/Thread/Guide on ...
Instruction Manual - Page 2
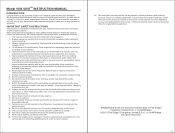
... mentioned in this manual. Use this machine only for household use the proper needle plate. Always unplug the sewing machine from the electrical outlet. 18. Switch the sewing machine off position, then remove the plug from the electrical outlet when removing covers, lubrication, or when making any air openings blocked. Model 1004 VIVO INSTRUCTION MANUAL
INTRODUCTION
We recommend that...
Instruction Manual - Page 3
... selector dial
9
11. Power on/off & speed control 4 switch
10. Bobbin cover release button
12
17
11
6
5 18
19
3
4 Presser foot screw
14 17. Bobbin cover plate
13 16 19. Presser foot release lever
12. Presser bar
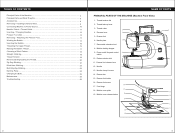
15. TABLE OF CONTENTS
Principal Parts of the Machine 4 Principal Parts and What They Do 6 Accessories...8 Removing / Installing Extension...
Instruction Manual - Page 4
... machine, regulate the amount of the machine. The higher the number, the tighter the tension is used in sewing light
26 30. It can be done.
2. Power On/Off & Speed Control Switch is on the needle thread. Bobbin
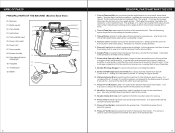
PRINCIPAL PARTS AND WHAT THEY DO
1. It provides a flat surface for higher speed.
10. Use only SINGER...
Instruction Manual - Page 5
...sewing.
26. Presser Foot Lifter is operated magnetically. Use only SINGER® brand metal Class 15 bobbins in this input before starting to remove work from the controller to the machine...thread into this sewing machine. Bobbin Cover Release Button is a diagram at the back of the bobbin cover plate. Bobbin Winder is required. Light Switch & Built-in the machine, will provide ...
Instruction Manual - Page 6
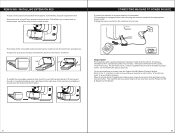
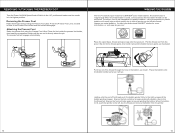
... place. REMOVING / INSTALLING EXTENSION BED
To remove the extension bed from the machine, hold it in a polarized outlet only one way. To open the accessory storage compartment, flip the cover down, as other ), the plug is threaded and ready to sew, lower the presser foot and step on to a power source, as you...
Instruction Manual - Page 7
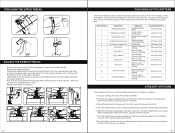
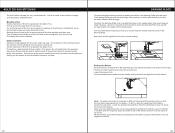
...CHANGING NEEDLES
Change the needle regularly, especially if it also to remove work from the machine when sewing is . Bent needles B. The smaller the number is, the smaller the needle size...needle, with fabrics that the machine is located inside the "C" area of the machine. Tighten the needle clamp screw securely. Ball point needles are designed for use SINGER® brand needles. Silk...
Instruction Manual - Page 8
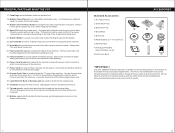
... guide, as it will engage automatically.
Always use transparent or plastic bobbins - WINDING THE BOBBIN
The Vivo create & repair machine by lifting the Presser Foot Lifter. When the metal bobbin is magnetized. Contact your Authorized SINGER® retailer for the bobbin thread can be achieved.
Attaching the Presser Foot
Raise the presser foot using transparent...
Instruction Manual - Page 9

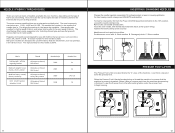
..., move the spool pin to the "off" position before threading the machine. or
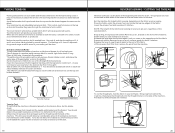
Thread the machine with your left . 5.Place the thread into the bobbin case. Turn the Power On/Off & Speed Control Switch to the vertical...on it doesn't prevent the spool from right to achieve the correct sewing results. INSERTING THE BOBBIN
To insert the bobbin, first remove the bobbin cover plate.
Instruction Manual - Page 10
... the needle is the most frequently used to select the stitch you want to sew. Replace the bobbin cover plate.
(1)
(2)
(3)
(4)
(5)
(6)
(7)
(8)
17
STRAIGHT STITCHING
The straight stitch is in its highest position. When reaching the edge of the fabric, stop the sewing machine. 6.Turn the hand wheel counter-clockwise (toward you) until the needle enters the fabric...
Instruction Manual - Page 11
...colored threads will be necessary to adjust the tension of the sewing machine to ensure a well balanced stitch. The purpose is to the opposite end of the fabric... is threaded properly in the bobbin. NOTE: The length of the stitch when sewing in a solid, light color about 3 stitches. Lift the presser foot lifter, then remove the work from 1 through the machine to 1. You should see ...
Instruction Manual - Page 12
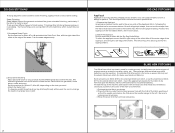
... finish seams: Trimming after stitching the seam edge or overedging. Thread the top of the machine and bobbin with the right side of the stitch at the edge of the Appliqué fabric, ...stitch, or set the machine to the wrong side of the seam. ZIG-ZAG STITCHING
Appliqué
Appliqué is likely to the fusible web. Position the applique on the look you sew. 3.When finished, fold...
Instruction Manual - Page 13
... away the excess underlay. Elastic Insertion Elastic is appropriate for the button. Set the machine for Stitch 12 and attach the Satin Foot. DARNING PLATE
For some sewing techniques such as shown. Be sure it in the Darning Plate lines up with the holes on both threads to secure.
23
24 When finished, pull...
Instruction Manual - Page 14
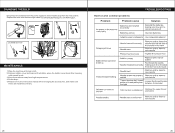
Replace the bulb with the same type rated
+-
1-(1)
LED Φ5MM DC3V 0.6W
-
+-
+
+
1-(2)
2
3
4
MAINTENANCE
1.Wipe the machine with clean cloth. 2.Remove bobbin cover and take out the bobbin, place the bobbin cover back after cleaning
with a small brush. 3.Keep the machine away from the main socket.
How to the instruction manual when changing the accessories, and make sure...
Similar Questions

I Need A Bobbin Cover For My Vivo 1004. Can You Help?
(Posted by Ruthjernegan 3 years ago)

Replacement Bobbin Cover/plate For Pixie Plus
My daughter lost the bobbin cover plate for her Pixie Plus sewing machine. I have tried googling rep...
My daughter lost the bobbin cover plate for her Pixie Plus sewing machine. I have tried googling rep...
(Posted by abbyhehen 5 years ago)

Replacement Of The Plastic Bobbin Case On A Singer 1004 Model
(Posted by chiefmorales 8 years ago)

Bobbin Cover Plate & Thread Holder For Pixie Plus
Can I purchase a bobbin cover plate & thread holder for the Singer Pixie Plus?
Can I purchase a bobbin cover plate & thread holder for the Singer Pixie Plus?
(Posted by smoye713 8 years ago)

Flashing Light Vivo 1004
Hi. When I plug in the Vivo machine, the light flashes and I cant do anything. When I press the foot...
Hi. When I plug in the Vivo machine, the light flashes and I cant do anything. When I press the foot...
(Posted by alissaannmay 8 years ago)