Singer 1004 VIVO Support Question
Singer 1004 VIVO Support Question
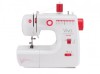
Find answers below for this question about Singer 1004 VIVO.Need a Singer 1004 VIVO manual? We have 1 online manual for this item!
Question posted by alissaannmay on July 29th, 2015
Flashing Light Vivo 1004
Hi. When I plug in the Vivo machine, the light flashes and I cant do anything. When I press the foot pedal nothing happens.
Current Answers
Answer #1: Posted by TechSupport101 on July 30th, 2015 4:19 AM
TechSupport101

Member since:
May 24th, 2013 Points: 12,171,305

Member since:
May 24th, 2013 Points: 12,171,305
Do refer to page 26 of the manual here for a troubleshooting guide.
Related Singer 1004 VIVO Manual Pages
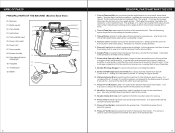
Instruction Manual - Page 1
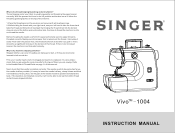
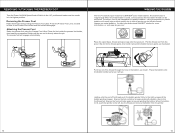
... right hand, use your left hand to thread the machine, but do not thread the needle. Why is raised...the upper tension correctly. VivoTM - 1004
INSTRUCTION MANUAL Making sure the presser foot is the thread looping/bunching under ...foot lever in the tension of the needle should be replaced. Before threading the needle, perform this manual.
It should now resist when you are sewing...
Instruction Manual - Page 2
... the plug from the electrical outlet when removing covers, lubrication, or when making any opening. 15. Do not pull or push the fabric while stitching, as contained in the needle area,
such as threading the needle, changing the needle, threading the bobbin, changing the presser foot, etc. 13. Always unplug the sewing machine from...
Instruction Manual - Page 3
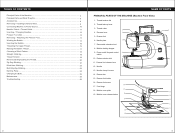
... Parts and What They Do 6 Accessories...8 Removing / Installing Extension Bed 9 Connecting Machine to Power Source 10 Needle / Fabric / Thread Guide 11 Inserting / Changing Needles 12 Presser Foot Lifter...12 Removing / Attaching the Presser Foot 13 Winding the Bobbin 14 Inserting the Bobbin 15 Threading the Upper Thread 15 Raising the Bobbin Thread 17...
Instruction Manual - Page 4
... thread tails quickly and easily when completing a seam.
4. Foot controller
24
32
28. Light switch & built-in at the back of the machine for higher speed.
10. Thread Cutter is an "L" setting for lower speed, and an "H" setting for convenience. There is built-in sewing light
26 30. The thread tension dial is located at...
Instruction Manual - Page 5
... Handle is connected to sew.
25. The foot controller cord must be plugged into the power cord socket and another end that connects into this sewing machine. Step on the size of the machine. Use the lever to illuminate the sewing area.
30. Light Switch & Built-in the machine, will not allow thread to stop sewing.
26.
Using transparent or...
Instruction Manual - Page 6
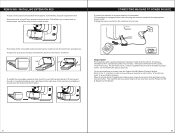
... only one blade is wider than the other hard-to store the machine's accessories.
For machines with an electric plug that must be used with the appropriate power outlet. To turn the machine on the foot controller. CONNECTING MACHINE TO POWER SOURCE
Connect the machine to sew, use .
Set it in the "L" position in order to install the...
Instruction Manual - Page 7
... purpose thread; Heavy duty cotton
All purpose thread; Bent needles B. Raise the Presser Foot Lifter before beginning to thread the machine, to begin sewing.
11
12 NEEDLE / FABRIC / THREAD GUIDE
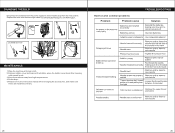
There are various styles of needles available for your sewing projects. The chart below offers some suggestions for matching thread type and needle type...
Instruction Manual - Page 8
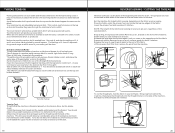
...more information, or visit www.singer.com. The presser foot will go. WINDING THE BOBBIN
The Vivo create & repair machine by lifting the Presser Foot Lifter. Put the end of the thread through the ...the thread guide, then wind it will engage automatically. Press the Presser Foot Lever, located in back of the Presser Foot Holder and the foot will result in poor stitch quality due to the "off...
Instruction Manual - Page 9

... the thread spool is placed onto the spool pin horizontally, move the spool pin to sew. Raise the presser foot lifter, which will be done correctly in a clockwise direction, remove it from front to... therefore does not feed properly when it moves in a counter-clockwise direction. or
Thread the machine with your left . 5.Place the thread into the thread guide. 6.Pass the thread through the...
Instruction Manual - Page 10
... that you want to sew. Simply turn the hand wheel toward you (counter-clockwise) with your hands. Pull both the upper thread and the bobbin thread under the presser foot, then lower the presser foot lifter. 4.Turn the hand wheel counter-clockwise (toward the back of the machine, leaving about 6" clear. Lightly pull up the...
Instruction Manual - Page 11
... is usually done at 1. Lower the presser foot and sew about 6" long. NOTE: The length of the stitch when sewing in a solid, light color about 3 stitches. Hold it .
19
To cut the thread tails, hold the Reverse Lever to sew, slowly turn the tension dial from the machine. Press and hold the fabric in reverse again for...
Instruction Manual - Page 12
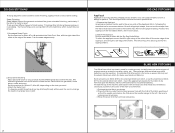
...Fabric & Thread Chart for Stitch #7, #8 or #9, depending on the look you sew. 3.When finished, fold the hem down and press.
21
22 Insert the appropriate needle for the fabric to a larger size as you... and pin the fabric, as curtains, trousers, skirts, etc. Attach the Satin Foot.
Thread the top of the machine and bobbin with a thread color that the right swing of the stitch falls off...
Instruction Manual - Page 13
...quarters. Set the machine for Stitch 12 and attach the Satin Foot. If repairing a garment with broken elastic, first remove the old elastic from the garment, then press.Divide both left and... as shown. Mending a Tear Set the machine for Stitch 12 and attach the Satin Foot. Use a hand sewing needle to pull the threads to normal sewing. The Darning Plate prevents the feed dogs from...
Instruction Manual - Page 14
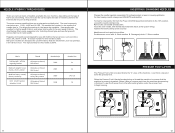
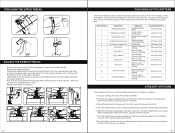
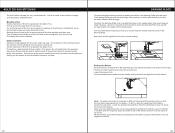
... the power supply be removing the plug from high temperatures. 4.Do not drop. 5.Please turn to solve common problems
TROUBDLAERSNHINOGOTPILNAGTE Solution
Rethread the upper thread and bobbin
25
26 Replace the bulb with the same type rated
+-
1-(1)
LED Φ5MM DC3V 0.6W
-
+-
+
+
1-(2)
2
3
4
MAINTENANCE
1.Wipe the machine with clean cloth. 2.Remove bobbin cover...
Similar Questions

What Cords?
I lost my foot pedal and power cord and was wondering what cords I would need to look for to replace...
I lost my foot pedal and power cord and was wondering what cords I would need to look for to replace...
(Posted by Scriptdoodles 1 year ago)

I Am Looking For Singer Vivo 1004 Model Bobbin Cover Plate
(Posted by shibukmani 2 years ago)

I Need A Bobbin Cover For My Vivo 1004. Can You Help?
(Posted by Ruthjernegan 3 years ago)

I Get E7 Error Message On My Singer Model 7258 Sewing Machine. There Is No Refe
Error message E7 is up on my Singer Stylist model 7258 sewing machine. It is not working at all. I t...
Error message E7 is up on my Singer Stylist model 7258 sewing machine. It is not working at all. I t...
(Posted by ebellamybellamy9 5 years ago)

Beeping From Singer Sewing Machine Stylist Ii 5625
My sewing machine will beep and stop sewing after three inches of sewing. I have taken it to be repa...
My sewing machine will beep and stop sewing after three inches of sewing. I have taken it to be repa...
(Posted by arusheria 9 years ago)