Ryobi P320 Support Question
Ryobi P320 Support Question
Find answers below for this question about Ryobi P320.Need a Ryobi P320 manual? We have 2 online manuals for this item!
Question posted by smhjpdj on January 15th, 2019
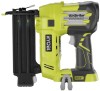
Ryobi P320 Battery Nailer
hi, can anyone help to identify the values of the 2 shunt resistors surrounding the thermal cut out fuse used for supply voltage protection located in the handle section of the Ryobi p320 battery nailer (resistor color coding are burnt, both are identical 5 band resistors. Brown - ? - ? - ? - Black)
Requests for more information
Request from przemasge on October 8th, 2020 3:16 AM
Hello smhjpdj,
Hello smhjpdj,
Did you get proper resistor for your nail gun? Can you share this with me?
Thanks in advance.
Regards
Przemek
Request from wagersshawn2 on November 21st, 2021 2:09 PM
just need the value or type of resistor and fuse to buy. Ryobi p320
just need the value or type of resistor and fuse to buy. Ryobi p320
Current Answers
Answer #1: Posted by hzplj9 on January 15th, 2019 6:57 AM
hzplj9

Member since:
June 25th, 2012 Points: 4,873,510

Member since:
June 25th, 2012 Points: 4,873,510
This youtube video may help you fix your device.
www.youtube.com/watch?v=WZ5WRpnkeMA
Good luck.
Related Ryobi P320 Manual Pages
Operation Manual - Page 2
...; Keep work to be performed. Distractions can be controlled with sharp cutting edges are less likely to lose control. Never use the cord for your finger on the switch or energising power tools that is unavoidable, use a ground fault circuit interrupter (GFCI) protected supply. Keep proper footing and balance at the rate for misalignment or binding...
Operation Manual - Page 3
... user must be accidentally activated if it away from the front and side. Be aware of the nailer can lead to another battery pack. Use power tools only with ANSI Z87.1.
Additional safety protection will require the use eye protection which could give the operator an electric shock.
Know your target.
Disconnect the...
Operation Manual - Page 4
... leave tool unattended if the battery is installed.
Do not operate this rule will recoil immediately after driving a fastener. If nails are not feeding smoothly and properly, discontinue their use a clean cloth when cleaning. Positioning the workpiece contact only partially above the workpiece. nailer SAFETY WARNINGS
Use the tool only for its handle dry...
Operation Manual - Page 5

... result in damp locations. Please study them and learn their meaning. Read Operator's Manual
To reduce the risk of injury, user must read and understand operator's manual before using this product. SYMBOLS
The following symbols may result in property damage. Proper interpretation of the tool.
Eye Protection
Always wear eye protection with side shields marked...
Operation Manual - Page 6
....
• Contact actuation An actuation system in which there is more than one requirement for use of this standard. Operating control A control that satisifes one operating control and the operating controls must be activated in the tools within the scope of a trigger, workpiece contact, and/or other fastening device which a fastener is...
Operation Manual - Page 7
... ruler located along the left side of these chemicals varies, depending on how often you are specially designed to prevent missing nails in the tool. Before use of this...handling. Nail Type 18 gauge Brad Nail Length 5/8 - 2 in a well-ventilated area and with all operating features and safety rules. KNOW YOUR brad nailer
See Figure 1, page 14.
workpiece contact
The tool...
Operation Manual - Page 8
... of the nailer, depending on the left side screw hole.
Use of a second is misuse and could result in use this product if any parts are replaced. n Using a phillips head screwdriver (not included) tighten
securely. OPERATION
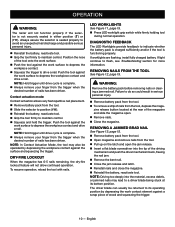
WARNING:
Do not allow familiarity with this tool for assistance. WARNING:
Always remove battery pack from the tool when you...
Operation Manual - Page 9
To remove battery pack: Locate latches on battery pack and depress to the nose of the tool helps prevent marring and denting when working with air pressure adjustments alone. WARNING:
Keep the tool pointed away from the tool. setting the AIR pressure
See Figure 7, page 15. It may need to achieve the desired depth with softer woods...
Operation Manual - Page 10
...section for more information. NOTE: Hold trigger until drive cycle is seated properly to avoid an unexpected nail discharge and possible serious personal injury.
Reinstall the battery, reactivate tool. Grip the tool firmly to indicate whether the battery.... OPERATION
WARNING:
The nailer will not allow continued...tool
during normal operation. zine release button located...
Operation Manual - Page 11
WARNING:
Always wear eye protection with side shields marked to do so could result in contact with plastic parts...come in fire and/ or serious injury.
11 - WARNING:
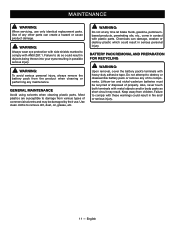
To avoid serious personal injury, always remove the battery pack from children. English Use clean cloths to damage from various types of its components.
Chemicals can create a hazard or cause product damage. ...
Operation Manual - Page 12
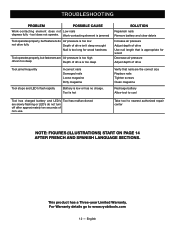
... tool to cool
Tool has charged battery and LED's Tool has malfunctioned are Air pressure is too high
driven too deep
Depth of non-use. tool does not operate.
For Warranty details go to nearest authorized repair center
NOTE: FIGURES (ILLUSTRATIONS) START ON PAGE 14 AFTER FRENCH AND SPANISH LANGUAGE SECTIONS. English This product has a Three-year...
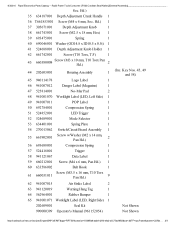
Parts Diagram - Page 2
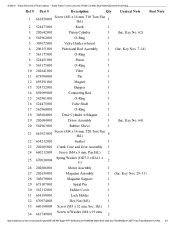
Ryobi Power Tools Consumer: [P320 Cordless Brad Nailer]/[General Assembly
Ref # Part #
Description
Qty Context Note ...No. 62)
4 562962001
O-Ring
1
5 305672001
Valve Holder w/Insert
1
6 206151001
Piston and Rod Assembly
1 (Inc. 4/3/2014 Ryobi Electronics Parts Catalog -- Key Nos. 7-14)
7 563177001
O-Ring
1
8 524451001
Piston
1
9 563175001
O-Ring
1
10 202641001
Filter...
Parts Diagram - Page 3
4/3/2014 Ryobi Electronics Parts Catalog -- Key Nos. 45, 49 1
and 58)
45 940114178
Logo...-4293-b4a3-a5c77acf9f03&cat=3&TF=epcFrame&assem=237&s... 3/3 Hd.)
35 634187001 Depth Adjustment Crank Handle 1
36 T661853001 Screw (M4 x 4 mm, Soc. Ryobi Power Tools Consumer: [P320 Cordless Brad Nailer]/[General Assembly
Soc. Hd.) 1
37 305671001
Depth Adjustment Knob
1
38 661743001 Screw (M2...
Similar Questions

Magazine Support Failure On Ryobi P320 Brad Nailer Airstrike
my magazine support shot off of my Ryobi brad nailer when trying to load why did this happen
my magazine support shot off of my Ryobi brad nailer when trying to load why did this happen
(Posted by Ianlowe76 3 years ago)

P320 Nailer Fuse Circuit
can anyone decode the value of a 5 band resistor with colors BROWN, BLUE, GOLD, BROWN, BLACK
can anyone decode the value of a 5 band resistor with colors BROWN, BLUE, GOLD, BROWN, BLACK
(Posted by disraeliwilliams 5 years ago)

Ryobi P320 Stopped Working
the lights blink and does not fire.I used it a week before and it worked fine. Now nothing.Replaced ...
the lights blink and does not fire.I used it a week before and it worked fine. Now nothing.Replaced ...
(Posted by bigbaseshop 7 years ago)

My P320 Brad Nailer Won't Do Anything And The Lights Are Flashing
(Posted by onyx1958 8 years ago)

My P320 Just Flashes When I Put A Battery In
my p320 just flash when you put a fully charged battery in
my p320 just flash when you put a fully charged battery in
(Posted by nolimitsbob 8 years ago)