Ryobi DP102L Support Question
Ryobi DP102L Support Question
Find answers below for this question about Ryobi DP102L.Need a Ryobi DP102L manual? We have 4 online manuals for this item!
Question posted by rjbsilverking on March 4th, 2014
How To Replace A Depth Stop Ring On The Dp102l What Parts Are Needed
I bought a DP102L at a auction but the entire depth stop feature was missing what parts do I need to replace it?
Current Answers
Related Ryobi DP102L Manual Pages
English Manual - Page 1
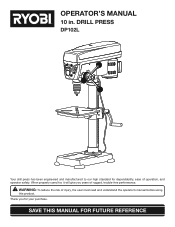
Thank you years of rugged, trouble-free performance.
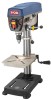
DRILL PRESS
DP102l
Your drill press has been engineered and manufactured to our high standard for your purchase. When properly cared for, it will give you for dependability, ...
English Manual - Page 2
...61550; Electrical...8 Glossary of Terms...9 Features...10-11 Tools Needed...11 Loose Parts...12 Assembly...13-17 Operation...18-20...the location of the Service Center nearest you may either repair or replace any RYOBI® power tool which includes the date of purchase (for the balance of the...
English Manual - Page 3
...tools should be properly repaired or replaced by an authorized service center to operate the tool.
DO NOT OVERREACH. Rubber gloves and nonskid footwear are NOT safety glasses.
SECURE WORK. Use clamps or a vise to hold work into moving parts... complete stop.
PROTECT YOUR LUNGS. Cluttered areas and benches invite accidents. Do not let visitors contact tool or ...
English Manual - Page 4
... ANY ROTATING COMPONENT IS IN CONTACT WITH THE WORKPIECE.
DO NOT OPERATE A TOOL WHILE UNDER THE INFLUENCE OF DRUGS, ALCOHOL, OR ANY MEDICATION.
WHEN SERVICING use only identical replacement parts. Watch what you are not listed may create a hazard or cause product damage.
USE ONLY RECOMMENDED ACCESSORIES...
English Manual - Page 5
... cutting tool if the workpiece should unexpectedly shift.
NEVER PERFORM ANY OPERATION by an authorized service center to power source or turning power ON.
ADJUST THE TABLE OR DEPTH STOP TO ... the table while the cutting tool is rotating, switched on, or connected to a power source.
IF THE POWER SUPPLY CORD IS DAMAGED, it must be replaced only by the manufacturer or ...
English Manual - Page 7
... or standard safety glasses with side shields and a full face shield when needed. Save this product. WARNING:
The operation of risk associated with ANSI Z87.1. Before beginning power tool operation, always wear safety goggles or safety glasses with side shields.
SYMBOL SIGNAL.... SYMBOLS
The following signal words and meanings are intended to use only identical replacement parts.
English Manual - Page 8
... grounded.
A substantial voltage drop will overheat. Use the chart provided below to a live terminal.
Repair or replace a damaged or worn cord immediately.
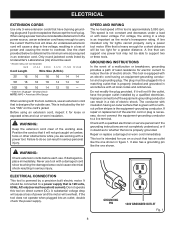
Electrical Connection
This tool is not constant and decreases under a load or with a power tool. Grounding Pin
120V GROUNDED OUTLET Fig. 1
Electrical
Extension Cords
Use only 3-wire extension cords that have...
English Manual - Page 9
...when properly installed and maintained, is designed to stop the workpiece from being kicked back toward operator.
...cut removing a wedge from a block so the end (or part of the workpiece.
Through Sawing Any cutting operation where the blade...piece of adjustable blades. Arbor The shaft on which a blade or cutting tool is being guided by a spinning object in a through cut . Resin ...
English Manual - Page 10
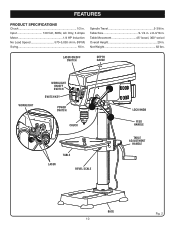
... Load Speed 570-3,050 r/min. (RPM) Swing 10 in . laser on/off switch
depth gauge
worklight
worklight on/off switch
switch key
power switch
chuck
table
laser
bevel scale
lock knob
feed handle
table adjustment
handle
base 10
Fig. 2
FEATURES
product specifications
Chuck 1/2 in . Spindle Travel 2-3/8 in . Table Movement 45° bevel...
English Manual - Page 11
...depth gaUge
A depth gauge is tilted.
worklight
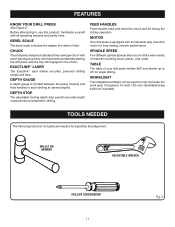
The integrated worklight can be used to use this product, familiarize yourself with all operating features and safety rules. TOOLS NEEDED
The following tools (not included) are needed...drilling operation. FEATURES
KNOW YOUR drill press
See Figure 2.
Depth Stop
The adjustable locking depth stop permits accurate depth measurement and repetitive...
English Manual - Page 12

LOOSE PARTS
The following items are included with the drill press:
Head Assembly 1 Column Assembly 1 Table Assembly 1 Base 1 Hex Key (3 mm, 4 mm, and 5 mm 3 Hex Bolts (M8 4 ...
English Manual - Page 13
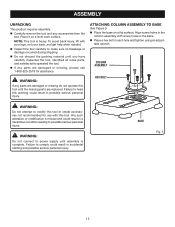
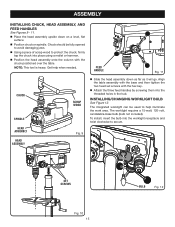
...tool or create accessories not recommended for assistance.
base
Fig. 5
13 WARNING:
If any parts are damaged or missing do not operate this tool until the missing parts are damaged or missing...this tool.... This tool is ...needed. Inspect the tool carefully to power supply until you have carefully inspected the tool, identified all loose parts, and satisfactorily operated the tool...
English Manual - Page 15
...down on a level, flat surface.
Position chuck on spindle. Installing/changing worklight bulb
See Figure 12.
Note: This tool is heavy.
The integrated worklight can be fully opened to avoid damaging jaws.
Using a piece of scrap wood to... by screwing them into the worklight receptacle and twist clockwise to help when needed.
Chuck should be used to secure.
English Manual - Page 20
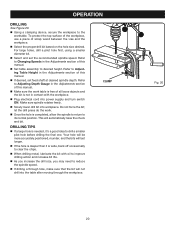
...If desired, set the recommended spindle speed.
DRILLING TIPS
If a large hole is needed, it is not in contact with oil to improve drilling action and increase bit life.
... size, you may need to its normal position. For large holes, drill a pilot hole first, using a smaller diameter bit.
Select and set feed shaft at desired spindle depth. Refer to Changing ...
English Manual - Page 21
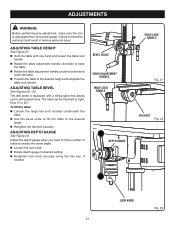
...you need to drill a number of holes to exactly the same depth. Loosen the lock knob. Rotate depth gauge to heed this warning could result in serious personal injury. adjusting depth GAUGE...bevel
See Figures 22 - 23. adjustments
WARNING:
Before performing any adjustment, make sure the tool is equipped with one hand and loosen the table lock
handle. Rotate the ...
English Manual - Page 23
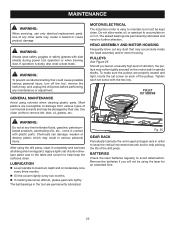
... the pulleys are susceptible to maintain but must be damaged by their use only identical replacement parts. batteries
Check the laser batteries regularly to remove dirt, dust, oil, grease, etc...blow out any other parts may result in contact with plastic parts. Should you will not be tightly secured on or in the tool are permanently lubricated and need no further attention. Chemicals...
English Manual - Page 26
...PARTS
When ordering repair parts, always give the following information:
• MODEL NUMBER
DP102L
• SERIAL NUMBER
Ryobi® is a registered trademark of this tool will be found on a plate attached to provide all pertinent facts when you have purchased your tool, should a need...web site at www.ryobitools.com for repair parts or service, simply contact your nearest Authorized Service...
Repair Sheet - Page 2
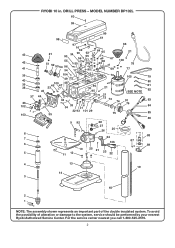
... DRILL PRESS - To avoid the possibility of the double insulated system. MODEL NUMBER DP102L
60 59
99
98
61
97
66
16
43
21
62
90 34 90
63...5
10 11 12
25 21 23 22
4
13
19
14 3
18
2 1
NOTE: The assembly shown represents an important part of alteration or damage to the system, service should be performed by your nearest Ryobi Authorized Service Center. For the service center ...
Repair Sheet - Page 3
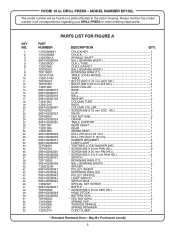
...PART
NUMBER
DESCRIPTION
QTY.
13103006M1 CHUCK KEY 1
13103006M CHUCK 1
13203001A SPINDLE SHAFT 1
089140200004 BALL BEARING (80201 1
13203002D QUILL TUBE 1
13303006 QUILL GASKET 1
TDP02001 BALL BEARING (60201 1
TDP10001 RETAINING RING...10 mm SOC. May Be Purchased Locally
MODEL NUMBER DP102L
The model number will be found on a plate attached to the motor housing. DRILL...
Repair Sheet - Page 4
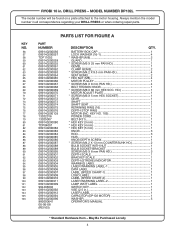
...
089140200073 SHAFT 1
089140200074 SHAFT SEAT 1
089140200075 RETAINING RING (16 1
089140200076 DEPTH STOP RING 1
089140200103 MOTOR (INC.
MODEL NUMBER DP102L
The model number will be found on a plate ...95 96 97 98 99 100 101 102 103 104 105 106
PARTS LIST FOR FIGURE A
PART
NUMBER
DESCRIPTION
QTY.
089140200056 BATTERY BOX CAP 1
089140200057 LOCK WASHER...
Similar Questions

Machine Is Not Turning On When Inserting Key And Pushing Up Key Pops Out?
(Posted by estherflam 2 years ago)

I Did Not Pay Attention To What Wires Go Where On Switch Replacement.
I do not understand the symbols on the electrical schematics for the DP102L drill press
I do not understand the symbols on the electrical schematics for the DP102L drill press
(Posted by jajzksb 8 years ago)

Where Are The Positive Stops Inside The Cabinet? Need To Make Adjustments For
I need to make adjustments for a 90 degree cut.
I need to make adjustments for a 90 degree cut.
(Posted by rnicot 10 years ago)

Dp102l Quit Working
Using a 4 1/2 inch bimetal hole saw to drill thru a side panel of my PC case using the speed setting...
Using a 4 1/2 inch bimetal hole saw to drill thru a side panel of my PC case using the speed setting...
(Posted by chief4070 12 years ago)