Ricoh Aficio MP C5000 Support Question
Ricoh Aficio MP C5000 Support Question
Find answers below for this question about Ricoh Aficio MP C5000.Need a Ricoh Aficio MP C5000 manual? We have 3 online manuals for this item!
Question posted by vonthshul on February 27th, 2014
How To Set Single Sided Scanning On Mp6001 As Default
The person who posted this question about this Ricoh product did not include a detailed explanation. Please use the "Request More Information" button to the right if more details would help you to answer this question.
Current Answers
Answer #1: Posted by freginold on March 4th, 2014 9:28 AM
freginold

Member since:
December 20th, 2011 Points: 23,253,885

Member since:
December 20th, 2011 Points: 23,253,885
Hi, to set single sided as the default so it's automatically selected each time, follow the steps in this article:
- How to configure the default scan settings for a Ricoh Aficio MP series copier
- How to configure the default scan settings for a Ricoh Aficio MP series copier
Related Ricoh Aficio MP C5000 Manual Pages
Quick Start Guide - Page 1
www.ricoh-usa.com
Ricoh Product Line Segment 2 thru 6
MP/5000/5001, MP C5000/C6000/C6501, MP7000/8000, MP6001/7001, MP8001/9001, MP907EX
This guide is not intended to replace your users manual, features and options will vary by machine type, model and finisher type installed.
Quick Start Guide - Page 11
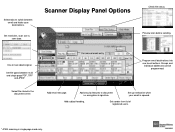
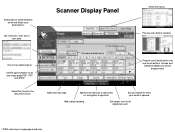
... your email is opened. Set file types between email and folder scan destinations.
encryption & signature.
Scanner Display Panel Options
Check file status. Add security features to switch between multi and single page PDF, TIFF
and JPEG*
Select file stored in single page mode only.
Add subject heading. One or two sided original.
Add email message...
Quick Start Guide - Page 12

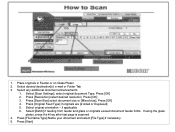
At copier Screen Press [Scanner]
2. Basic Scanning
1. Select destination [email address or folder location
4. Select [E-mail] or [Folder] Tab 3. Your display may vary depending on Glass 5. Place Originals in Feeder or on your operating system and device.) Press [Start]
(Note: Screenshots are provided for reference purposes only.
Quick Start Guide - Page 13
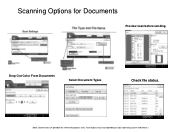
Drop Out Color From Documents
Select Document Types
Check file status.
(Note: Screenshots are provided for Documents
Preview scan before sending. Your display may vary depending on your operating system and device.) Scanning Options for reference purposes only.
Quick Start Guide - Page 18

Confirmations can send single document to one or more users simultaneously. Select Stored Fax Destination(s) or enter a New Destination using the Numeric Key Pad on Right Side of Installing the LAN fax driver for errors only or off. When Networked, ... with fax Covers and other options. Use The Original Feed type to select 2 sided when originals are 2 sided and copier
Will scan and send both...
User Guide - Page 2
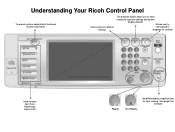
Understanding Your Ricoh Control Panel
To access system administrator tools and counter information
Clears screen to default settings
The program button allows you to store
frequently used job settings and screen
display defaults
Allows user to
interrupt job in
progress for new job
Hard function keys have Red/Yellow status LEDs
8.5" Full Color W-VGA Screen...
User Guide - Page 6
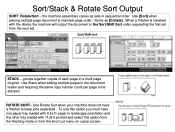
...must have a finisher to keep jobs separated . Use Stack when setting multiple pages in the Sort/Shift Sort order, separating the first set from the short cut menu on copier screen. To use this...paper tray loaded with 8.5x11 paper in landscape orientation and the other tray loaded with the device the machine will output the document in the document feeder and requiring the same copy number count...
User Guide - Page 10
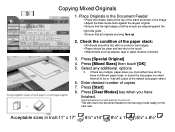
... on the same size. Acceptable sizes in the image Adjust the Side Guide flush against the
right side guide .
Ensure that the right edges of the paper stack:
...x 17" ; 8½" x14" ; 8½" x 11" ;5½" x 8½" This will output al the default auto paper select.
6.
Check the condition of all the sheets are lying face up.
2. Copying Mixed Originals
1. Place ...
User Guide - Page 22
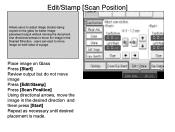
... image in the desired direction and them press [Start] Repeat as necessary until desired placement is made. Edit/Stamp [Scan Position]
Allows users to adjust image (books) being copied on both sides of a page. Use directional arrows to move image on the glass for better image placement output without moving the document...
User Guide - Page 26

... for 4 page output) use Magazine for 5 or more pages. Series - Default Screen Settings Combine multiple pages on single pages with options for 2 sided or single sided output and options of placing 2, 4, 8 or pages on panel Duplex - 1 sided+2 Sided 2 Sided+ 2 Sided Combine - Dup./Combine/Series
Full menu for short cuts on a single page. Use to copy 2 face forwarding pages of a book to...
User Guide - Page 27

Combine Pages
Use this option. Some of a page.
You cannot use the Bypass tray with this option to combine multiple single pages or 2 sided pages for multiple pages copied on each side of these options are available from the main copier panel. Originals can be copied in portrait or landscape orientation.
User Guide - Page 29
... exit
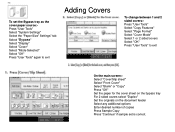
On the main screen:Select "Cover/Slip sheet" Select "Front Cover" Select "Blank" or "Copy" Press "OK" Set the paper for the cover sheet on the bypass tray For 2 sided covers select "Duplex" Set the originals on the document feeder Select any additional options Enter desired number of copies Press Sample Copy...
User Guide - Page 30

... right and left and right pages and place front and back to a single page - Copies the left pages Press [OK] OR
Press the [BOOK ]button • Select [BOOK TO 2 SIDED]
- Press [OK]
Press Page size Paper tray Enter desired sets Press [Start]
•
Book 1-Sided Book 2-Sided
Odd sized books may require some manual adjustments
User Guide - Page 31

...Select [Dup./Combine/Series]
3. Select [Centering] 8. Press [Start]
Optional
Press [Sample Copy] to preview job before running multiple sets
3 4
Use [*Magazine] Mode for Simplex originals or
12
2
5. Booklets & Magazine Modes
1. Select [Magazine] *
4. 1 - Sided for 5 or more page originals
12 34
1
56 7 8 Select the [Paper size] for 4 page originals
9. Enter desired number...
User Guide - Page 33
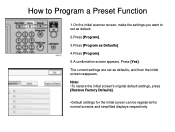
How to Program a Preset Function
1.On the initial scanner screen, make the settings you want to set as Defaults].
4.Press [Program].
5.A confirmation screen appears. Press [Yes].
Note: •To restore the initial screen's original default settings, press [Restore Factory Defaults].
•Default settings for the initial screen can be registered for normal screens and simplified displays ...
User Guide - Page 34

TAB Copying
Set tab stock so that the tab sheet holder will be fed from the side without the tab edges first. To Copy Tabs Place the Tab Copy Originals in the Document Feeder Select the Paper Tray containing the Tab Paper (tray 2 or tray 3) Press START Adjust the back fence position so that it will fit the tab stock.
User Guide - Page 42
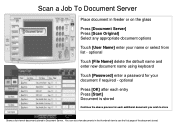
... To Document Server
Place document in feeder or on the glass
Press [Document Server] Press [Scan Original] Select any appropriate document options
Touch [User Name] enter your document if required - optional
Touch [File Name] delete the default name and enter new document name using keyboard
Touch [Password] enter a password for each entry...
User Guide - Page 52
...
and JPEG*
Select file stored in single page mode only. Set sender from list of registered users.
* JPEG scanning in the document server. Set resolution, scan size & scan type.
For manual email entry
Program email destinations into one touch buttons. Groups and
individual addresses can be programmed.
Preview scan before sending. Set up notification when your email is...
User Guide - Page 53
... Feed Type] if originals are [2 sided or Duplexed] 5. Select desired destination[s] e-mail or Folder Tab 3. Press [Resolution] select desired resolution, Press [OK] 3. if applicable 6. Place originals in Feeder or on Glass Platen 2. Press [File Name/Type] Name your document and select [File Type] if necessary 5. Select [Scan Settings], select original document Type, Press...
User Guide - Page 59
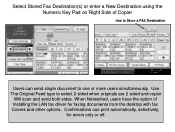
... Feed type to one or more users simultaneously. Confirmations can send single document to select 2 sided when originals are 2 sided and copier
Will scan and send both sides. Select Stored Fax Destination(s) or enter a New Destination using the Numeric Key Pad on Right Side of Installing the LAN fax driver for errors only or off. When...
Similar Questions


How To Set Black And White As Default On Richo Aficio
(Posted by halimatt 9 years ago)

How To Copy Double Sided Documents To A Single Sided Document On A Aficio Mp
5000
5000
(Posted by anddrunk 10 years ago)

How To Make My Ricoh Aficio Mp7000 Print Single Sided
(Posted by red7sbaker 10 years ago)

How Do I Convert A Double Sided Document To Single Sided
(Posted by normamonaghan 12 years ago)