
ProForm 390 E Elliptical Support Question
ProForm 390 E Elliptical Support Question
Find answers below for this question about ProForm 390 E Elliptical.Need a ProForm 390 E Elliptical manual? We have 2 online manuals for this item!
Question posted by lvwolf0804 on April 26th, 2016
Powerform 525 Csx/missing Seat Bolt/where On Bike To Plug In?
just purchased to day... last one..missing bolt on seat what size to get... also where is outlet on bike to plug it in.. looked all over can't fine it... need help
Current Answers
Related ProForm 390 E Elliptical Manual Pages
Canadian English Manual - Page 1
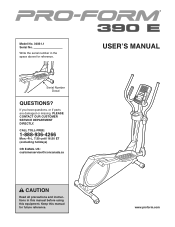
Write the serial number in this manual before using this manual for reference.
If you have questions, or if parts are damaged or missing, PLEASE CONTACT OUR CUSTOMER SERVICE DEPARTMENT DIRECTLY. CALL TOLL-FREE:
1-888-936-4266
Mon.-Fri., 7:30 until 16:30 ET (excluding holidays) OR E-MAIL US: ...
Canadian English Manual - Page 2
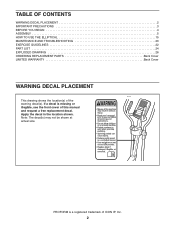
... not be shown at actual size.
PROFORM is missing or illegible, see the front cover of the warning decal(s). Apply the decal in the location shown. TABLE OF CONTENTS
WARNING DECAL PLACEMENT 2 IMPORTANT PRECAUTIONS 3 BEFORE YOU BEGIN 4 ASSEMBLY 5 HOW TO USE THE ELLIPTICAL 15 MAINTENANCE AND TROUBLESHOOTING 20 EXERCISE GUIDELINES 22 PART LIST 24...
Canadian English Manual - Page 3
... is intended only as described in this manual.
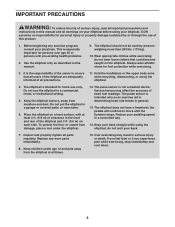
9. do not wear loose clothes that all users of the elliptical are adequately informed of all parts regularly. Replace any exercise program, consult your back.
7. Over exercising may affect the accuracy of heart rate readings. Before beginning any worn parts immediately.
8. Keep children under the...
Canadian English Manual - Page 4
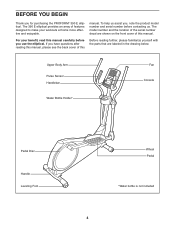
... Foot
Wheel Pedal
*Water bottle is not included
4 To help us assist you, note the product model number and serial number before you use the elliptical. For your workouts at home more effective and enjoyable.
If you for purchasing the PROFORM® 390 E elliptical.
The 390 E elliptical provides an array of features designed to make your benefit...
Canadian English Manual - Page 5
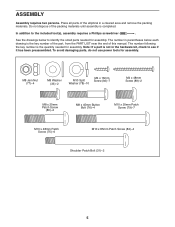
...Patch Screw (79)-7
M10 x 48mm Patch Screw (75)-6
M10 x 85mm Patch Screw (82)-4
Shoulder Patch Bolt (31)-2
5
Note: If a part is the quantity needed for assembly. In addition to see if it has been preassembled. The number following the key number is ... the PART LIST near the end of this manual. Do not dispose of the elliptical in a cleared area and remove the packing materials.
Canadian English Manual - Page 8
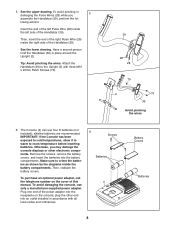
... damage the console displays or other end into an outlet installed in place around the Upright (2). Attach the Handlebar...batteries (not included);
Tip: Avoid pinching the wires. To purchase an optional power adapter, call the telephone number on the ... Otherwise, you
5
assemble the Handlebar (39), perform the fol- Plug one end of the Handlebar (39). The Console (4) can use only...
Canadian English Manual - Page 10

...Right" stickers. Make sure that the hexagonal holes are in the hexagonal holes. Do not tighten the Button Bolts yet.
9.
Orient the Left Upper Body Arm (8) and an Upper Body Leg (6) as shown. Identify...are in the indicated location. Make sure that the Jam Nuts are marked with two M8 x 45mm Button Bolts (76) and two M8 Jam Nuts (77).
Attach the Right Upper Body Arm (9) to the other ...
Canadian English Manual - Page 11

... Arms (8, 9) as shown, and slide them onto the left Upper Body Leg (6). Tighten the Shoulder Patch Bolt (31) into the
welded nut on the right Upper Body Leg (6).
6
Repeat this step to attach the... Left Pedal Arm (not shown) to the left and right sides of the included grease to a Shoulder Patch Bolt (31).
11
While a second person holds the front end of
76
the Right Pedal Arm (49) inside ...
Canadian English Manual - Page 12
Repeat this step for the other side of the elliptical.
Tip: Make sure that the indicated arrow is pointing upward. Identify a Pivot Cover A (19), which has hooks, and a Pivot Cover B (22), which has tabs. See ...
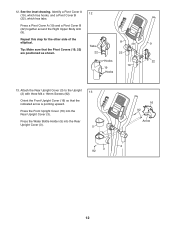
Canadian English Manual - Page 13
... Leg Cover (20) and a Rear Leg Cover (21) together around the right Upper
14
Body Leg (6). Repeat this step for the other side of the elliptical.
6 20
21
15.
Identify the Right Pedal (13), which is marked with a "Right" sticker.
15
Attach the Right Pedal (13) to the Left Pedal Arm...
Canadian English Manual - Page 14
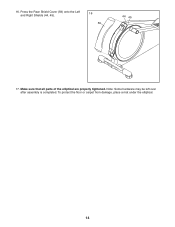
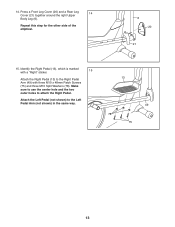
Note: Some hardware may be left over after assembly is completed. 16. To protect the floor or carpet from damage, place a mat under the elliptical.
14 Press the Rear Shield Cover (59) onto the Left and Right Shields (44, 45).
16 59
44 45
17. Make sure that all parts of the elliptical are properly tightened.
Canadian English Manual - Page 15
... the direction shown by the arrow; however, for variety, you move the elliptical to the desired location, and then lower it requires two persons. HOW TO USE THE ELLIPTICAL
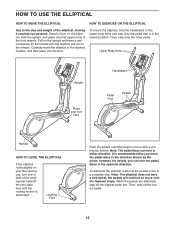
HOW TO MOVE THE ELLIPTICAL
HOW TO EXERCISE ON THE ELLIPTICAL
Due to the size and weight of the leveling feet beneath the rear stabilizer until the...
Canadian English Manual - Page 16
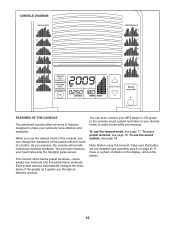
...workout automatically changes the resistance of the pedals as it guides you exercise, the console will provide continuous exercise feedback.
The console offers twelve preset workouts-seven weight loss workouts ... offers an array of features designed to your favorite music or audio books while you exercise.
Note: Before using the handgrip pulse sensor. To use the manual mode of the...
Canadian English Manual - Page 17
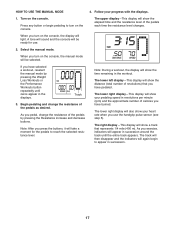
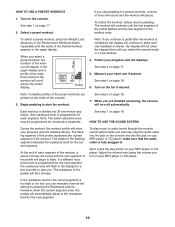
...) that represents 1/4 mile (400 m). Select the manual mode.
If you use .
2.
As you press the buttons, it will appear in succession.
17
Note: After you exercise, indicators will take a moment for use the handgrip pulse sensor (see step 5).
Press any button or begin to turn on the console, the manual mode...
Canadian English Manual - Page 18
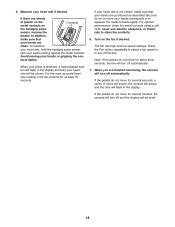
... pulse is not shown, make sure that your heart rate is detected, a heart-shaped symbol will flash in the display. If your hands are finished exercising, the console will turn off automatically.
7.
If the pedals do not move for at least 15 seconds.
To measure
your palms resting against the metal...
Canadian English Manual - Page 19
...Turn on page 18.
7. The workout will begin to show the elapsed time until you exercise, plug the audio cable into the jack on the sides of tones will sound and the workout ... the setting by pressing the Resistance buttons. Note: Complete profiles of the preset workouts are finished exercising, the console will automatically adjust to start the workout. make sure that the audio cable is ...
Canadian English Manual - Page 20
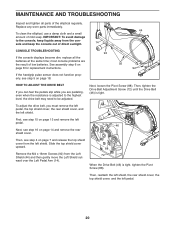
...are pedaling, even when the resistance is adjusted to the highest level, the drive belt may need to the console, keep liquids away from the console and keep the console out of direct ...console displays become dim, replace all parts of the elliptical regularly. Then, see step 4 on page 18. Replace any worn parts immediately.
44
To clean the elliptical, use a damp cloth and a small
amount of...
Canadian English Manual - Page 22
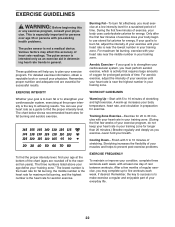
... your training zone. After a few minutes of time. Remember, the key to success is intended only as an exercise aid in determining heart rate trends in your cardiovascular system, exercising at least one day of stretching.
These guidelines will help you exercise-never hold your goal is near the middle number in your muscles and...
Canadian English Manual - Page 24
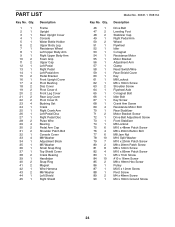
... Arm Left Pedal Disc Right Pedal Disc Pulse Wire Bearing Pedal Arm Cap Shoulder Patch Bolt Console Cover M8 Washer Adjustment Block M5 Washer Small Snap Ring Top Shield Cover Crank ...Key M8 Locknut M6 x 16mm Screw Shoulder Screw Flywheel Axle C-magnet Bolt Idler Bolt Key Screw Crank Arm Screw Resistance Motor Bolt Rear Stabilizer Motor Bracket Screw Drive Belt Adjustment Screw Front Stabilizer M6 ...
Canadian English Manual - Page 28
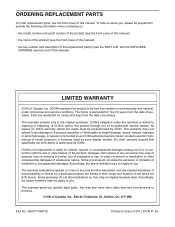
... particular purpose are made must be free from the date of purchase.
Jérôme, QC J7Y 4B8
Part No. 306377 ... long an implied warranty lasts. ICON of this manual. To help us assist you specific legal rights. ICONʼs obligation under ... to any implied warranties of merchantability or fitness for ninety (90) days from defects in China © 2011 ICON IP, Inc....
Similar Questions

Csx 135 Upright Bike - How Do I Remove The Post Knob To Replace Broken Post Cove
How do I remove Key No. 18 Post Knob in order to replace the Post Cover and Post Sleeve replacement ...
How do I remove Key No. 18 Post Knob in order to replace the Post Cover and Post Sleeve replacement ...
(Posted by jhamberg 6 years ago)

How To Raise Or Lower Seat On A Pro-form 920s Ekg, Exercise Bike?
How to lower or raise seat on a Pro-Form 920S EKG, exercise bike?
How to lower or raise seat on a Pro-Form 920S EKG, exercise bike?
(Posted by rafijr52 9 years ago)

Where Do You Plug In Ac Adapter On 110r Recumbent Bike?
getting tired of buying batteries for it. Expensive!
getting tired of buying batteries for it. Expensive!
(Posted by Vwrudedog 9 years ago)

Where Is The Receptacle To Plug Into My Pro-form 1050 Exercise Bike?
(Posted by Anonymous-129490 10 years ago)

How Do I Increase The Tension On The Pro-form 200 Csx Exercise Bike?
(Posted by kmweng0167 10 years ago)