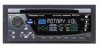
Pioneer DEH-P77DH Support Question
Pioneer DEH-P77DH Support Question
Find answers below for this question about Pioneer DEH-P77DH - Radio / CD Player.Need a Pioneer DEH-P77DH manual? We have 1 online manual for this item!
Question posted by rfetters on September 17th, 2015
Error Ao Code When Trying To Play Cd...
installed deh-p77dh headunit and new speakers in 1994 lhs...cd played,had to bypass factory amp in trunk and speakers played good..stereo plays good but cd start giving out error ao code..would turn ignition off and on and cd would play...went out next day and got error ao code and no cd play since...tried to reset unit but no luck...help????
Current Answers
Answer #1: Posted by TechSupport101 on September 17th, 2015 9:24 AM
TechSupport101

Member since:
May 24th, 2013 Points: 12,171,305

Member since:
May 24th, 2013 Points: 12,171,305
Manual say AO indicate an "Electrical or Mechanical issue"; it recommend turning the ignition off and then back on as you have previously done, and then toggling from CD to radio and back to CD again. If the issue should persist, you will need to take it to an authorized Pioneer Service Center.
Related Pioneer DEH-P77DH Manual Pages
Other Manual - Page 2
... 11 DOOR LOCK (White/Orange 12 STARTER CUT-OFF (Blue/Brown 13 Avoiding Trouble 14
Installation 15
GM Panel Type Installation 16 GM ('94 & Newer Vehicles) Panel Type
Installation 17 GM ('95 & Newer Monte Carlo,
Caprice Classic, Lumina, Cavalier) Installation 18 Standard Chrysler/Dodge/ Plymouth Installation 19 '95 Cirrus/Stratus Installation 20 Grand Cherokee/Sebring/ Avenger...
Other Manual - Page 3
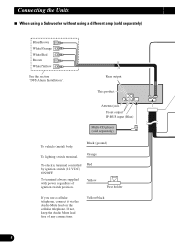
... of the connector.
• When this product's source is switched ON, a control signal is installed in the speakers catching fire, emitting smoke or becoming damaged. • If the RCA pin jack on the unit... in a vehicle that does not have an ACC (accessory) position on connecting the power amp and other products may fail to work when it cannot touch any leads. Connect the connectors...
Other Manual - Page 4
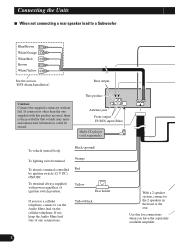
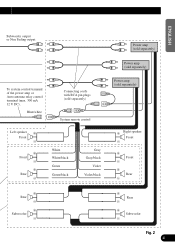
...-CD player (sold separately)
To vehicle (metal) body. Orange
To electric terminal controlled by ignition switch (12 V DC) ON/OFF. If not, keep the Audio Mute lead free of ignition switch position. Yellow/black
With a 2 speaker system, connect to a Subwoofer
Blue/Brown White/Orange White/Red Brown White/Yellow
See the section "DFS Alarm Installation...
Other Manual - Page 5
... + Front ≠
+ Front
≠
+ Rear
≠
White White/black Green Green/black
Gray Gray/black
Violet Violet/black
Power amp (sold separately)
Power amp (sold separately)
Power amp (sold separately)
+ Right speaker Front
≠
+ Front
≠ +
Rear ≠
FRANÇAIS
ITALIANO NEDERLANDS
+ Rear
≠
+ Subwoofer
≠
+ Rear
≠
+ Subwoofer
≠
Fig. 2 4 ENGLISH
ESPA...
Other Manual - Page 6
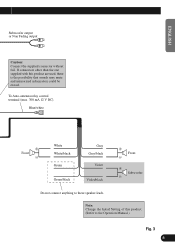
... This product
Antenna jack Front output IP-BUS input (Blue)
Multi-CD player (sold separately)
Blue/Brown White/Orange White/Red Brown White/Yellow
See the section "DFS Alarm Installation". Red Yellow
Fuse holder
If you use a cellular telephone, connect it via the Audio Mute lead on the cellular telephone. If not, keep the...
Other Manual - Page 7
... output or Non Fading output
Caution: Connect the supplied connector without fail. If connectors other than the one supplied with this product. (Refer to these speaker leads.
To Auto-antenna relay control terminal (max. 300 mA 12 V DC). Note: Change the Initial Setting of this product are used, there is the...
Other Manual - Page 8
... for last door to close and courtesy light to turn off before Exit Delay Timer Starts.
7
After hookup, simply set door system type from power door lock systems or ...today's technically advanced vehicle wiring systems, we recommend that your DFS Alarm be installed ONLY by a professional Pioneer installer.
• Install the unit so that it can be connected to either positive or negative ...
Other Manual - Page 9

..., Japanese and most European vehicles Note:
• Set DFS Alarm to "ALARM OUTPUT".) White/Yellow
DEUTSCH
FRANÇAIS
ITALIANO NEDERLANDS
Fuse holder Dome light
Factory Door Switches
Fig. 4 8 Set Door system to "DOOR-L :CLS".
Other Manual - Page 10
... can be used with your vehicle's trunk, hood, etc. This product
Blue/Brown (refer to "STARTER CUT-OFF".) White/Orange (refer to "DOOR LOCK".) White/Red (refer to "ALARM SENSOR".) Brown (refer to "ALARM OUTPUT".) White/Yellow
Dome light
Factory Door Switch
Fuse holder
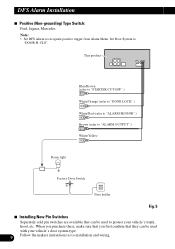
Fig. 5 7 Installing New Pin Switches
Separately sold pin switches are...
Other Manual - Page 11
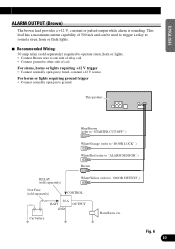
... can be used to trigger a relay to other side of relay coil. • Connect ground to sound a siren, horn or flash lights.
7 Recommended Wiring: 30 amp relay (sold separately)
CONTROL
≠+
30 A
BATT
OUTPUT
GND
Car battery
Horn/Siren, etc. ENGLISH
ALARM OUTPUT (Brown)
The brown lead provides a +12 V, constant or...
Other Manual - Page 13
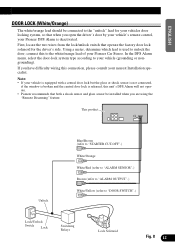
...(refer to the white/orange lead of your Pioneer Car Stereo.
ENGLISH
ESPAÑOL
DOOR LOCK (White/Orange)
The white/orange lead should be installed when you open the driver's door by your vehicle's ...the driver's side. First, locate the two wires from the lock/unlock switch that operate the factory door lock solenoid for your vehicle is equipped with a central door lock but the glass or...
Other Manual - Page 14
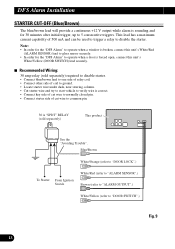
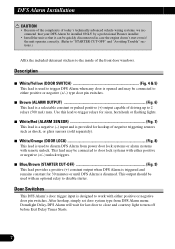
DFS Alarm Installation
STARTER CUT...Locate starter wire under dash, near steering column. • Cut starter wire and try to start vehicle to verify wire is sounding and for the "DFS Alarm" to operate when..., connect this unit's
White/Yellow (DOOR SWITCH) lead securely.
7 Recommended Wiring: 30 amp relay (sold separately)
This product
See the "Avoiding Trouble". This lead has a maximum current...
Other Manual - Page 15

Take the following measures to deal with such a problem, install it where it is least conspicuous.
30 A "SPDT" RELAY (sold separately)
To this problem. SW... greater than that of the relay to be able to deal with this unit's Blue/Brown lead. When installing a switch to start the engine even if you operate the unit correctly.
ENGLISH
ESPAÑOL
DEUTSCH
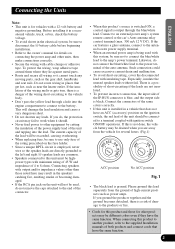
Avoiding Trouble
You may not...
Other Manual - Page 16
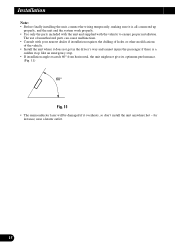
...sure it is a
sudden stop, like an emergency stop. • If installation angle exceeds 60° from horizontal, the unit might not give its optimum performance.
(Fig. 11)
60°
Fig. 11
•... the parts included with the unit and supplied with your nearest dealer if installation requires the drilling of holes or other modifications
of unauthorized parts can cause malfunctions. •...
Other Manual - Page 17

.... Dash panel
Fig. 12
DEUTSCH
FRANÇAIS
ITALIANO NEDERLANDS
16
Fit the bracket provided on the vehicle. ENGLISH
ESPAÑOL
GM Panel Type Installation
An example is shown in the same way that it was fitted to the original car...
Other Manual - Page 18

...
Vehicle supplied screw (not included)
Bracket (not included) In some cases, this may not be provided on the vehicle to the unit in Fig. 13. Installation
GM ('94 & Newer Vehicles) Panel Type Installation
An example is shown in the same way that it was fitted to the original car...
Other Manual - Page 19

... included)
Dash panel
Fig. 14
DEUTSCH
FRANÇAIS
ITALIANO NEDERLANDS
18
ENGLISH
ESPAÑOL
GM ('95 & Newer Monte Carlo, Caprice Classic, Lumina, Cavalier) Installation
An example is shown in the same way that it was fitted to the original car...
Other Manual - Page 20
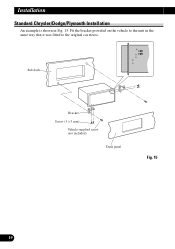
Fit the bracket provided on the vehicle to the original car stereo. Sub dash
Bracket Screw (3 × 5 mm)
Vehicle supplied screw (not included)
Dash panel
Fig. 15
19 Installation
Standard Chrysler/Dodge/Plymouth Installation
An example is shown in the same way that it was fitted to the unit in Fig. 15.
Other Manual - Page 21

Sub dash
Screw (3 × 5 mm) Bracket
Vehicle supplied screw (not included)
Dash panel
Fig. 16
FRANÇAIS
ITALIANO NEDERLANDS
20 ENGLISH
ESPAÑOL
DEUTSCH
'95 Cirrus/Stratus Installation
An example is shown in the same way that it was fitted to the original car stereo. Fit the bracket provided on the vehicle to the unit in Fig. 16.
Other Manual - Page 22

Fit the bracket provided on the vehicle to the original car stereo. Sub dash
Bracket
Screw (3 × 5 mm)
Vehicle supplied screw (not included)
Dash panel
Fig. 17
21
Installation
Grand Cherokee/Sebring/Avenger Installation
An example is shown in the same way that it was fitted to the unit in Fig. 17.
Similar Questions

Unit Was Working Fine Then One Day Got In Car Radio Would Not Turn On Checked
car fuse was fine used test light at back of unit had power at red and yellow was thinking maybe int...
car fuse was fine used test light at back of unit had power at red and yellow was thinking maybe int...
(Posted by arcticcatfans 9 years ago)

Can't Get Car Radio Off Of Demo Mode Pioneer Deh 24ub
(Posted by dranc 9 years ago)

How Do I Find My Radio Id Number For A Pioneer Deh-p8400bh
(Posted by blWoodyW 9 years ago)

Y Wont My Pioneer Cd Player Save My Settings Deh X6500bt
(Posted by erclui 10 years ago)

Does The Pioneer Deh-1900mp Cd Have A Reset Button
(Posted by nansen 10 years ago)