Pioneer AVIC-X920BT Support Question
Pioneer AVIC-X920BT Support Question
Find answers below for this question about Pioneer AVIC-X920BT.Need a Pioneer AVIC-X920BT manual? We have 2 online manuals for this item!
Question posted by wenosi on January 4th, 2014
How To Set Up Avic X920bt Bluetooth
The person who posted this question about this Pioneer product did not include a detailed explanation. Please use the "Request More Information" button to the right if more details would help you to answer this question.
Current Answers
Related Pioneer AVIC-X920BT Manual Pages
Owner's Manual - Page 1
... for the User first! For more information, please contact your vehicle, additional installation may be required.
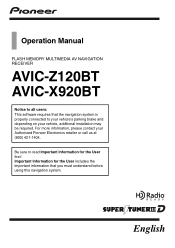
English Operation Manual
FLASH MEMORY MULTIMEDIA AV NAVIGATION RECEIVER
AVIC-Z120BT AVIC-X920BT
Notice to all users: This software requires that you must understand before using this navigation system.
Owner's Manual - Page 2
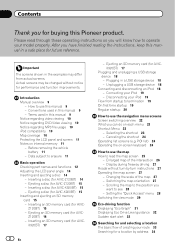
... card 15 - Ejecting a disc (for AVIC-X920BT) 15 -
Z120BT) 16 - Please read the map screen 25
- Terms used in this Pioneer product. Before removing the vehicle
battery 11 - X920BT) 17
2 En
- Ejecting an SD memory card (for AVIC- Unplugging a USB storage device 18
Connecting and disconnecting an iPod 18 - Setting the "Quick Access" menu 28...
Owner's Manual - Page 8
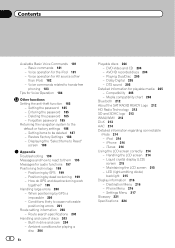
... by GPS is impossible 200
- Ambient conditions for the iPod 181 - iTunes 214 Using the LCD screen correctly 214 - Setting the password 185 - Setting items to the default or factory settings 186 ...214 - Voice operation for Voice Operation 184
Other functions Setting the anti-theft function 185
- Media compatibility chart 208
Bluetooth 212 About the SAT RADIO READY Logo 212 HD ...
Owner's Manual - Page 13
Basic operation
6
8
Chapter
02
9
Basic operation
2
3
7 4
5
1
AVIC-X920BT
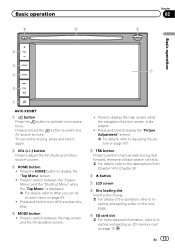
1 button Press the button to switch between the "Classic Menu" and the "Shortcut Menu" while the "Top Menu" is displayed.
! Press to activate voice operations. ...
Owner's Manual - Page 15
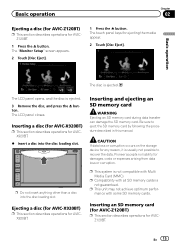
... disc is not guaranteed. The LCD panel closes. Inserting a disc (for AVIC-X920BT)
p This section describes operations for AVICX920BT.
% Insert a disc into the...Monitor Setup" screen appears.
2 Touch [Disc Eject].
1 Press the h button. Ejecting a disc (for AVIC-X920BT)
p This section describes operations for AVICZ120BT.
Pioneer accepts no liability for ejecting the media appear.
2 Touch ...
Owner's Manual - Page 17
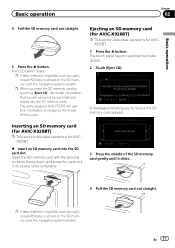
..., is stored on the SD memory card, the navigation system restarts.
Inserting an SD memory card (for AVIC-X920BT)
p This section describes operations for ejecting the media appear. 2 Touch [Eject SD]. The utility program AVIC FEEDS will be automatically stored into the SD card slot.
A message prompting you to recognize the model that...
Owner's Manual - Page 23

... destination on this menu.
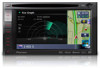
3 Phone Menu You can access the screen that is related to hands-free phoning to see call histories and change the settings on the Bluetooth wireless technology connection.
4 AV operation screen This is the screen that normally appears when you play the AV source...
Owner's Manual - Page 39
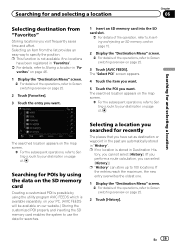
... = For details of the operations, refer to Screen switching overview on page 22.
3 Touch [AVIC FEEDS]. En 39
Searching for POIs by using the data on the SD memory card
Creating a ...
The searched location appears on the map screen.
= For the subsequent operations, refer to Setting a route to your PC. (AVIC FEEDS will be available on page 41. vorites" on page 46.
1 Display the "Destination...
Owner's Manual - Page 63
... List" screen appears. For details about the connectivity with this navigation system can be connected to set up a Bluetooth connection.
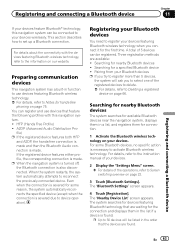
Registering and connecting a Bluetooth device
Chapter
11
Registering and connecting a Bluetooth device
If your devices feature Bluetoothâ technology, this navigation system. ! This section describes how to your devices wirelessly. A2DP...
Owner's Manual - Page 68

... of connected cellular phone
2 Network name of the cellular phone company
3 Strength of the Bluetooth connection between the navigation system and the device
4 Reception status of the cellular phone 5 Battery...section describes how to set up a Bluetooth connection and how to make a call .
68 En For details about the connectivity with the devices featuring Bluetooth wireless technology, refer to...
Owner's Manual - Page 151

... SD memory cards, you can check the fuel consumption information by using the utility program AVIC FEEDS, which is displayed next to 24 sets of fuel cost information
Exporting the fuel cost data to Displaying the "Navi Settings" screen on page 148.
3 Touch [Gas Mileage]. These calculations are entered, the fuel consumption is...
Owner's Manual - Page 156
... on the map. Each time you touch the key changes that setting.
!
Chapter
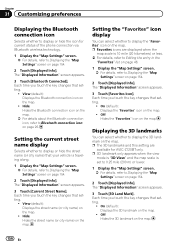
31 Customizing preferences
Displaying the Bluetooth connection icon
Selects whether to display or hide the icon for AVIC-Z120BT only. Each time you touch the key changes that setting.
! On (default): Displays the "Favorites" icon on the map. Hide: Hides the...
Owner's Manual - Page 224
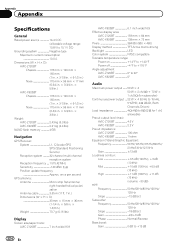
.... × 6-1/2 in.) Nose 170 mm × 96 mm × 11 mm (6-3/4 in. × 3-3/4 in. × 3/8 in.)
Weight: AVIC-Z120BT 2.43 kg (5.3 lbs) AVIC-X920BT 2.01 kg (4.4 lbs)
NAND flash memory 4 GB
Navigation
GPS Receiver: System L1, C/Acode GPS SPS (Standard Positioning Service) Reception system .......... 32-channel multi-channel reception system Reception frequency .... 1 575.42 MHz...
Owner's Manual - Page 225
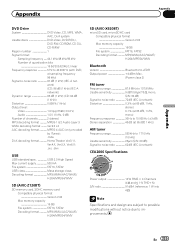
..., FAT32 Decoding format MP3/WMA/AAC/WAVE/ H.264/MPEG4/WMV
SD (AVIC-X920BT)
microSD card, microSDHC card Compatible physical format Version 2.00 Max memory capacity 16 GB File system FAT16, FAT32 Decoding format MP3/WMA/AAC/WAVE/ H.264/MPEG4/WMV
Bluetooth
Version Bluetooth 2.0+EDR Output power 4 dBm Max.
(Power class 2)
FM tuner
Frequency range...
Installation Manual - Page 2
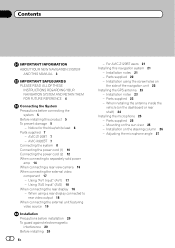
AVIC-X920BT 7 Connecting the system 8 Connecting the power cord (1) 10 Connecting the power cord (2) 12 When connecting... sun visor 25 - When installing the antenna inside the
vehicle (on
the side of the navigation unit 22 Installing the GPS antenna 23
- Adjusting the microphone angle 27 Contents
IMPORTANT INFORMATION ABOUT YOUR NEW NAVIGATION SYSTEM
AND THIS MANUAL 3
IMPORTANT SAFEGUARDS...
Installation Manual - Page 7
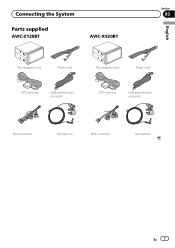
Connecting the System
Section
03
Parts supplied
AVIC-Z120BT
AVIC-X920BT
English
The navigation unit
Power cord
The navigation unit
Power cord
GPS antenna
USB and mini-jack connector
GPS antenna
USB and mini-jack connector
RCA connector
Microphone
RCA connector
Microphone
En 7
Installation Manual - Page 14
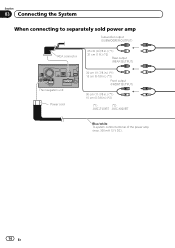
... (REAR OUTPUT)
The navigation unit Power cord
30 cm (11-7/8 in.) (*1) 15 cm (5-7/8 in.) (*2)
Front output (FRONT OUTPUT)
30 cm (11-7/8 in.) (*1) 15 cm (5-7/8 in.) (*2)
(*1)
(*2)
AVIC-Z120BT AVIC-X920BT
Blue/white To system control terminal of the power amp (max. 300 mA 12 V DC).
14 En
Installation Manual - Page 16
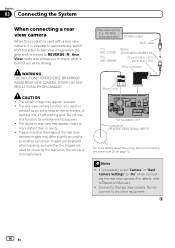
... IN INJURY OR DAMAGE.
ND-BC4) (sold separately) To video output
RCA cable
(*1) AVIC-Z120BT
(*2) AVIC-X920BT
Brown (REAR VIEW CAMERA IN)
20 cm (7-7/8 in.) (*1) 23 cm (9 in.)... (*2)
RCA connector
Power cord
The navigation unit Violet/white (REVERSE GEAR SIGNAL INPUT)
For more distant than in "Back
Camera Settings...
Installation Manual - Page 18

...the driver to watch the video source.
18 En
It is necessary to set "AV2 Input" in "AV Settings" to "Video" when connecting the external video component. (For details, refer...unit
When connecting the rear display
The navigation unit
(*1)
20 cm (7-7/8 in.) (*1) AVIC-Z120BT
23 cm (9 in.) (*2)
(*2)
AVIC-X920BT
RCA connector
Yellow (VIDEO INPUT)
Red, white (AUDIO INPUT)
RCA cables (sold ...
Installation Manual - Page 19

... "EXT" when connecting the external unit. (For details, refer to Operation Manual.)
English
Section
03
En 19 It is necessary to set "AV2 Input" in .) (*2)
Yellow (VIDEO INPUT)
IP-BUS cable (sold separately)
Black
RCA cable (sold separately)
To IP-BUS output
To video output
Pioneer external unit (sold separately)
(*1)
(*2)
AVIC-Z120BT AVIC-X920BT
!
Similar Questions


