
Pfaff hobbylock 776 Support Question
Pfaff hobbylock 776 Support Question
Find answers below for this question about Pfaff hobbylock 776.Need a Pfaff hobbylock 776 manual? We have 1 online manual for this item!
Question posted by bevrose on May 6th, 2013
My Serger Has Stopped Looping After Making A Load Noise During Use.
The person who posted this question about this Pfaff product did not include a detailed explanation. Please use the "Request More Information" button to the right if more details would help you to answer this question.
Current Answers
Related Pfaff hobbylock 776 Manual Pages
Owner's Manual - Page 2

...
length
9 9 10 10
e. Fitting the foot controfler c. Turning on / off the amp
5
e. Lubrication Opening and
closing
looper
cover
and
side
cover
6 6
g. Threading procedure
9
C. Operating the machine
g
a. Test sewing
b. d. Incorrect thread tension and how to adjust
11 12
g. Replacing needle (S)
18
e, Replacing the upper knife
19
f. Replacing the lower knife
19...
Owner's Manual - Page 5
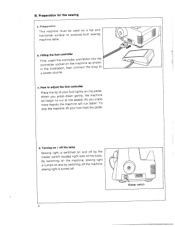
...a flat and horizontal surface or purpose-built sewing machine table. When you press down gently, the machine will begin to adjust the foot controller Place the tip of the body. Fitting the foot controller cFinoirnsthtn,eeicnitsloleurrsttsrtoahcteikoecnot, notthnroetnlhleecr omcnoanncenhceitncettohaersipnslthuoogwthtneo a power source.
To stop the machine, lift your foot lightly on and by...
Owner's Manual - Page 6
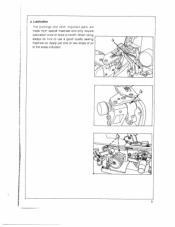
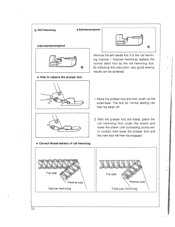
When oiling always be sure to the areas indicated.
5 Lubrication The bushings and other important parts are made from special materials and only require lubrication once or twice a month. Apply just one or two drops of oil to use a good quality sewing machine oil. e.
Owner's Manual - Page 7
... ff7
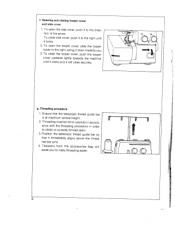
6 Threading must be done carefully in accord ance with the threading procedure in order to make threading easier.
To open the looper cover, slide the looper cover to the direc tion of ... height.
2. To open the side cover, push it to the right, swing it down towards the machine until it will assist you .
3. Threading procedure
1. To close the looper cover, push the looper ...
Owner's Manual - Page 10
OPerating the machine
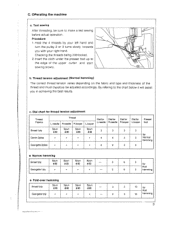
a. Hold the 4 threads by your right hand.
b. Dial chart for thread tension adjustment
...left hand and turn the pulley 2 or 3 turns slowly towards you in achieving the best results. By refering to make a test sewing before actual operation. C. Checking the threads being interlocked.
2. Thread tension adjustment (Normal hemming)
The correct thread tension varies...
Owner's Manual - Page 13
... small lever. Roll hemming
. Normal hemming toot • How to replace the presser toot
Remove the left needle first. By following this instruction, very good sewing results can then be taken off.
2. For the roll hemm ng (narrow / foldover hemming) replace the normal stitch foot by the roll hemming foot. The...
Owner's Manual - Page 14

For crochet needle can be used to observe during sewing
• •
PtTfhalheabecrfneiocotsthlwoebiwlelfflayobfreresiecedcwoumnatudhmteeoermnftichrasietnticgcfaeultwoltytesrseatwiant.cndhdegsl,oenwttheiyer
•
guide by hand. Do not push or pull avoid the possibility of
sew approximately 5 the seam then cut the
thread chain.
•
Securing the seam: Tie the thread chain. ...
Owner's Manual - Page 15
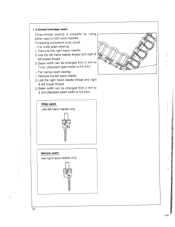
... thread. 3. Seam width can be changed from 3 mm to 7 mm. (Standard seam width is possible by using either right or left hand needles. I. 3 thread overedge seam Three-thread sewing is 5,5 mm). • For narrow seam sewing. 1.
Use the left hand needle thread and right & left hand needle. 2. Seam width can be changed from 5 mm...
Owner's Manual - Page 16

...Adjusting the seam width Standard seam width is adjusted from 3.0mm to
3.5 mm. ay be 5.0mm when using
t1h.eOtrtrhTdihepgeioelhfeeftnkauersarnpateiiohpnnsnebedget r,msatthhinwkdaeednetheiipfkrlkcesirnnoateiilvfscfsemsee.o,urnatrsoitaeinrwnmotadalapsirlnlykdtoihsnnoregoeypbvokepenurrfriciefsdreosemosviwlusteyhrrnle.eotw,owPoauteruptrsdhrehesend,r.
D. It can be
_\'\. Seam Width d,alJ
15
Owner's Manual - Page 17
...Standard stitch length is 3mm.
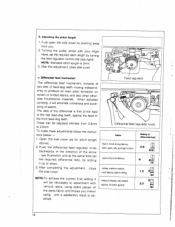
3. Fully open the side cover by sliding it up or down.
3. To make these adjustments follow the instruc tions below: -
1. Push the differential feed regulator knob backwards, in the direction...NOTE:To achieve the correct final setting it will be adjusted infinitely from you intend using, until a satisfactory result is that of the feed of the rear feed-dog teeth...
Owner's Manual - Page 18
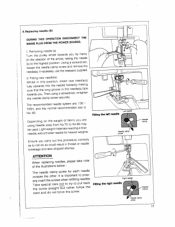
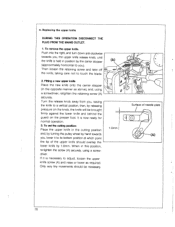
...(S) DURING THIS OPERATION DISCONNECT THE MAINS PLUG FROM THE POWER SOURCE.
1. The recommended needle system are using a screwdriver, re-tighten the needle clamp screw securely.
slant and do so could result in the... direction of the arrow), raising the needle (s) to No.90 may be used. Fitting the right needle
screw
17 Fitting the left needle
screw
Ensure you by hand,...
Owner's Manual - Page 19
... now ready for normal operation. 3. Fitting a new upper knife Place the new knife onto the carrier stopper (in this position, re-tighten the screw (A) securely, using a screwdriver, retighten the retaining screw (A) securely. Only very tiny movements should overlap the lower knife by hand towards you , lower it is necessary to adjust...
Owner's Manual - Page 20
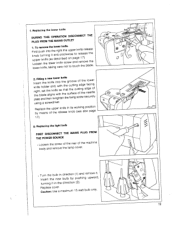
... THE POWER SOURCE • Loosen the screw of the rear of the machine
body and remove the lamp cover.
•
Turn the bulb in Insert the new
direction bulb by
(1) and remove it in the direction (2). Rbyepmlaecaentsheofutphpeerreklneiafseeinknitos bwo(srekeingalspoospitaiogne 17)
g. using a screwdriver. Replacing the lower knife DURING ThIS OPERATION DISCONNECT THE PLUG...
Owner's Manual - Page 21
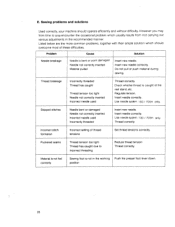
... tight Thread has caught due to time encounter the occasional problem which should operate efficiently and without difficulty.
Incorrect setting of these difficulties. Sewing problems and solutions
Used correctly, your machine should overcome most of thread tensions
Set thread tensions correctly. Insert new needle correctly.
position
20 However you may from not carrying...
Similar Questions

My Wife Pfaff Performance Icon Sewing Machine Started Freezing Up A Few Days Ago
my wifes performance icon sewing machine started freezing up after sewing for a few minutes. it migh...
my wifes performance icon sewing machine started freezing up after sewing for a few minutes. it migh...
(Posted by klandsemtrucking 10 months ago)

I Need A Replacement Feet For My 776.the Pin Has Broke And Is Not Holding The Fe
(Posted by lilih 2 years ago)

I'm Trying To Make A Button Hole, The Sewing Machine Is Not Advancing The Fabric
(Posted by paulinegp22 4 years ago)

My Hobby Lock 4860 Was Making Noise While Sewing Thick Fabric And Cutting Quit L
While sewing and trimming 5 layers of sheeting fabric, my 4860 was making noise. Then the top thread...
While sewing and trimming 5 layers of sheeting fabric, my 4860 was making noise. Then the top thread...
(Posted by gcolumbo5 9 years ago)
Loop Feed Needs Replacing
I am looking at a pfaff hobblock 776 and it says it needs a new loop feed unit is it repairable or a...
I am looking at a pfaff hobblock 776 and it says it needs a new loop feed unit is it repairable or a...
(Posted by kathypartridge 9 years ago)