Oki B4350 Support Question
Oki B4350 Support Question
Find answers below for this question about Oki B4350.Need a Oki B4350 manual? We have 16 online manuals for this item!
Question posted by waynash on September 16th, 2014
How To Change Drum On Oki B4350
The person who posted this question about this Oki product did not include a detailed explanation. Please use the "Request More Information" button to the right if more details would help you to answer this question.
Current Answers
Answer #1: Posted by support38611 on October 8th, 2014 3:55 AM
support38611

Member since:
March 23rd, 2012 Points: 203,070

Member since:
March 23rd, 2012 Points: 203,070
Hello. I am an Oki Data helpdesk technician from Oki Data America's.
It is recommended that you change the toner cartridge and clean the LED
array at the same time as you change the image drum.
The green image drum surface at the base of the cartridge is very delicate
and light sensitive. Do not touch it and do not expose it to normal room
light for more than 5 minutes. If the drum unit needs to be out of the printer
for longer than this, please wrap the cartridge inside a black plastic bag to
keep it away from light. Never expose the drum to direct sunlight or very
bright room lighting. Always hold the image drum unit by the ends or from
the top
Press the cover release and open the printer’s top cover fully.
Remove the used image drum and toner cartridge.
Follow the installation instructions on or inside the box containing
the new image drum to install the new image drum.
Follow the installation instructions on or inside the box containing
the new toner cartridge to install the new toner cartridge.
Gently wipe the LED array surface with the LED lens cleaner that
came with the new toner cartridge, or wipe with a soft tissue.
Close the top cover and press it down to latch it closed.
If you still have a problem, please give us a call at 1-800-Okidata. for more interactive support.
Related Oki B4350 Manual Pages
Guide: User's, B4100, B4250, B4350, B4350n (American English) - Page 3

... indicators 16 Power on LED (green 16 Control button 17 Status Monitor 18 Using the Printer Status Monitor 18 Printer Setup Tab 19 Preferences Tab 21 Menu functions 21 Changing the display language 22 Printing menu settings 22 B4350, B4350n 23 Operator panel 23 Panel elements 23 Menu functions 24 Information Menu 25 Print...
Guide: User's, B4100, B4250, B4350, B4350n (American English) - Page 4
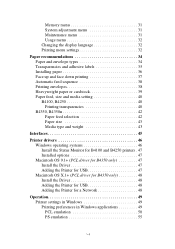
... 31 System adjustment menu 31 Maintenance menu 31 Usage menu 32 Changing the display language 32 Printing menu settings 32
Paper recommendations 34 ... for B4350 only 47 Install the Driver 47 Adding the Printer for USB 47 Macintosh OS X.1+ (PCL driver for B4350 only 48 Install the Driver 48 Adding the Printer for USB 48 Adding the Printer for a Network 48
Operation 49 Printer settings ...
Guide: User's, B4100, B4250, B4350, B4350n (American English) - Page 5

... 67 Replacing the toner cartridge 67 Image drum life 69 When to replace the image drum 69 B4100, B4250 69 B4350, B4350n 69 Replacing the image drum 69 Resetting the drum counter 70 B4100, B4250 70 B4350, B4350n 70 Generating a cleaning page 71 B4100, B4250 71 Using the printer Status Monitor 71 Using the Control button 71...
Guide: User's, B4100, B4250, B4350, B4350n (American English) - Page 8

... the following options are available for the B4250, B4350, and B4350n printers only:
> 10/100 BASE-TX Network Interface Card: to make the B4350 network compatible
> 16MB; 32MB; 64MB, 128MB ...black and white pages at high speed on purchasing this OKI monochrome page printer.
INTRODUCTION
Congratulations on a wide range of your printer's paper handling capacity by 500 sheets
> PostScript level 3...
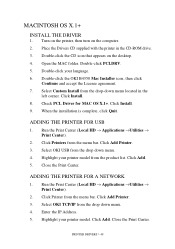
Guide: User's, B4100, B4250, B4350, B4350n (American English) - Page 47

...
the left corner. Double-click PCLDR. 5. Double-click the OKI B4350 Mac Installer icon, then click
Continue and accept the License agreement. 7. ADDING THE PRINTER FOR USB
1. Highlight the printer model. Double-click the CD icon that your options are installed, check that they appear enabled on the Menu Map (See "Confirming current settings...
Guide: User's, B4100, B4250, B4350, B4350n (American English) - Page 48
... the drop down menu located in the CD-ROM drive. 3. Click Add.
Click Add Printer. 3. Click Add. 5. When the installation is complete, click Quit. Double-click the OKI B4350 Mac Installer icon, then click
Continue and accept the License agreement. 7. Highlight your language. 6. Double-click the CD icon that appears on the computer...
Guide: User's, B4100, B4250, B4350, B4350n (American English) - Page 49

... settings available from either a Windows or a Macintosh environment. This dialogue usually specifies the name of how to change here will override those in the printer driver are the same as on the B4250, B4350 and B4350n printer models. Next to print your application are the same. OPERATION > 49
PRINTING PREFERENCES IN WINDOWS APPLICATIONS
When...
Guide: User's, B4100, B4250, B4350, B4350n (American English) - Page 66

... letter has 3% to fill the image drum reservoir and saturate the developing roller with ... will print an average of the toner cartridge and image drum and general maintenance.
TONER CARTRIDGE LIFE
How long your toner...toner cartridge installed in a new printer has to 5% print coverage; CONSUMABLE ORDER DETAILS
Item
Toner, B4100, B4250 Toner, B4350, B4350n Image drum
Life
2,500 letter @ 5%...
Guide: User's, B4100, B4250, B4350, B4350n (American English) - Page 67

.... If printing continues without replacing the toner cartridge, CHANGE TONER is displayed and printing is low. CONSUMABLES AND MAINTENANCE > 67 B4350, B4350n
When the toner is running low, TONER LOW is recommended that the new one . REPLACING THE TONER CARTRIDGE
It is displayed in the printer Status Monitor. Dispose of any regulations, recommendations...
Guide: User's, B4100, B4250, B4350, B4350n (American English) - Page 69

.... This number is very delicate and light sensitive. WHEN TO REPLACE THE IMAGE DRUM
B4100, B4250
When the drum reaches 90% of its life, a CHANGE DRUM message is recommended that you change the image drum. B4350, B4350n
When the drum reaches 90% of its life, a CHANGE DRUM message is displayed in the operator panel LCD. Do not touch it and...
Guide: User's, B4100, B4250, B4350, B4350n (American English) - Page 70

... cover fully. Close the top cover and press it closed. Start the Status Monitor for the printer. 2. Click on , the fuser may be hot. Maintenance 1
tab. 3. B4350, B4350n
1. Press the Select button and the Drum Counter is displayed, then press the Select button. 3. Do not touch.
2. Follow the installation instructions on the
[OK...
Guide: User's, B4100, B4250, B4350, B4350n (American English) - Page 71
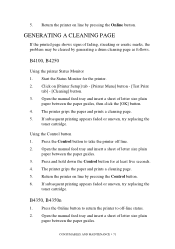
... insert a sheet of fading, streaking or erratic marks, the problem may be cleared by generating a drum cleaning page as follows.
B4350, B4350n
1.
B4100, B4250
Using the printer Status Monitor 1. Click on line by pressing the Control button. 6. The printer grips the paper and prints a cleaning page. 5. If subsequent printing appears faded or uneven, try...
Guide: User's, B4100, B4250, B4350, B4350n (American English) - Page 81

...B4350, B4350n), expandable to 272MB A4, A5, A6, B5, Letter, Legal 13, Legal 14, Executive, Custom, Envelopes (5 types) Automatic feeding via paper trays Manual feeding of your printer... lb (80g/m²) Printer life Consumables
See the ...B4350, B4350n) 23 pages per minute maximum 600 x1200 dots per inch (B4100) GDI; (B4250, B4350...2: 500 sheets (not available for B4350, B4350n. USB 2.0 full speed ...
Guide: User's, B4100, B4250, B4350, B4350n (American English) - Page 85

INDEX
A Adhesive labels 35 Advanced features
enabling or disabling 62
C Changing display language
B4100, B4250 22 B4350, B4350n 32 Cleaning page B4100, B4250 71 B4350, B4350n 71 control button B4100, B4250 17
D Display language
B4100, B4250 22 B4300 32 Drum counter 70
E Envelopes
Printing 38 Types 34 Exit paper jam 75
F Feed jam or exit...
Warranty, Certifications, etc. (AE, FRCan, LASpan, BrazPort) - Page 1

... Fax: 1-905-238-4421
This Limited Warranty applies to state.
1
English OKI® B4100, B4250, B4350 & B4350n
Warranty, Certifications, etc. This Limited Warranty extends to solve your being charged... printer, remove the image drum and toner cartridge to prevent damage to the printer during shipment: failure to be performed under this Limited Warranty. Overnight Exchange of the printer for...
Warranty, Certifications, etc. (AE, FRCan, LASpan, BrazPort) - Page 5

..., your personal solutions center
OKI and OkiLAN are registered trademarks of Oki Electric Industry Company, Ltd. Use of a power cord not supplied with the printer. Macintosh is a registered ...9W
Approx. 66W Approx. 68W
Approx. 340W Approx. 350W
Approx. 700W Approx. 700W
Power B4250, B4350, B4350n
Power save mode: Idle: Operating: Peak:
120VAC
230VAC
Approx. 13W Approx. 14W
Approx....
Guide: Software Installation B4350, B4350n (American English) - Page 4

Click the Install User's Guide button. 3. Right-click OKI B4350(PCL) icon. 3. Local Printer Installation: Windows® (cont'd)
INSTALL THE ON-LINE USER'S GUIDE NOTE
In order to open the ...Tab. 5. Click the Print Test Page button.
4 Click the Documentation button. 2. Click Start →Settings→Printers. 2. Follow the on -line User's Guide, you must have Acrobat Reader installed. 1.
Guide: Software Installation B4350, B4350n (American English) - Page 5
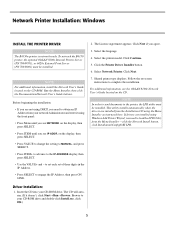
... Press VALUE to change the setting to ...B4350 printer, the optional OkiLAN 8100e Internal Printer Server (PN 70049701), or 6020e External Print Server (PN 70036001) must be installed. NOTE
For additional information, install the Network User's Guide located on -screen instructions to obtain an IP Address from the Menu Installer -click the Network Install button, click Installation/Config/OKI...
Guide: Software Installation B4350, B4350n (American English) - Page 6

Select the B4350 USB icon. 3. Highlight the printer model. 4. ON-LINE MANUALS
To Load the Manuals
Note: In order to the desktop.
6 Insert the Installation CD into the
CD-ROM drive. 3. Open the MAC folder. 5.
Macintosh® OS 9.1+ Installation
INSTALL THE DRIVER
1. Double-click the PCLDRV folder. 6. Double-click the OKI B4350 MAC Installer icon...
Guide: Software Installation B4350, B4350n (American English) - Page 7
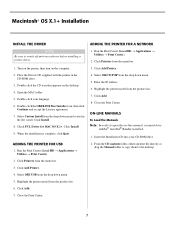
.... 8. Open the MAC folder. 5. Check PCL Driver for MAC OS X.1+. ADDING THE PRINTER FOR USB
1. Run the Print Center (Local HD → Applications → Utilities → Print Center).
2.
Click Add Printer. 4.
Click Add Printer. 4. Close the Print Center. Double-click the OKI B4350 Mac Installer icon, then click
Continue and accept the License agreement. 7. Click...
Similar Questions

How Do I Change The Darkness Settings On A Oki B4350 Laser Printer
(Posted by Warrilcoh 9 years ago)


Oki B4350 is not Print In Window 7 Ultimate
Window 7 Recognizes The Printer But No Print, The Printer Screen Says Invalid.
Window 7 Recognizes The Printer But No Print, The Printer Screen Says Invalid.
(Posted by manuvace 10 years ago)
We have a Oki B4350 In School, No Print With Window 7. Window 7 Recognizes The
Window 7 Recognizes The Printer But No Print, We Can Support Please.
Window 7 Recognizes The Printer But No Print, We Can Support Please.
(Posted by manuvace 10 years ago)
