Memorex Mi1111 Support Question
Memorex Mi1111 Support Question
Find answers below for this question about Memorex Mi1111 - Micro System.Need a Memorex Mi1111 manual? We have 2 online manuals for this item!
Question posted by debragrant on August 27th, 2012
I Am Borrowing This Unit Can I Plug In Additional Speakers? If So How?
Hello,
I am borrowing this unit for my wedding reception. I need to know if I can plug in additional speakers (2) to the back or anywhere on this unit for a surround sound effect. What would I need to get as far as wiring? Can you please let me know asap it is for this Sunday. Thank you Debra
Current Answers
Related Memorex Mi1111 Manual Pages
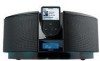
Info Sheet - Page 1

Mi1111
home stereo system for iPod
with CD player + integrated subwoofer
Product Highlights
• Plays and charges all iPod devices with docking capability
• Integrated downfiring subwoofer • Top ...
Info Sheet - Page 2
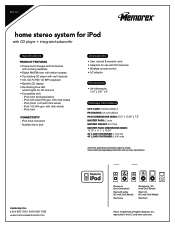
... mini
iPod is a trademark of Apple Computer, Inc., registered in jack
Accessories • User manual & warranty card • Adapters for CD and unit • Compatible with click wheel) -
Mi1111
home stereo system for iPod
with CD player + integrated subwoofer
Specifications
PRODUCT FEATURES
• Powers and charges all iPod devices with docking capability
• Digital...
User's Manual - Page 2

... the literature accompanying the appliance. REFER SERVICING TO QUALIFIED SERVICE PERSONNEL. (This Caution Marking with Rating Label is located at the bottom enclosure of the unit.)
DANGEROUS VOLTAGE:
The lightning flash with arrowhead symbol within an equilateral triangle is intended to alert the user to the presence of important operating...
User's Manual - Page 3

... to radio communications. If this equipment does cause harmful interference to radio or television reception, which the receiver is encouraged to try to correct the interference by turning the equipment...• Consult the dealer or an experienced radio/TV technician for help.
LASER SAFETY: This unit employs a laser. SURGE PROTECTORS: It is no guarantee that to use a surge protector for...
User's Manual - Page 4

...3. IMPORTANT SAFETY INSTRUCTION
Before using the unit, be moved with care. CLEANING Unplug ... injury and serious damage to your home, consult your obsolete outlet. POWER-...system should be blocked by the manufacturer. 8A. For products intended to . 4. or near a swimming pool. 8. If the plug should use liquid cleaners or aerosol cleaners. Any mounting of the polarized plug...
User's Manual - Page 5

...fire, electric shock or other hazards. NOTE TO CATV SYSTEM INSTALLER This reminder is grounded so as contact with respect...that the product is
damaged.
When the power-supply cord or plug is in proper operating condition. 21. b. c. If the ...the wall outlet and refer servicing to service this indicates a need for grounding electrodes. OVERLOADING Do not overload wall outlets and...
User's Manual - Page 6

...Dear Customer: Selecting fine audio equipment such as the unit you've just purchased is only the start of sound. This manufacturer and the Electronic Industries Association's Consumer ... to prevent hearing damage or loss in front of speakers, thunderclap
140
Gunshot blast, jet engine
180
Rocket launching pad
Information courtesy of sound levels is included for a lifetime.
To establish a...
User's Manual - Page 7
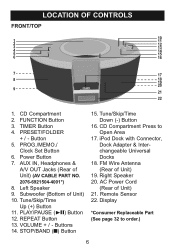
... Button 13. Tune/Skip/Time Down (-) Button
16. AC Power Cord
(Rear of Unit) (AV CABLE PART NO.
2076-6921504-4001*) 8. TIMER Button 4. Subwoofer (Bottom of Unit)
19. CD Compartment Press to order.)
6 Button 5. Right Speaker 20. VOLUME + / - CD Compartment 2. Power Button 7. FUNCTION Button 3. Tune/Skip/Time
Up (+) Button 11. FM Wire Antenna...
User's Manual - Page 9
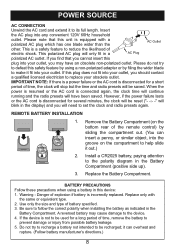
...but the time and radio presets will need to help slide it out.)
2. Install a CR2025 battery, paying attention to be saved. Replace only with a polarized AC plug which has one blade wider than the
...in the display) and you may cause damage to defeat this safety feature by using a battery in this unit is not to be used for a long period of time, remove the battery to
prevent damage or ...
User's Manual - Page 10

...speakers are not listening to the TV, make sure the power is inserted in the jack.
9 The external audio unit's output sound will then be heard through this unit. otherwise, you can connect this unit to the external audio unit... the audio cable when you are automatically disconnected when the headphone plug is off and both units on and press the FUNCTION button on the rear of the ...
User's Manual - Page 11

... 12 hour mode, be set the current minute. Press the PROG./
MEMO./Clock Set button 3 and
the hours will appear in the display when the unit is turned off , press and hold the PROG./MEMO./Clock Set button until "12" or "24" Hour blinks in the display.
NOTE: The time will...
User's Manual - Page 12

... the battery until it is connected to the mode that it will charge until it is connected, this unit, make sure to slide the connector to the left before inserting the dock and dock adapter.
3 (A)...dock's two tabs are facing front, and slip the tabs into the dock, whether this unit is on this unit will change to remove the iPod from the connector first. When the iPod is full. ...
User's Manual - Page 13

... the volume. • To turn this unit on your iPod.
the display will show briefly
"Good Bye" and the display will show briefly "Hello" and the backlight will show the actual ... controls, as per its owner's manual, and the sound will be heard through this unit's speakers.
3
1
4
2
21
To play/pause/stop playback (and turn this unit off the iPod), press the STOP/BAND (I)
button ...
User's Manual - Page 14
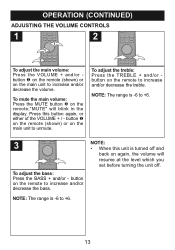
...remote (shown) or on the remote;"MUTE" will resume at the level which you set before turning the unit off.
13 NOTE: • When this button again, or either of the VOLUME + / - To ... the volume.
NOTE: The range is turned off and
back on the main unit to increase and/or decrease the bass.
Press this unit is -6 to unmute. button on the remote to +6. OPERATION (CONTINUED)
ADJUSTING...
User's Manual - Page 15
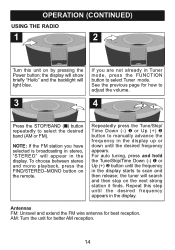
...mode, press the FUNCTION button to select Tuner mode.
Repeat this unit on by pressing the Power button; the display will show briefly "Hello" and the backlight will light blue.
3
1
If you have...it finds.
Antennas FM: Unravel and extend the FM wire antenna for better AM reception.
14 AM: Turn the unit for best reception. Repeatedly press the Tune/Skip/ Time Down (-) 1 or Up (+) 2
...
User's Manual - Page 16

...for AM)
1
Follow Steps 1-3 on the previous page to adjust the volume. • To turn this unit off .
15
Within five seconds, press the PRESET/FOLDER + or - Press the PRESET/ FOLDER + or...MEMO./Clock Set button 2 again to confirm, the station will turn the unit on the previous page to program additional Presets in the display. button repeatedly to select 2a de1sired Preset. Repeat to...
User's Manual - Page 17

... number of tracks will gently press a CD onto the center
show briefly "Hello" and the spindle with this unit on by pressing the Press the "Press to Open" area and
Power button... button to stop . and close the CD compartment.
OPERATION (CONTINUED)
USING A CD WITH THIS UNIT
12
2
1
Turn this unit.
3
4
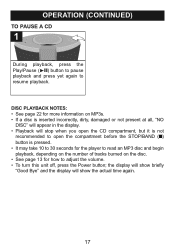
Press the Play/Pause (®p) button to begin playback; NOTE: 3 inch single,...
User's Manual - Page 18
...
playback, depending on the number of tracks burned on the disc. • See page 13 for how to adjust the volume. • To turn this unit off, press the Power button;
User's Manual - Page 19
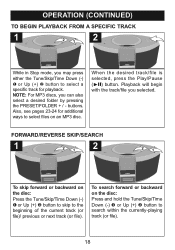
... mode, you can also
select a desired folder by pressing
the PRESET/FOLDER + / -
Also, see pages 23-24 for playback. Playback will begin
specific track for additional
ways to the beginning of the current track (or file)/ previous or next track (or file).
FORWARD/REVERSE SKIP/SEARCH
1
21
2
21
To skip forward...
User's Manual - Page 33
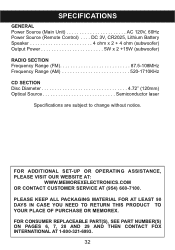
... ALL PACKAGING MATERIAL FOR AT LEAST 90 DAYS IN CASE YOU NEED TO RETURN THIS PRODUCT TO YOUR PLACE OF PURCHASE OR MEMOREX. SPECIFICATIONS
GENERAL Power Source (Main Unit AC 120V, 60Hz Power Source (Remote Control) . . . . DC 3V, CR2025, Lithium Battery Speaker 4 ohm x 2 + 4 ohm (subwoofer) Output Power 5W x 2 +15W (subwoofer)
RADIO SECTION Frequency...
Similar Questions

Looking For Ir Remote Control Codes For A Memorex Mi1111 Home Audio System.
Got an IR Blaster on my (Android) phone & a MI1111 Sound System w/ no control so looking for the...
Got an IR Blaster on my (Android) phone & a MI1111 Sound System w/ no control so looking for the...
(Posted by scart69 10 years ago)

No Sound Coming Through Speakers
I have a Memorex Mi1111 when you play a CD or ipod no sound/music comes through the speakers but you...
I have a Memorex Mi1111 when you play a CD or ipod no sound/music comes through the speakers but you...
(Posted by tonypjames 11 years ago)

Hooking Up External Speakers
(Posted by pontiacgurl2002 12 years ago)
I Have A Memorex Mi1111 Blk Cd Micro System Cd Lid Won't Stay Down
(Posted by reekie1 12 years ago)

I Have Model Number Mks8580 Can I Get A Owners Manual For This Unit.
(Posted by ajwoodall 13 years ago)