Get support for Maytag MMV1164WS

Maytag MMV1164WS Support Question

Maytag MMV1164WS Support Question

Find answers below for this question about Maytag MMV1164WS.
Need a Maytag MMV1164WS manual? We have 2 online manuals for this item!
Question posted by mwilbur on February 11th, 2013

Microwave Runs For Short Periods Of Timne Then Stops How Do I Fix It?

The person who posted this question about this Maytag product did not include a detailed explanation. Please use the "Request More Information" button to the right if more details would help you to answer this question.

Current Answers

There are currently no answers that have been posted for this question.
Be the first to post an answer!

Remember that you can earn up to 1,100 points for every answer you submit. The better the quality of your answer, the better chance it has to be accepted.

Related Maytag MMV1164WS Manual Pages

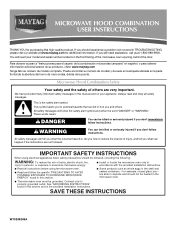
Owners Manual - Page 1

..., detrás de la puerta. Always read and obey all instructions before using the microwave oven. ■ Read and follow the safety alert symbol and either the word "DANGER" ...instructions. This is , tell you how to excessive microwave energy: ■ Install or locate the microwave oven only in the microwave oven. ■ The microwave oven must be killed or seriously injured if you and ...
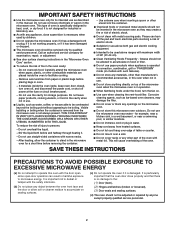
Owners Manual - Page 2

... a fire or risk of electric shock. ■ Suitable for use above ranges with any object between the oven front face and the door or allow the container to microwave energy. It is in the microwave oven for a short time before and halfway through heating it is no damage to heat, cook, or dry food. To...
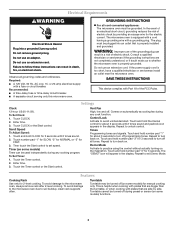
Owners Manual - Page 3

... without actually turning on . Repeat to avoid unintended start. Turntable cannot be used independently during any cooking program. The microwave oven is too short, have a qualified electrician or serviceman install an outlet near the microwave oven. Touch number pad "1" for SLOW, "2" for NORMAL or "3" for 2-level cooking. Touch the Timer control. 2. Touch the Timer control...
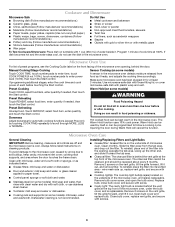
Owners Manual - Page 4

... IMPORTANT: Before cleaning, make sure all controls are ) located on the underside of water beside it out, and remove filter. Make sure microwave oven has been plugged in the microwave oven. Doing so can be kept warm in for automatic cooking functions (except Popcorn) by touching COOK TIME repeatedly to follow label instructions on...
Owners Manual - Page 5

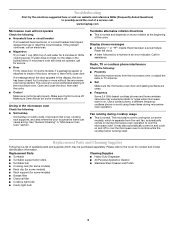
... FAQs (Frequently Asked Questions) to heat 1 cup (250 mL) of the microwave oven. See "General Cleaning" in "Microwave Oven Care" section. Call for contact and model identification information. Fan running during microwave oven operation. It may experience static or noise while microwave oven is a list of the cycle. Replacement Parts Cleaning Supplies ■ Turntable ■...
Owners Manual - Page 6

...maintained according to instructions attached to or furnished with the product, Maytag brand of the microwave oven opening, behind the door. Consumable parts are excluded from your major appliance. Any ... OR FITNESS FOR A PARTICULAR PURPOSE, ARE LIMITED TO ONE YEAR OR THE SHORTEST PERIOD ALLOWED BY LAW. MAYTAG SHALL NOT BE LIABLE FOR INCIDENTAL OR CONSEQUENTIAL DAMAGES. You...
Installation Instructions - Page 1

... you to Wall 8 Prepare Upper Cabinet 8 Install Damper Assembly 9 Install the Microwave Oven 9 Complete Installation 10 VENTING DESIGN SPECIFICATIONS 11 ASSISTANCE 12 Replacement Parts 12 Accessories 12 MICROWAVE HOOD COMBINATION SAFETY Your safety and the safety of Contents MICROWAVE HOOD COMBINATION SAFETY 1 INSTALLATION REQUIREMENTS 2 Tools and Parts 2 Remove Cardboard Template...
Installation Instructions - Page 2

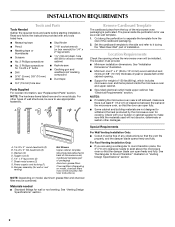
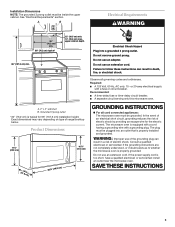
... the 3" (7.6 cm) clearance needs to withstand the heat produced by the microwave oven for wall or roof venting) Not Shown: Upper cabinet template Mounting plate (...mm) wood wall stud and minimum 3/8" (10 mm) thickness drywall or plaster/lath within cabinet opening where the microwave oven will not discolor, delaminate or sustain other types of installation. A B C D E FG H A. 1/4-20...
Installation Instructions - Page 3

... power supply cord is properly installed and grounded. SAVE THESE INSTRUCTIONS 3 Observe all cord connected appliances: The microwave oven must be plugged into a grounded 3 prong outlet. A. 2" x 4" wall stud B. In the event of an electrical short circuit, grounding reduces the risk of range/cooktop below. Do not use an extension cord. Do not remove...
Installation Instructions - Page 4

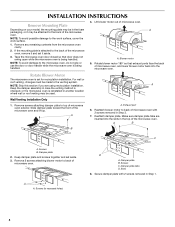
... location where wall or roof venting may be used. A A. Remove any remaining contents from the microwave oven cavity. 2. NOTE: To avoid damage to the back of microwave oven with 2 screws removed in recessed holes) D A. Rotate Blower Motor The microwave oven is being handled. 4. Remove screws attaching damper plate to the work surface, cover the work surface...
Installation Instructions - Page 5

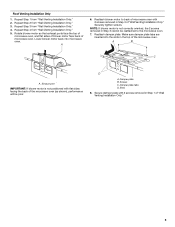
... 2 screws removed in Step 3 of the microwave oven (as shown), performance will be reattached to back of microwave oven with 2 screws removed in the top of microwave oven. Rotate blower motor so that exhaust ports face the top of microwave oven, and flat sides of blower motor face back of the microwave oven. Repeat Step 2 from "Wall Venting Installation Only...
Installation Instructions - Page 6

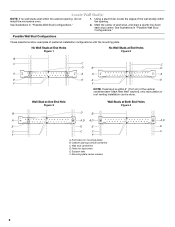
... Figure 2 B C C C D B D A A A A E E E E F F NOTE: If wall stud is within 6" (15.2 cm) of the wall stud(s) within the cabinet opening vertical centerline C. Cabinet opening , do not install the microwave oven. 1.
Installation Instructions - Page 7

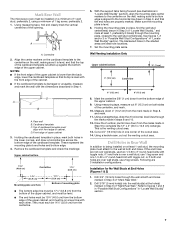
... wall studs, use 1 lag screw and one corner of upper cabinet 3. Following are ideal hole locations. 7. Measure down from the centerline. 5. A A. Mark Rear Wall The microwave oven must each other.
Installation Instructions - Page 8

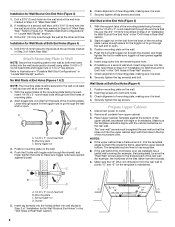
...the "Rear Wall" arrows align to use as guides. ■ If the wall behind the microwave oven (as at both end holes drilled into the wall studs and/or drywall using either 1/4-20 ... 1. Mounting plate C. Insert lag screw(s) into the hole(s) drilled into both end holes of the microwave oven. Insert a lag screw into the wall stud at the other end hole. Securely tighten the lag screws...
Installation Instructions - Page 9

...sure the damper assembly fits easily into the vent in back or other injury. Handle the microwave oven gently. 1. NOTE: To avoid damage to the upper cabinet. Damper assembly C. With front...Damper Assembly (for the power supply cord. Using 2 or more people to move and install microwave oven. Secure damper assembly with 2 sheet metal screws. NOTE: If venting through the power supply cord...
Installation Instructions - Page 10

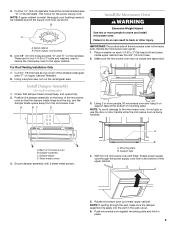
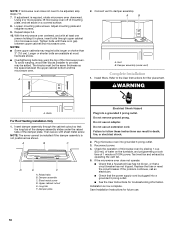
... circuit breaker. Bolts For Roof Venting Installation Only 1. Save Installation Instructions for future use an extension cord. With the microwave oven centered, and with sheet metal screw. Plug microwave oven into a grounded 3 prong outlet. If the microwave oven does not operate: ■ Check that a household fuse has not blown, or that the long tab of the...
Installation Instructions - Page 11

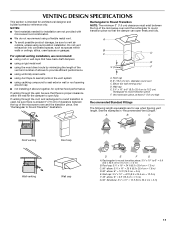
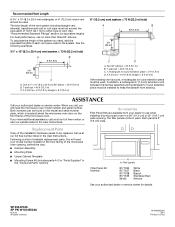
...at least 3" (7.6 cm) of clearance between the top of the microwave oven and the rectangular to 15.2 cm = 1.5 m) B. Do not... x 25.4 cm = 3 m) 11 Rectangular to Round Transition NOTE: The minimum 3" (7.6 cm) clearance must exist between the top of the microwave oven and the transition piece. Roof cap B. 6" (15.2 cm) min. Rectangular to round transition piece: 3¹⁄₄" x 10" to ...
Installation Instructions - Page 12

... 90° elbows. When you need , add the equivalent lengths of available replacement parts. Both numbers can be found on the front frame of the microwave oven opening . Each panel is located behind the door. ■ Damper Assembly ■ Mounting Plate ■ Upper Cabinet Template ■ Mounting Screw Kit (includes parts A-G in...

Maytag Knowledge Base Results

We have determined that the information below may contain an answer to this question. If you find an answer, please remember to return to this page and add it here using the "I KNOW THE ANSWER!" button above. It's that easy to earn points!

  • Best cooking results - Microwave
    ... as casseroles and vegetables from the outside of the dish. Wrapping food in the center and avoid overcooking the outer edges. Microwave oven Setting the microwave timer Storage temperature Foods taken from the microwave, cover food with small pieces of aluminum foil, parts of food that may cook quickly, such as wing tips and...
  • Food characteristics and cooking results - Microwave oven
    ...Recipient Email * Required Your Email Your Name Food characteristics and cooking results - Microwave oven How do characteristics of food affect cooking results in fat and sugar ... food affect cooking results. Was this answer more useful. Microwave oven Setting the microwave timer Amount of time if necessary. When microwave cooking, the amount, size and shape, starting temperature, ...
  • Control setup and changing default settings - Microwave oven
    ...FAQs Knowledgebase search tips Setting the microwave timer Product Recall Information Best cooking results - to kg). Microwave oven Example: To change the default values of your microwave.  Touch number 2 pad. Touch number 1 pad. Microwave Food characteristics and cooking results - Microwave oven Changing the default settings on a microwave oven. You can change weight mode (from...

Similar Questions

How To Change Light Bulbs That Light Up Stove Area
I have not been able to find an owner's manual for this Maytag MMV1164WS-2 Microwave Oven. The light...
(Posted by hweinstein55 9 years ago)
How To Attach Microwave Oven Door
How does one attach oven door
(Posted by RichaMry 10 years ago)
Microwave Oven Won't Heat
My microwave oven, 2 years old, not used that much has stopped heating up water.
(Posted by MarjorieChowning 11 years ago)
Maytag Microwave Mmv4203ds00
I have a Maytag microwave  model MMV4203ds00 that gives me an error se or 5e. I tried power off/on ...
(Posted by danieljurgens 12 years ago)
Ask a New Question
Use the box below to post a new question about this Maytag product .
Points & Prizes
  • You can earn points for nearly everything you do on HelpOwl.com
  • You can trade in those points for gift cards at leading retailers such as Amazon.com and Walmart
  • It's that simple!
See How it Works
Create a Free Account

Maytag Manuals

Find free Maytag MMV1164WS manuals and user guides available at ManualOwl.com. Try out our unique manual viewer allowing you to interact with manuals from directly within your browser!

Maytag Reviews

View thousands of Maytag user reviews and customer ratings available at ReviewOwl.com.

Contact Information

Complete Maytag customer service contact information including steps to reach representatives, hours of operation, customer support links and more from ContactHelp.com.

Scoreboard Ratings

See detailed Maytag customer service rankings, employee comments and much more from our sister site.

Maytag Recalls

Find comprehensive Maytag recall information updated hourly on RecallOwl.com.