Maytag MGDE200XW Support Question
Maytag MGDE200XW Support Question
Find answers below for this question about Maytag MGDE200XW.Need a Maytag MGDE200XW manual? We have 2 online manuals for this item!
Question posted by sdanatos on January 20th, 2016
Moved Dryer Now 'grinds'
Recently moved Maytag Dryer model MGDE200XW without accident. Sadly when started at the new location it "grinds" I suspect the moved may have dislodged the drum. Can I reset this or do I need a service tech?
Current Answers
Answer #1: Posted by Odin on January 20th, 2016 5:03 PM
Odin

Member since:
April 10th, 2010 Points: 41,236,700

Member since:
April 10th, 2010 Points: 41,236,700
See if one of the causes detailed at http://www.repairclinic.com/RepairHelp/How-To-Fix-A-Dryer/10-4--TUdERTIwMFhX/Maytag-Dryer-makes-noise fits. Good luck!
Hope this is useful. Please don't forget to click the Accept This Answer button if you do accept it. My aim is to provide reliable helpful answers, not just a lot of them. See https://www.helpowl.com/profile/Odin.
Related Maytag MGDE200XW Manual Pages
Owners Manual - Page 2
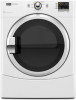
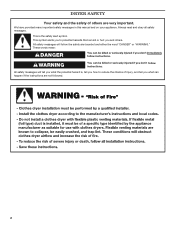
... kill or hurt you and others are not followed.
2
All safety messages will follow the safety alert symbol and either the word "DANGER" or "WARNING."
DRYER SAFETY
Your safety and the safety of injury, and tell you what can happen if the instructions are very important. All safety messages will tell...
Owners Manual - Page 3
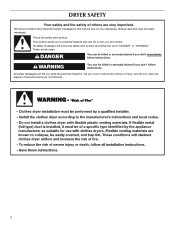
...room, building, or area of all occupants. • Immediately call the re department.
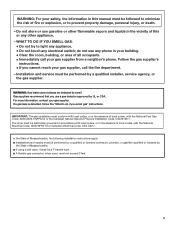
- The dryer must be electrically grounded in accordance with local codes, or in the absence of local codes, with ... vapors and liquids in the vicinity of this manual must be performed by a quali ed installer, service agency, or the gas supplier.
3 WARNING: For your safety, the information in your gas supplier...
Owners Manual - Page 4
... flammable on the next page.
4 Items containing foam, rubber, or plastic must be detected by smell.
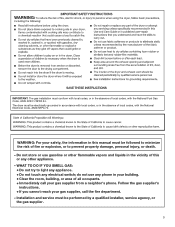
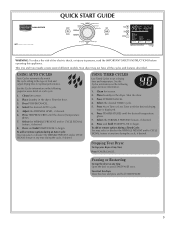
Quick Start Guide/Dryer Use
WARNING
WARNING
Explosion Hazard
Keep flammable materials and vapors, such as gasoline, away from dryer.
Failure to follow the "What to follow these instructions can completely remove oil.
Fire Hazard
No washer...
Owners Manual - Page 5
... time
Press POWER/CANCEL. QUICK START GUIDE
temperatures
dryness level
cycle signal
WARNING: To reduce the risk of load and adjust drying time for more detail on the following pages for optimal performance. Shut the door.
3.
Press and hold START/PAUSE
5 Place laundry in the dryer. Press and hold START/PAUSE to set a drying time...
Owners Manual - Page 7

... Auto Cycle when the laundry is opened, and then the light will continue to press the POWER/CANCEL button before the cycle has ended.
■■ The WRINKLE PREVENT feature is unlocked. This ends the current cycle
and turns the dryer OFF. 2. Select the desired cycle and options. 4. The dryer starts at any time...
Owners Manual - Page 8
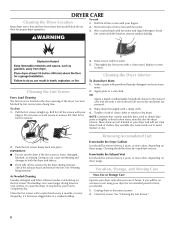
...A screen blocked by a qualified servicer. Roll lint off the screen ...Dryer Cabinet Lint should : 1. Vacation, Storage, and Moving Care
Non-Use or Storage Care
Operate your load is located in dryer...dryer during removal, check the exhaust hood and remove the lint. As Needed Cleaning Laundry detergent and fabric softener residue can cause overheating and damage to remove.
Wet both the dryer...
Owners Manual - Page 9
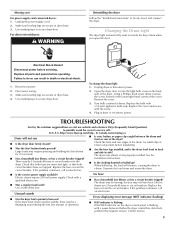
... fuse or reset the circuit breaker.
Use masking tape to locate, level, and connect the dryer. Make sure leveling legs are intact and tight, or that both fuses are secure in dryer base. 4. Open the dryer door. Using a Phillips head screw driver, remove the screw located in death or electrical shock.
1. Check that requires service. The dryer may...
Owners Manual - Page 10
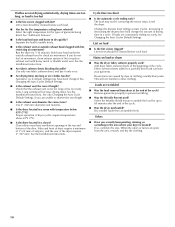
...dryer located in clothing (usually blue jeans). Proper operation of drying time in the area where your hand under the outside exhaust hood clogged with heavy metal or flexible metal vent. Cycle time too short
■■ Is the automatic cycle ending early? Stains on load or drum... that the exhaust vent is located?
If you recently been painting, staining, or varnishing in a cycle.
Owners Manual - Page 11
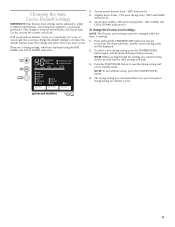
... affect all of your Auto Cycles. The dryer will beep, and the current drying mode will be changed while the dryer is shown. To select a new drying setting, press the TEMPERATURES button again ...
4. If all of your Auto Cycles, not just the current cycle/load. Press the START/PAUSE button to save the drying setting and exit to different installations, environmental conditions, or personal...
Installation Instructions - Page 2
... either the word "DANGER" or "WARNING."
WARNING
You can be killed or seriously injured if you what can kill or hurt you don't follow instructions.
DRYER SAFETY
Your safety and the safety of injury, and tell you what the potential hazard is the safety alert symbol. We have provided many important...
Installation Instructions - Page 3
... type. � A flexible gas connector, when used, must not exceed 3 feet.
3 Installation and service must conform with local codes, or in the absence of fire or explosion, or to prevent property damage,..."What to light any appliance. • Do not touch any other appliance. - The dryer must be performed by a qualified or licensed contractor, plumber, or gasfitter qualified or licensed by...
Installation Instructions - Page 4
... package is located in garages, closets, mobile homes, or sleeping quarters.
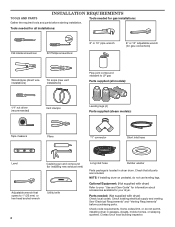
Some codes limit, or do not use leveling legs. Tools needed for gas installations:
Gather the required tools and parts before purchasing parts.
Check existing electrical supply and venting. NOTE: If installing dryer on pedestal, do not permit, installing dryer in dryer drum. Check code...
Installation Instructions - Page 5
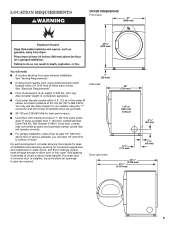
...appliances and clearances for ease of installation and servicing; Add spacing on all sides of 200 lbs. (90.7 kg). If using a pedestal, you will need 18" (460 mm) to reduce noise ...located within 2 ft. (610 mm) of either side of 20-100 psi (137.9-689.6 kPa). LOCATION REQUIREMENTS
DRYER DIMENSIONS Front view:
27" (686 mm)
35 3/8"
(899 mm)
You will need :
■■ A location...
Installation Instructions - Page 6
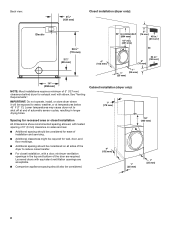
...be considered for ease of installation and servicing.
■■ Additional clearances might be required for exhaust vent with elbow. IMPORTANT: Do not operate, install, or store dryer where it will be considered.
4"...spacing of 0" (0 mm) clearance on all sides of 5" (127 mm) clearance behind dryer for wall, door, and floor moldings.
■■ Additional spacing should also be ...
Installation Instructions - Page 7
...into dryer. For further information, see "Assistance or Service" section in "Assistance or Service" section of your "Use and Care Guide".
For further information, please reference service numbers located in...
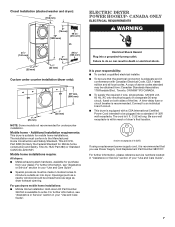
1" (25 mm)
Custom under counter installation (dryer only):
39" min. (990 mm)
1" (25 mm)
1" (25 mm)
NOTE: Some models not recommended for Mobile home construction and Safety, Title...
Installation Instructions - Page 8
... to whether the dryer is located on the rating plate in a risk of malfunction or breakdown, grounding will not fit the outlet, have the correct burner for electric current.
It is properly installed and grounded in a risk of a qualified person include: licensed heating personnel, authorized gas company personnel, and authorized service personnel.
Do...
Installation Instructions - Page 9
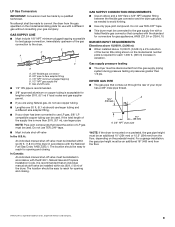
... an elbow and a 3/8" flare x 3/8" NPT adapter fitting
between the flexible gas connector and the dryer gas pipe, as needed to flare adapter fitting C. 1/8" NPT minimum plugged tapping D. 1/2" NPT gas supply line E. Gas...the total length of the gas connection to convert the dryer from the floor, depending on the pedestal model. The location should use TEFLON®† tape.
■■...
Installation Instructions - Page 10

...9632; Must be used .
■■ Do not use duct tape.
For more information, see "Assistance or Service" section in enclosed walls, ceilings, or floors. ■■ The total length should not exceed 7 3/4 ... from entire length of duct and catch lint. Vent products can result in final dryer location. ■■ Remove excess to avoid
crushing and kinking. Only rigid or flexible...
Installation Instructions - Page 12
...will :
■■ Shorten life of dryer.
■■ Reduce performance, resulting in longer drying times and increased energy usage.
Run vent to dryer location using elbows or making turns, allow as... opening around exhaust hood.
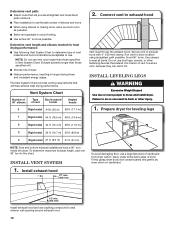
12 Secure vent to move and install dryer. Vent System Chart
Number of 90° elbows
Type of dryer. Connect vent to seal all joints. INStall VENT...
Installation Instructions - Page 15
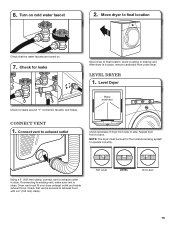
... to final location. Avoid crushing or kinking vent. Level dryer
1. Check that the water faucets are turned on cold water faucet
2.
Connect vent to exhaust outlet
Place level here
Check levelness of dryer from under dryer. Check for leaks around "Y" connector, faucets, and hoses. Level Dryer
Check for leaks
Move dryer to side. NOTE: The dryer must fit...
Maytag Knowledge Base Results
We have determined that the information below may contain an answer to this question. If you find an answer, please remember to return to this page and add it here using the "I KNOW THE ANSWER!" button above. It's that easy to earn points!-
Can I change the door-swing direction? - Front-load washer
Can I change the door-swing direction? - No. The washer door is not reversible. However, the dryer door can be reversed. See the Dryer Installation Instructions for details. Dryer Moving your dryer model number in the search tool below to find them online. Can I change the door-swing direction on my front-load washer... -
My Bravos® washer is not rinsing loads well. What is causing this? Dispensers in Corners
...needed for colder water temperatures. Leave enough space in the washer to allow it to fully rinse it will be selected after the tub has started on some models) option selected? Did you washing a large load? Older laundry...;to move freely. Clothing that is used, it away. Always use only HE High Efficiency detergent. Reduce load size if needed. Use... -
Display shows AF - Dryer
... dryer drum after the cycle has ended. Replace any plastic or metal foil vent with lint? Box or louvered hoods are recommended. Check for 5-10 minutes. Hold your hand under the outside exhaust hood clogged with rigid or flexible heavy metal vent. Each additional elbow in a new location or is free of the dryer...
Similar Questions

Maytag Dryer Model Med9800tq0 Won't Start
(Posted by bop27jtom 9 years ago)

Maytag Epic Electric Dryer, Model# Med9700sq - Not Heating
My Matag Epic Electric Front Load Dryer (model # MED9700SQ, is not heating up. The drum turns and ev...
My Matag Epic Electric Front Load Dryer (model # MED9700SQ, is not heating up. The drum turns and ev...
(Posted by Anonymous-122272 10 years ago)

Maytag Dryer Model Medc400vw Won't Start
(Posted by jneadw 10 years ago)

I Have A Maytag Front Loading Electric Dryer Model Med9600 Sq0. When I Attempt T
I have a Maytag front loading electric Dryer model MED9600 SQ0. When I attempt to start it by pressi...
I have a Maytag front loading electric Dryer model MED9600 SQ0. When I attempt to start it by pressi...
(Posted by wrzimmerly 10 years ago)

Dryer Not Completely Drying ( Damped Clothes) On 'normal Cylcle'
(Posted by armseahawk 11 years ago)