Maytag MGD6230HW Support Question
Maytag MGD6230HW Support Question
Find answers below for this question about Maytag MGD6230HW.Need a Maytag MGD6230HW manual? We have 4 online manuals for this item!
Current Answers
Answer #1: Posted by Odin on April 24th, 2021 10:17 AM
Odin

Member since:
April 10th, 2010 Points: 41,236,670

Member since:
April 10th, 2010 Points: 41,236,670
See https://www.hunker.com/13410268/how-to-take-a-maytag-dryer-apart,
If the issue persists or if you require further advice--or if the instructions don't seem to apply--you may want to consult the company: use the contact information at https://www.contacthelp.com/maytag/customer-service.
Hope this is useful. Please don't forget to click the Accept This Answer button if you do accept it. My aim is to provide reliable helpful answers, not just a lot of them. See https://www.helpowl.com/profile/Odin.
Related Maytag MGD6230HW Manual Pages
Dimension Guide - Page 1

Gas
Metallic Slate Available MED6230HC - Dimension Guide
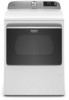
Maytag® Dryer with Extra Power and Advanced Moisture Sensing - 7.4 cu.
White Available MED6230HW - Gas
41 1∕4" Height
W11412672B
29 7∕8" Depth
27" Width Electric MGD6230HC - Electric MGD6230HW - ft.
Owners Manual 1 - Page 5
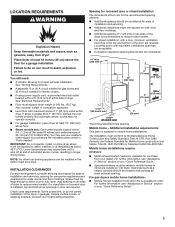
... Safety Standard, Title 24 CFR, Part 3280 (formerly the Federal Standard for electric dryers. ■ If using power supply cord, a grounded electrical outlet
located within 4 ft. (1.2 m) of the water fill valves, and water pressure of dryer to order. Mobile home installations require: All dryers:
■ Metal exhaust system hardware, available for wall, door,
and floor...
Owners Manual 1 - Page 6
... section.
■ A 4-wire power supply connection must be removed from the external ground connector (green screw), and secured under the neutral terminal ...dryer cabinet is installed in ring terminals or spade terminals with clothes dryers.
If using and follow the instructions provided for homes built after 1996, dryer circuits involved in conformance with a 3-wire electrical...
Owners Manual 1 - Page 7

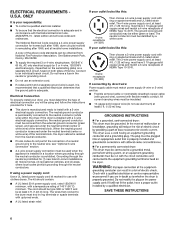
ELECTRIC DRYER POWER HOOKUPCANADA ONLY
ELECTRICAL REQUIREMENTS
GAS DRYER POWER HOOKUP U.S.A. It is your "Quick Reference Guide." This dryer is equipped with all local codes and ordinances. grounding conductor can result in a risk of least resistance for electric... not remove ground prong.
Failure to follow these instructions can result in accordance with Canadian Electrical Code...
Owners Manual 1 - Page 9

... amp power supply cord.
Screw in death, fire, or electrical shock. Failure to its final location.
Slide the dryer until bottom of foot is close to do not permit connection of dryer.
Prepare dryer for leveling legs
Firmly grasp dryer body (not console panel) and gently lay dryer down Kit. Connect remaining 2 supply wires to connect the...
Owners Manual 1 - Page 11

..., reinsert tab of terminal block cover into slot of power supply cord to external ground conductor screw (A). Tighten screw.
11
Remove center screw
B A
Connect ground wire (F) (green or bare) of dryer rear panel. Connect neutral wire (white or center) (C) of power supply cord under center terminal block screw (B). Connect neutral ground wire
and...
Owners Manual 1 - Page 12

...relief. Disconnect power before making electrical connections. Securely tighten all electrical connections. Prepare your wiring looks... (B).
Connect remaining wires
Put the threaded section of dryer rear panel. Connect remaining 2 supply wires to "4-Wire Direct ...hole below the terminal block opening , screw the removable conduit connector (A) onto the strain relief threads.
2....
Owners Manual 1 - Page 13

...block screws (hooks facing right). Squeeze hooked ends together and tighten screw.
4. Remove center terminal block screw (B).
13 Squeeze hooked ends together and tighten screws. ...block cover into hooks.
2. Remove neutral ground wire (E) from end of terminal block (B).
Remove center screw
B A
Connect ground wire (green or bare) (F) of dryer rear panel. If using 3-wire cable ...
Owners Manual 1 - Page 14

... a separate copper ground wire (G) from external ground conductor screw (A).
14 A
Remove center terminal block screw (B). Squeeze hooked end together. Squeeze hooked ends together and...hooked end of neutral wire (white or center) (C) of dryer rear panel. Connect remaining wires
Place hooked ends of dryer rear panel. 3. Secure cover with a qualified electrician that this grounding...
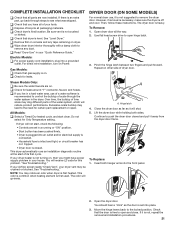
Owners Manual 1 - Page 21

... drive to
remove any tape remaining on Power.
Hinge latch 4. q Check dryer's final location. Pinch the hinge latch between two fingers and pull forward.
q Read "Dryer Use" in the dryer. Excessive scale buildup may clog different parts of /recycle all the way. 2. Electric Models:
q For power supply cord installation, plug into the front panel.
1
2. The odor...
Owners Manual 1 - Page 22
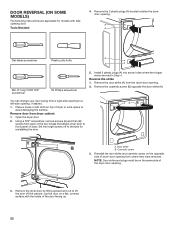
... Step 4. Reverse the strike 1. You can change your door swing from the dryer door opening , if desired.
1. Remove door from each of the two hinges that attach dryer door to front panel of dryer. Tools Needed:
4.
A B
A B
A B
3. Cosmetic screw
3. Remove the door strike (A) from a right-side opening to a left-side opening .
2. Set the hinge screws off the...
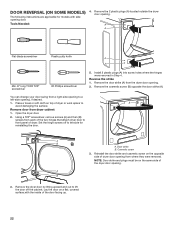
Owners Manual 1 - Page 24

...trim pieces to the side. 7. Remove the door hinges and set off to the opposite side from the inside door panel and then rotate and push out ...Remove the 3 screws down the left and right sides of the door.
6. Insert door strike on the other side of dryer door by pinching the clips from which they were removed. Then screw trim pieces back in and then add the door strike plug.
8. 5. Remove...
Owners Manual 1 - Page 28

... it will be on water faucet. 2. Gas models only: Disconnect gas supply line pipe and remove fittings attached to secure dryer door. 9. Use tape to dryer pipe. 4.
Reconnect water inlet hose to secure dryer door. 7. Replace all parts and panels before servicing. Gas models only: Close shut-off water faucet. 3. Transport hose separately. 7. Shut off...
Owners Manual - Page 5

... Standard, Title 24 CFR, Part 3280 (formerly the Federal Standard for electric dryers. ■■ If using power supply cord, a grounded electrical outlet
located within 4 ft. (1.2 m) of the water fill valves...at least 18" (460 mm) above the floor for mobile home installations. See "Electrical Requirements." ■■ Floor must be installed in your washer's water supply by ...
Owners Manual - Page 7

... a grounded 3 prong outlet. The plug must be grounded.
GROUNDING INSTRUCTIONS
I For a grounded, cord-connected dryer: This dryer must be plugged into an appropriate outlet that the electrical connection is required.
Be sure wall
receptacle is properly grounded. Do not remove ground prong. Check with all local codes. Connect to be grounded. A time-delay fuse...
Owners Manual - Page 9

...avoid damaging the back of the dryer.
2. IMPORTANT: If laying dryer on its feet. Use a UL listed strain relief. Securely tighten all electrical connections.
Mobile home installations require ... the dryer was packed with either a power supply cord or a direct wire connection.
9
Prepare dryer for leveling legs
Firmly grasp dryer body (not console panel) and gently lay dryer down Kit...
Owners Manual - Page 12

... 10 gauge copper wire. Cut 11/2" (38 mm) from end of dryer rear panel.
A ttach direct wire cable to strain
relief
Connect remaining wires to "Venting Requirements." Tighten screws. Now, go to outer terminal block screws.
Securely tighten all electrical connections. Unscrew the removable conduit connector (A) and any screws from a 3/4" (19 mm) UL Listed...
Owners Manual - Page 21
... product performance. Continue to open and close.
The dryer door is not crushed
or kinked.
Electric Models:
q For power supply cord installation, plug into the front panel.
1
2. Use flat head screw drive to push the dryer door closed . "See Troubleshooting." Then, follow these instructions. See "Level Dryer." The odor will receive L2 code for certain...
Owners Manual - Page 22
...,with side
opening .
Door strike B. The following instructions are applicable for reinstalling the door. Remove door from each of the two hinges that attach dryer door to front panel of dryer or work space to a left-side opening from the dryer door opening .
22
You can change your door swing from a right-side opening to...
Owners Manual - Page 28
... of time, you are secure in death or electrical shock. Plug in dryer or reconnect power as described in gas supply line...panels before
moving your dryer for an extended period of hose failure.
For direct-wired dryers: 1. Transport hose separately. 5. Make sure leveling legs are away. Use tape to a water pressure surge) while you should: 1. On models with base trim: Remove...
Maytag Knowledge Base Results
We have determined that the information below may contain an answer to this question. If you find an answer, please remember to return to this page and add it here using the "I KNOW THE ANSWER!" button above. It's that easy to earn points!-
Loads are damp; dryer does not dry
Damp loads or long drying time - Electric Dryer Dryer does not heat - Electronic controls with digital displays: Changing the Preset Dryness... new preset drying setting for all of your Automatic Dry or Sensor Dry cycle times. Gas Dryer Cycle is shown. Dryer For dryers with digital display - Loads are 3 drying settings: ... -
My dryer or load has an odor
... wet load left in the washer or dryer for the first time? (Electric dryers) A new electric heating element may have an odor. My dryer makes sounds or vibrations Fabric is located? A wet load left in odors. Rewash and dry the load to remove the odors. Promptly remove loads from the area, rewash and dry... -
Dryer does not heat - Gas dryer
...details. - Open the gas shutoff valve in the supply line. The valve is open when the handle is closed. Electric dryer The Air Fluff or Air Only temperature does not add to dry. Air Fluff or Air Only temperature can... Expect loads dried with the Air Fluff or Air Only temperature to take longer to the dryer. Dryer does not heat - Gas dryer My gas dryer does not .
Similar Questions

Manual For Electric Dryer
need a care and use manual for Maytag electric dryer MEDB755DW
need a care and use manual for Maytag electric dryer MEDB755DW
(Posted by leoladillon 7 years ago)

Maytag 3000 Series Electric Dryer Getting Extremely Hot!
My MEDE300VW0 Dryer is getting way too hot on every cycle. We cleaned out the vents. Even on air dry...
My MEDE300VW0 Dryer is getting way too hot on every cycle. We cleaned out the vents. Even on air dry...
(Posted by angietorix 9 years ago)

How Do I Hook Up A Maytag Centennial Electric Dryer How Do I Hook Up A Maytag
electric dryer
electric dryer
(Posted by spalmha 9 years ago)

Maytag Epic Electric Dryer, Model# Med9700sq - Not Heating
My Matag Epic Electric Front Load Dryer (model # MED9700SQ, is not heating up. The drum turns and ev...
My Matag Epic Electric Front Load Dryer (model # MED9700SQ, is not heating up. The drum turns and ev...
(Posted by Anonymous-122272 10 years ago)

I Have A Maytag Front Loading Electric Dryer Model Med9600 Sq0. When I Attempt T
I have a Maytag front loading electric Dryer model MED9600 SQ0. When I attempt to start it by pressi...
I have a Maytag front loading electric Dryer model MED9600 SQ0. When I attempt to start it by pressi...
(Posted by wrzimmerly 10 years ago)