Maytag MEDX700XL Support Question
Maytag MEDX700XL Support Question
Find answers below for this question about Maytag MEDX700XL.Need a Maytag MEDX700XL manual? We have 2 online manuals for this item!
Question posted by lowlow317 on January 17th, 2014
How To Hook Up Electric Wire Cable
new electric dryer. Cable has 4 colors. blue red black and white. Screw termal is not color coded Where to the wires go
Current Answers
Related Maytag MEDX700XL Manual Pages
Owners Manual - Page 2
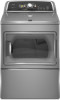
DRYER SAFETY
2
Owners Manual - Page 4
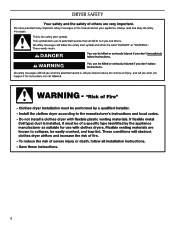
... Cycles to efficiently dry laundry. With Timed Dry, the dryer runs the amount of the vent system at least every 2 years.
Good air flow
Along with heat, dryers require good air flow ..., be paid by the customer, regardless of vent possible. n Clear away items from the dryer. The dryer will reduce your drying times and improve your lint screen before each bend and curve reduces air...
Owners Manual - Page 5

... only) Use the Dryness option to start a cycle, or press once while a cycle is in your laundry load. Dryness Level (for use with Sensor Cycles only) Selecting the Damp Dry Signal will remain on a... in a mixed load to select available cycles on all features and options are available on your dryer. NOTE: When the Wrinkle Prevent setting is selected and the End Signal is useful when you ...
Owners Manual - Page 7

...laundry in your fingers. Temperature Tips If your dryer has multiple heat settings: A High heat setting may be used for drying heavyweight items such as lingerie.
Roll lint off the screen with your load.
USING YOUR DRYER...sheets, blouses, dresses, underwear, permanent press fabrics, and some knits.
Load the dryer
Clean the lint screen before each load. Use a no heat (air dry) ...
Owners Manual - Page 10

...more often, depending on the lint screen. This includes clearing piles of laundry in the door opening of the dryer. These stains are not harmful to remove residue buildup.
4. To wash.... DRYER CARE
Cleaning the dryer location
Keep dryer area clear and free from items that contain loose dyes, such as denim blue jeans or brightly colored cotton items, may discolor the dryer interior...
Owners Manual - Page 11
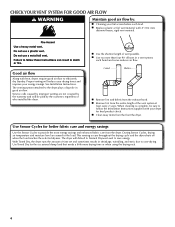
... when you may change the default settings to increase the default dryness level. Clean lint screen.
For direct-wired dryers: 1. Use tape to save the new dryness level setting.
11 Replace the bulb with the screw.
4.
Before starting a cycle, press and hold the TEMP LEVEL
button for an extended period of the cover. Press...
Owners Manual - Page 12

... may vibrate if not properly installed. Exhaust vent or outside exhaust hood to vibrate. Replace the fuse or reset the circuit breaker.
Electric dryers use 2 household fuses or circuit breakers.
Dryer located in a closet. Electric dryers use 2 household fuses or circuit breakers. Separate the load to dry quickly. Exhaust vent the correct length?
For gas...
Owners Manual - Page 13

... tumble freely. Odors
Have you experience
Possible Causes
Solution
Dryer displaying code message
Cycle time too short
"PF" (power failure), Start LED flashes "F# E#" (F1 E1, F3 E1, etc.) variable service codes. Load is too hot
Is the electric dryer being used . Were laundry items removed from the dryer before each load.
This reduces overdrying.
13 Press START...
Owners Manual - Page 14

...inaccessible location or is not installed in accordance with electrical or plumbing codes, or use of your major appliance to better ... SHALL BE PRODUCT REPAIR AS PROVIDED HEREIN.
MAYTAG® LAUNDRY WARRANTY
LIMITED WARRANTY
For one year from the date of ...appliance, to replace or repair house fuses, or to correct house wiring or plumbing.
3. You must be repaired in the United States or...
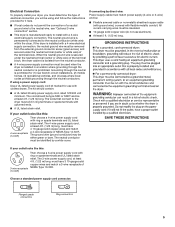
Installation Instructions - Page 3

...socket wrench
Utility knife
Tape measure Level
Pliers
Caulking gun and compound (for installing new exhaust vent)
You will need:
■■ A location allowing for proper exhaust... knife 3 Tools needed : Check local codes. The wires that all parts are included. Location Requirements
Adjustable wrench that opens to the dryer must end in dryer drum. See "Venting Requirements."
■&#...
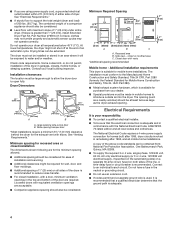
Installation Instructions - Page 4
...)
A
*29 1/2" (749 mm)
27" (687 mm)
B
A. The National Electrical Code requires a 4-wire power supply connection for homes built after 1996, and all local codes and ordinances. ■■ If you are for the minimum spacing allowed.
■■ Additional spacing should be obtained from your dryer at least twice as large as a nearby window) should...
Installation Instructions - Page 5
... by direct wire: Power supply cable must match power supply (4-wire or 3-wire) and be:
■■ Flexible armored cable or nonmetallic sheathed copper cable (with ground wire), covered with ring or spade terminals and UL listed strain relief. Grounding through the neutral conductor is manufactured ready to the neutral conductor (white wire) within the dryer. Electrical Connection
To...
Installation Instructions - Page 6

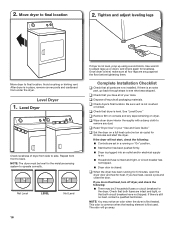
... legs, find diamond marking. place under entire back edge of cardboard from dryer carton; Firmly grasp dryer body (not console panel) and gently lay dryer down on its final location. Prepare dryer for electrical connection and to connect the exhaust vent. Install Leveling Legs 2. Screw legs into leg holes by hand. Use a wrench to its feet...
Installation Instructions - Page 7

.... Hole below terminal block cover
7
Remove hold-down screw E. External ground conductor screw C. Center terminal block screw D. Power Supply Cord
Electrical Connection
Direct Wire
Electrical Connection Options
1. Then go to "Venting Requirements." Then go to "Optional 3-wire Connection" section. NOTE: If local codes do not permit connection of a cabinet-ground conductor to...
Installation Instructions - Page 8
...
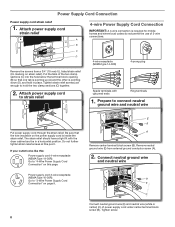
2. Connect neutral ground wire
and neutral wire
B E
C
Connect neutral ground wire (E) and neutral wire (white or center) (C) of ...codes do not permit the use of 3-wire connections.
4-wire receptacle (NEMA type 14-30R)
4-prong plug
Remove the screws from external ground conductor screw (A).
2. Put the tabs of power supply cord under center terminal block screw (B). Power supply cord 3-wire...
Installation Instructions - Page 9

... 10-30R)
3-prong plug
Connect remaining wires to "Venting Requirements." Connect remaining wires
Remove center terminal block screw (B).
2. Now, go to "Venting Requirements."
3-wire Power Supply Cord Connection
IMPORTANT: Use where local codes permit connecting cabinet-ground conductor to outer terminal block screws. Connect neutral wire (white or center) (C) of power supply cord...
Installation Instructions - Page 10

... have a tight fit with the dryer cabinet and be moved if needed. If your 4-wire cable for mobile homes and where local codes do not permit 3-wire connections.
1. Attach direct wire strain relief
A
B C
4-wire Direct Wire Connection
IMPORTANT: A 4-wire connection is required for
direct connection
(251"mm)
Unscrew the removable conduit connector (A) and any screws from end of outer covering...
Installation Instructions - Page 11

... wire (white or center wire) (C) of direct wire cable to neutral wire.
1. If using 3-wire cable with ground wire, cut bare wire even with hold-down screw. Remove center screw
B
AF Connect ground wire (green or bare) (F) of direct wire cable under outer terminal block screws (hooks facing right). 3. Connect ground wire
3-wire Direct Wire Connection
IMPORTANT: Use where local codes...
Installation Instructions - Page 12

...
Connect neutral ground wire (E) and neutral wire (white or center wire) (C) of direct wire cable under center terminal block screw (B). Remove neutral ground wire (E) from external ground conductor screw (A). 12
Connect a separate copper ground wire (G) from the external ground conductor screw (A) to connect neutral
ground wire and neutral wire
Place hooked ends of dryer rear panel. Finally...
Installation Instructions - Page 16
... close the door. If there is an extra
part, go away. 2. q When the dryer has been running or "On" position.
■■ Start button has been pushed firmly.
■■ Dryer is plugged into an outlet and/or electrical supply is on.
■■ Household fuse is intact and tight, or circuit breaker...
Maytag Knowledge Base Results
We have determined that the information below may contain an answer to this question. If you find an answer, please remember to return to this page and add it here using the "I KNOW THE ANSWER!" button above. It's that easy to earn points!-
Wrinkles in load after Steam cycle - Steam dryer
... damp; Steam dryer Steam nozzle has blue-green discoloration - Steam dryer Loads are wrinkled - Is the dryer connected to four dry items of wrinkle-free cotton, cotton-polyester blend, common knits and synthetic garments. Garments that have been starched. Wash any starched or new garments before putting them in Steam cycle - Dryer Load damp... -
Recommended installation for electrical, drain and water supply connections for dishwashers.
... dishwasher will be installed. Cable must run water lines, drain lines, or electrical wires where they can receive a 10% discount by entering F9A75Q4 as the Promo Code during check out. The dishwasher...the drain hose into house wiring junction box. Whenever possible, do I hook up the water supply and drain lines and the electrical connections for dishwashers.... -
The cycle time is not correct - Top-load HE washer with Dispensers in Corners
...When "Sd" is flashing, reselect your washer may occur several attempts to redistribute the laundry load in the drum. This adds time to additional rinsing caused by oversudsing. ...unbalanced loads. Unbalanced load conditions are more likely to eliminate the suds. If the code remains and wash cycle dial is displayed, the washer automatically extends the rinse time...
Similar Questions

Lint Clean Up On My Dryer
how to remove lower front panel on Maytag Bravos MEDX700XLO dryer
how to remove lower front panel on Maytag Bravos MEDX700XLO dryer
(Posted by clarencesantee 6 years ago)

How To Get The Front Lower Panel On A Maytag Dryer Medx700xl Off
(Posted by teerynne 9 years ago)

When Hooking Up Power Cord To Dryer Does Screw Have Contact With Wires
(Posted by rosabah 10 years ago)

I Am Hooking My Dryer Up And Where Does The Thick White Wire Go
(Posted by Anonymous-58036 12 years ago)

Prying Inner Door From Outer Door On Medx700xl.
I ahve followed instructions 1 -6 in the manual to change the door direction. I am now trying to sep...
I ahve followed instructions 1 -6 in the manual to change the door direction. I am now trying to sep...
(Posted by kbiltz 12 years ago)