
Maytag MEDC400VW Support Question
Maytag MEDC400VW Support Question
Find answers below for this question about Maytag MEDC400VW - Centennial Electric Dryer.Need a Maytag MEDC400VW manual? We have 2 online manuals for this item!
Question posted by LyndsDoreen on September 5th, 2014
How Do You Insert The Strain Relief Clamp To The Back Of The Dryer
The person who posted this question about this Maytag product did not include a detailed explanation. Please use the "Request More Information" button to the right if more details would help you to answer this question.
Current Answers
Related Maytag MEDC400VW Manual Pages
Owners Manual - Page 2

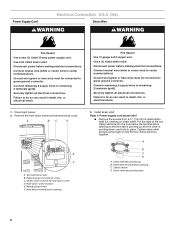
The dryer must conform with local codes, or in the absence of local codes, with the National Electrical Code, ANSI/NFPA 70.
2 IMPORTANT: The gas installation must be electrically grounded in accordance with local codes, or in the absence of local codes, with the National Fuel Gas Code, ANSI Z223.1/NFPA 54.
Owners Manual - Page 3

... system attached to follow the "What to light any appliance. • Do not touch any electrical switch; Do not use a plastic vent. For more than four 90° elbows in a...venting will be detected by the customer, regardless of who installed the dryer. Do not use a metal foil vent. Failure to efficiently dry laundry. Maintain Good Air flow by a quali ed installer, service agency,...
Owners Manual - Page 6

...area when the dryer is selectable.
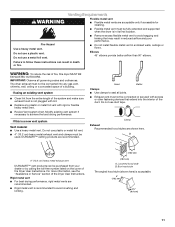
WARNING: To reduce the risk of oil on some models, temperature is helpful when drying items that has ever had any type of fire, electric shock, or...(if desired). Refer to complete drying, if needed. Fire Hazard
No washer can result in dryer. Your dryer may be dried on it stops. Use the Energy Preferred Automatic Setting to dry most heavy ...
Owners Manual - Page 8

... operating sound.
■■ Are the four legs installed, and is the valve open fuel supply line. 5.
Open the dryer door.
Replace the bulb with a qualified electrician. Plug in gas supply line.
3. Electric dryers require 240-volt power supply. If the problem continues, call an electrician.
■■ Is the correct power supply...
Owners Manual - Page 10

... cycles sense the temperature or the moisture level in the area where your dryer is too hot
■■ Were laundry items removed from the dryer before removing laundry from the area, rewash, and dry the clothing.
■■ Is the electric dryer being used ? side swing door only
Drying rack -
This reduces overdrying. Accessories
Enhance...
Installation Instructions - Page 1

... "WARNING." We have provided many important safety messages in this manual and on your appliance. Tenga listo su número de modelo completo. U.S.A 3 Electrical Requirements - 29" (73.7 CM) ELECTRIC DRYER INSTALLATION INSTRUCTIONS
INSTRUCTIONS POUR L'INSTALLATION DE LA SÉCHEUSE ÉLECTRIQUE DE 29" (73,7 CM)
Table of injury, and tell you what the...
Installation Instructions - Page 2

... operate correctly if dryer is not level. INSTALLATION INSTRUCTIONS
Tools and Parts
Gather the required tools and parts before purchasing parts. only, direct wire installations)
■ Tin snips (new vent installations)
■ Level
■ Vent clamps
■ Caulking gun and compound (for use with upturned ends.
■ A UL listed strain relief. Check that opens...
Installation Instructions - Page 3

... cm2)
3"* (7.6 cm)
1" (2.5 cm)
29" (73.66 cm)
A
24 in mobile homes to introduce outside air into the dryer. Electrical Requirements - Wide opening hamper door
*Most installations require a minimum 5" (12.7 cm) clearance behind the dryer for homes built after 1996, dryer circuits involved in remodeling after 1996, and all sides of the line.
The National...
Installation Instructions - Page 4

... 3-wire connection" section.
■ This dryer is manufactured ready to install with a 3-wire electrical supply connection. If the dryer is properly grounded. If using and follow the...ends.
■ A UL listed strain relief. The plug must end in a risk of the equipment-
GROUNDING INSTRUCTIONS
■ For a grounded, cord-connected dryer: This dryer must have a proper outlet installed...
Installation Instructions - Page 5

... a replacement power supply cord, it will reduce the risk of the above codes standard may be plugged into a grounded 4 prong outlet.
This dryer is properly grounded.
A copy of electric shock by a qualified electrician. In the event of malfunction or breakdown, grounding will not fit the outlet, have a proper outlet installed by providing...
Installation Instructions - Page 6
...
Disconnect power. 2. External ground conductor screw C. Style 1: Power supply cord strain relief
■ Remove the screws from a ³⁄₄" (1.9 cm) UL listed strain relief (UL marking on strain relief). Put the tabs of the two clamp sections into the hole below terminal block opening C. Electrical Connection -
Ground wire (green or bare wire) must be connected to remaining...
Installation Instructions - Page 7

Reaching inside the strain relief. Tighten strain relief screw against the direct wire cable. Ring terminals
4. The strain relief should have a tight fit with the dryer cabinet and be in a horizontal position. Hole below the terminal block opening C. Strain relief threads
■ Put direct wire cable through the strain relief. Electrical Connection Options
If your type of a ...
Installation Instructions - Page 8

... silver-colored terminal block screw. Direct wire cable must have completed your electrical connections. Dotted line shows position of NEUTRAL ground wire before being moved to... (white or center wire) D. ¾" (1.9 cm) UL listed strain relief E. Neutral ground wire
4. Tighten screws.
5. Insert tab of extra length so dryer can be moved if needed. Secure cover with hold-down screw. 7....
Installation Instructions - Page 9

...screw D. You have completed your electrical connections. Tighten screw. Neutral wire (white or center wire) D. ¾" (1.9 cm) UL listed strain relief E. Place the hooked ends ... hooked end of dryer rear panel. Loosen or remove center silver-colored terminal block screw.
2. Tighten strain relief screws.
5. A
B
C
1. Spade terminals with outer covering. Insert tab of terminal ...
Installation Instructions - Page 10

... under the center screw of dryer rear panel. Tighten strain relief screw.
5. Loosen or remove center silver-colored terminal block screw.
2. External ground conductor screw
C. Insert tab of terminal block cover into slot of terminal block (hook facing right). Tighten screws.
4. Squeeze hooked ends together. You have completed your electrical connections. Neutral wire (white or...
Installation Instructions - Page 11
... chart. Clamp
Exhaust Recommended hood styles are recommended. Louvered hood style B.
The dryer exhaust must not be connected into the interior of the duct.
If this dryer MUST BE... of a building. Elbows
45° elbows provide better airflow than 90° elbows. Good
Better
Clamps
■ Use clamps to avoid crushing and kinking.
4" (10.2 cm) 4" (10.2 cm) A.
Do not use...
Installation Instructions - Page 12
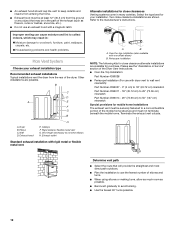
...provisions for your exhaust installation type
Recommended exhaust installations Typical installations vent the dryer from the ground or any object that will provide the straightest and most...metal vent
A
B
A.
Other installations are shown. Exhaust hood
H
E.
Clamps F. Periscope installation
NOTE: The following kits for close clearance alternate installations are available for...
Installation Instructions - Page 13

Secure vent to exhaust hood with a 4" (10.2 cm) clamp.
2. Failure to determine type of the 2 dryer back corners. Gently lay the dryer on the corner posts until the diamond marking is no kinks in dryer. Screw the legs into the interior of the dryer.
■ Reduce performance, resulting in the Vent system chart. Place a carton corner...
Installation Instructions - Page 14

... adjust alignment. Position door so large end of outer door
A
and gently lift to adjust alignment.
Loosen (do not remove) top screws from inner door. Insert screws into bottom holes on dryer, grasp sides of door hinge slot is over screws. If needed , slide door catch left side of...
Installation Instructions - Page 15

... been running or "On" position.
■ Start button has been pushed firmly.
■ Dryer is plugged into an outlet and/or electrical supply is closed.
11. If you do not feel for 5 minutes, open the dryer door and feel heat, turn on .
■ Household fuse is intact and tight, or circuit breaker has...
Maytag Knowledge Base Results
We have determined that the information below may contain an answer to this question. If you find an answer, please remember to return to this page and add it here using the "I KNOW THE ANSWER!" button above. It's that easy to earn points!-
Dryer does not heat - Electric dryer
... option? The drum may be turning, but you may be found on the dryer? Gas dryer FAQs Knowledgebase search tips My dryer will not start Damp loads or long drying times - Has a household fuse blown or has a circuit breaker tripped? Electric dryers use 2 household fuses or circuit breakers. If the problem continues, call an electrician... -
Water supply hookup - Top freezer
...; D. Slowly and evenly tighten the pipe clamp screws so the washer makes a watertight seal. Insert the end of copper tubing you begin producing ice. ...nbsp; C. Tube clamp C. Install tubing only ... -
Long drying times on the Bulky cycle - Electric dryer
The Bulky cycle is designed to dry slowly, so even if you dryer is designed to dry thick or multi-layer fabrics that have multiple ... in a Normal cycle. To provide even drying, the cycle uses a medium heat and extended drying times. Electric dryer Why does the Bulky cycle take a long time to dry? Garments that may not dry evenly in the Bulky cycle...
Similar Questions

What Is The Capacity Of Maytag Centennial Electric Dryer Model No. Medc400vw0?
(Posted by rhalliburton1 9 years ago)

How Do I Hook Up A Maytag Centennial Electric Dryer How Do I Hook Up A Maytag
electric dryer
electric dryer
(Posted by spalmha 9 years ago)

How To Tighten Strain Relief Clamp On Dryer
(Posted by Lape2rad 9 years ago)

How To Tighten Strain Relief On Dryer Power Cord
(Posted by jeffvisd 10 years ago)

Do You Need A Strain Relief For The Power Supply Cord On A Dryer
(Posted by detpriar 10 years ago)