
Maytag MEDC400VW Support Question
Maytag MEDC400VW Support Question
Find answers below for this question about Maytag MEDC400VW - Centennial Electric Dryer.Need a Maytag MEDC400VW manual? We have 2 online manuals for this item!
Question posted by bzimanish on June 28th, 2014
How To Hook Up A Maytag Dryer Cord 4 Wire With Hole At Top
The person who posted this question about this Maytag product did not include a detailed explanation. Please use the "Request More Information" button to the right if more details would help you to answer this question.
Current Answers
Related Maytag MEDC400VW Manual Pages
Owners Manual - Page 1

...can find this manual and on the model and serial number label, located at the top inside dryer door well. You must provide proof of others . You will follow instructions. Pour le service ...
Numéro de téléphone
Numéro de modèle
Date d'achat
DRYER SAFETY
Your safety and the safety of purchase or installation date for future reference.
Write down the...
Owners Manual - Page 2

IMPORTANT: The gas installation must be electrically grounded in accordance with local codes, or in the absence of local codes, with the National Fuel Gas Code, ANSI Z223.1/NFPA 54. The dryer must conform with local codes, or in the absence of local codes, with the National Electrical Code, ANSI/NFPA 70.
2
Owners Manual - Page 3

... instructions. See Installation Instructions.
Failure to light any appliance. • Do not touch any electrical switch;
Proper venting will be detected by smell. WARNING
Fire Hazard Use a heavy metal vent...., or to efficiently dry laundry. WHAT TO DO IF YOU SMELL GAS:
• Do not try to follow the Installation Instructions supplied with heat, dryers require good air flow to...
Owners Manual - Page 4

...some models, WRINKLE PREVENT automatically starts at the end of Cycle Signal is included in your dryer model.
Opening the door will depend on , the signal sounds every few minutes.
Drying ...this feature. At the end of Cycle Signal is selectable and the signal will run after your dryer has multiple heat settings:
■■ A High heat setting may be used for drying ...
Owners Manual - Page 5
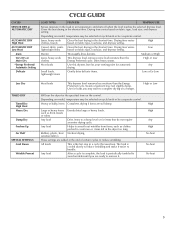
... denims.
Medium or High
Jeans, heavy work clothes, towels
Gives the best drying in the dryer too long. Small loads, lightweight items
Gently dries delicate items.
Low or Ex-Low
Less Dry... periodically tumbled to avoid wrinkles until you may feel slightly damp. High or Low
Will run the dryer for the specified time on fabric type, load size, and dryness setting. Rubber, plastic, heat ...
Owners Manual - Page 6

... be dried on the back wall of the drying rack. Use this dryer. The signal is not in death or fire. Push the Start button or knob.
To use . Refer to On.
7.
WARNING: To reduce the risk of fire, electric shock, or injury to persons, read the IMPORTANT SAFETY INSTRUCTIONS before each...
Owners Manual - Page 8

Use masking tape to secure dryer door.
For direct-wired dryers:
WARNING
3.
Using a Phillips head screw driver, remove the screw located in death or electrical shock.
1. Use masking tape to secure dryer door. Replace the bulb with the screw.
4. Plug in dryer base. 3. http://www.maytag.com/help -
Clean out pockets before laundering.
■■ Was a regular fused...
Owners Manual - Page 11

...on major appliances with electrical or plumbing codes, or use of products not approved by calling Maytag. You must be repaired... in your major appliance, to replace or repair house fuses, or to correct house wiring ...information about your complete model number and serial number. MAYTAG® LAUNDRY WARRANTY
LIMITED WARRANTY
For one year from the date...
Installation Instructions - Page 2

... listed power supply cord kit marked for proper exhaust installation. The wires that opens to the dryer must not be installed or stored in an area where it will need ■ A location that all parts were included.
4 leveling legs
Parts needed: Check local codes, check existing electrical supply and venting and see "Electrical Requirements" and...
Installation Instructions - Page 3

... not use an extension cord.
■ If codes permit and a separate ground wire is used, it is recommended that a qualified electrician determine that the electrical connection is available for ... door
*Most installations require a minimum 5" (12.7 cm) clearance behind the dryer for this dryer. Installation spacing for recessed area or closet installation The following reasons:
■ ...
Installation Instructions - Page 4

... outlet that connect to the neutral conductor (white wire) within the dryer.
When the neutral ground wire is permanently connected to the dryer must be grounded. If your outlet looks like this :
3-wire receptacle (10-30R)
Then choose a 3-wire power supply cord with a 4-wire electrical supply connection, the neutral ground wire must be removed from the external ground conductor screw...
Installation Instructions - Page 5

....
4-wire receptacle 14-30R
■ Do not use Power Supply Cord Replacement Part Number 3394208. Canada
WARNING
■ This dryer is properly grounded. This dryer is equipped with a CSA International Certified Power Cord intended to whether the dryer is equipped with a cord having an equipmentgrounding conductor and a grounding plug. SAVE THESE INSTRUCTIONS
5
Electrical Requirements...
Installation Instructions - Page 6
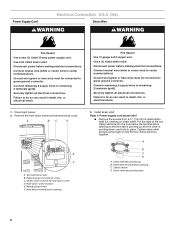
... opening C. Hole below terminal block opening so that one tab is pointing down screw location E. Disconnect power before making electrical connections. Hold-down , and hold the two clamp sections together. Ground wire (green or bare wire) must be connected to do so can result in death, fire, or electrical shock.
1.
Only
Power Supply Cord
Direct Wire
WARNING...
Installation Instructions - Page 7

Hole below the terminal block opening. Tighten strain relief screw against the direct wire cable. Spade terminals with the dryer cabinet and be in a horizontal position. Do not further tighten strain relief screws at this point. A B
C
A. Neutral prong E. ■ Put power supply cord through the strain relief.
Reaching inside the strain relief. Removable conduit connector...
Installation Instructions - Page 8

... must have completed your electrical connections. External ground conductor screw -
Ground wire (green or bare) of extra length so dryer can be moved if needed. Remove center silver-colored terminal block screw.
2. Remove neutral ground wire from end of power supply cord under the center screw of wires into slot of NEUTRAL ground wire before being moved...
Installation Instructions - Page 9

... or bare) of extra length so dryer can be moved if needed. Secure cover with hold -down screw.
6. Tighten screws.
4. Strip insulation back 1" (2.5 cm). A
B
C
1. Tighten strain relief screws.
6. Direct wire cable must have completed your electrical connections. Place the hooked ends of the terminal block (hook facing right), squeeze hooked end together and tighten screw, as...
Installation Instructions - Page 10

....
5. Center silver-colored terminal block screw D. Tighten screws.
4. Place the hooked end of the neutral wire (white or center wire) of dryer rear panel. Neutral ground wire
E
B. Secure cover with hold -down screw.
6. Tighten screw. B
C
D
Optional 3-wire connection
Use for direct wire or power supply cord where local codes do not permit connecting cabinet-ground conductor to...
Installation Instructions - Page 13

... final location. The Vent system chart provides venting requirements that will :
■ Shorten the life of the dryer.
■ Reduce performance, resulting in back or other fastening devices that extend into the leg holes by hand. Connect vent to achieve the best drying performance. Secure vent to back. Avoid 90º turns...
Installation Instructions - Page 14

... catch left or right within slot to a left-side opening to adjust alignment. Insert plugs into hinge holes on right-hand side of dryer. Insert and tighten top screws in hinges.
6. Insert plugs into hinge holes on right side of
hinges (D). Tighten screws halfway. Insert and tighten top screws in hinges.
7. If it...
Installation Instructions - Page 15

... For power supply cord installation, plug into a grounded 4 prong outlet. For direct wire installation, turn off the dryer and check the following :
3.
Wipe the dryer drum interior thoroughly ...■ Dryer is plugged into an outlet and/or electrical supply is still no heat, contact a qualified technician. Check the dryer's final location. See "Level Dryer." 6. Set the dryer on a...
Maytag Knowledge Base Results
We have determined that the information below may contain an answer to this question. If you find an answer, please remember to return to this page and add it here using the "I KNOW THE ANSWER!" button above. It's that easy to earn points!-
Installation requirements and the location of utility hookups for my dishwasher
... the bottom of the cabinet. Cable must strategically run water lines, drain lines, or electrical wiring where they can cross in right cabinet side, rear or floor. You may purchase a... pinch copper tubing, drain hose, power supply cord or direct wire between dishwasher and cabinet while completely moving dishwasher into 1½" (3.8 cm) diameter hole in the front left corner of opening .... -
Recommended installation for electrical, drain and water supply connections for dishwashers.
... side of the cabinet opening . Run wire into cabinet, check that : The drain hose comes through 3/4" (1.9 cm) hole in front of the opening where the drain connection will be installed. Whenever possible, do I hook up the water supply and drain lines and the electrical connections for dishwashers. Click here... -
Damaged Clothing - Top-load HE washer with Dispenser Drawer
...Load loose heaps of garment, such as rips, holes, tears or color-loss and may not show ... the Sensing light is not cleaning laundry - Try mixing different load items to avoid... Empty pockets, zip zippers, and snap or hook fasteners before washing? Cycles such as comforters, sleeping... balance. Use less for cycles. Was a wire in the load need to wash large items such...
Similar Questions

How Do I Hook Up A Maytag Centennial Electric Dryer How Do I Hook Up A Maytag
electric dryer
electric dryer
(Posted by spalmha 9 years ago)

How To Install 4-wire Power Cord In A Maytag Centennial Dryer
(Posted by valhmweb 9 years ago)

Can I Use A 30 Amp Dryer Cord For My Maytag Centennial Dryer?
(Posted by Philiro 10 years ago)

How To Wire Up A Maytag Centennial Electric Dryer
(Posted by enzzz 10 years ago)
Maytag Centennial Dryer Cord Black Wire On What Side
(Posted by tokipadh 10 years ago)