Makita LS1216L Support Question
Makita LS1216L Support Question
Find answers below for this question about Makita LS1216L.Need a Makita LS1216L manual? We have 4 online manuals for this item!
Current Answers
Related Makita LS1216L Manual Pages
Owners Manual - Page 2
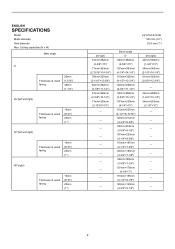
...angle
0°
Thickness of wood facing
20mm (13/16") 38mm (1-1/2")
45°(left and right)
Thickness of wood facing
15mm (9/16") 25mm (1")
52°(left and right)
Thickness of wood facing
15mm (9/16") 25mm (1")
60°(right)
Thickness of wood facing
15mm (9/16") 25mm (1")
LS1216/LS1216L...
―
―
―
―
Bevel angle 0°
92mm×382mm (3-5/8"×15")
107mm&#...
Owners Manual - Page 3
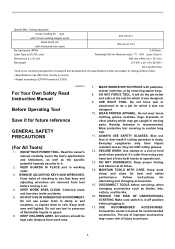
... (LS1216L only)
Wavelength 655 nm, Maximum output 1mW (Laser Class II)
Dimensions (L x W x H)
806 mm x 640 mm x 721 mm
Net weight
(31-3/4" x 25-1/4"x 28-3/8")
26.4 kg (58.2 lbs)
• Due to our continuing programme of injury to rain. Read the owner's manual carefully. All visitors should be kept safe distance from tool before turning...
Owners Manual - Page 4
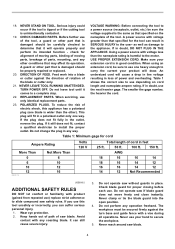
...Never clamp or tie the blade guard into a blade or cutter against the turn base and guide fence with voltage less than the nameplate rating is damaged should ...conditions that specified for alignment of moving parts, binding of moving parts, breakage of the tool. USE PROPER EXTENSION CORD.
Table 1: Minimum gage for proper closing before each use of power and overheating. Do not...
Owners Manual - Page 5
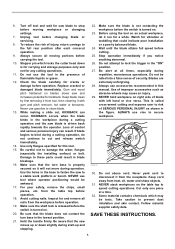
..., do not continue to these parts could indicate poor installation or a poorly balanced blade.
24. 6. Turn off tool and wait for kickback. To reduce the risk of flammable liquids or gases.
12. Always secure all...position.
27. Make sure the shaft lock is released before the switch is turned on the table top to a stable work platform or bench. Make sure the blade is not contacting the...
Owners Manual - Page 7
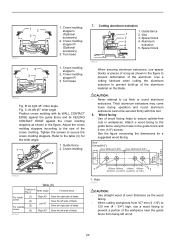
...screws (do not tighten firmly).
This tool is complete, reverse procedure above . ... If guard becomes discolored through age or UV light exposure, contact a Makita service center for a 305 mm (12") saw blade does not contact...; Before and after changing the bevel angle, always
adjust the kerf boards as ...stopper pin to lock the handle in the turn base to provide the maximum cutting capacity ...
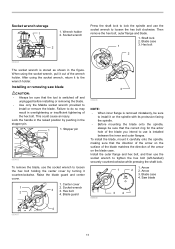
Owners Manual - Page 8
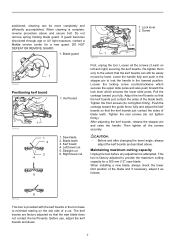
... direction of
blade
3. Stopper lever
009487
The lower limit position of the tool counterclockwise. Adjust the adjusting screw so that the blade does not contact any part of
3
turn base. Adjusting the miter angle
1. Grip 3. Cam
2
1
009736
First, unplug the tool. Push the carriage toward the guide fence fully and lower the handle completely...
Owners Manual - Page 9

... lock the upper slide pole, turn the locking screw clockwise. This can be repaired before further usage. • For your safety, this tool is provided in the lock-off button which prevents the tool from being pressed, tilt the carriage to the left 22.5 ° and 33.9 ° angle to a Makita service
9 WARNING: • Do...
Owners Manual - Page 10
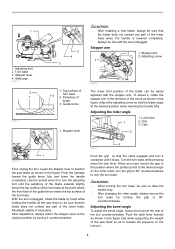
...at a Makita service center. B) When ... Laser beam action For model LS1216L only
1.
Aligning the laser...angle right 45 degrees). If the tool consistently fails to the direct sunlight. The blade brake system is dim and almost or entirely
invisible because of the blade (cutting position).
Press the lower position (O) to the left side of workpiece • Shift the laser line to turn...
Owners Manual - Page 11
... Before mounting the blade onto the spindle, always be sure that the tool is installed between the inner and outer flanges. Failure to tighten the...the blade case. Lock the handle in the raised position by turning it to loosen the hex bolt clockwise. Install the outer flange ...the blade. • Use only the Makita socket wrench provided to loosen the hex bolt holding the center cover by pushing ...
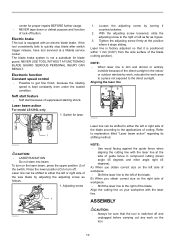
Owners Manual - Page 12
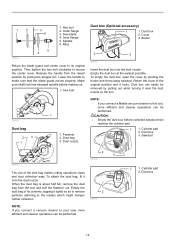
... position by pushing the button and throw away sawdust. NOTE: If you connect a Makita vacuum cleaner to your saw, more efficient and cleaner operations can be removed by pulling out while turning it near the dust nozzle on the tool. Outer flange 3. Hex bolt
009524
Dust bag
2
3
1
1
1. NOTE: • If you connect a vacuum...
Owners Manual - Page 16
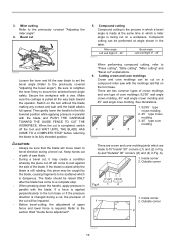
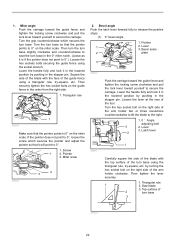
... the cut off the tool and WAIT UNTIL THE BLADE HAS COME TO A COMPLETE STOP before returning the blade to the section titled "Guide fence adjustment". 3. Inside corner
1
(2)
(1)
2.
If a force is required.
Outside corner
Fig.A
001556
(1) (2) (3) (4)
1
2
1. Be sure to retighten the lever firmly to the turn base. Miter angle Left and Right 0 - 45...
Owners Manual - Page 17
...
Bevel angle
position in the table (B).
A: • Tilt and secure bevel angle setting to
33.9° RIGHT. • Adjust and secure miter angle setting to
31.6° RIGHT. • Lay crown molding with its broad back
(hidden) surface down on the turn base with its WALL CONTACT EDGE against the guide fence on the saw...
Owners Manual - Page 20
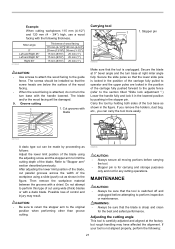
...table (C) for a suggested wood facing. Vise
2
3.
Attach a wood facing to prevent deformation of blade
Right 45° Save the left 45° miter angle Position crown molding with this tool. 8. Guide fence
1
2. A
Miter angle...8226; Use straight wood of the crown molding. Turn base
1. Crown molding stopper R
3. Turn base
009522
Fig. Adjust the crown molding stoppers ...
Owners Manual - Page 21
...the wood facing is sharp and clean for any cutting operations. Adjusting the cutting angle This tool is for carrying and storage purposes
only and not for the best and safest performance... is attached, do not turn the turn base at the factory, but rough handling may result. If your tool is unplugged. Secure the blade at 0° bevel angle and the turn base with the handle lowered...
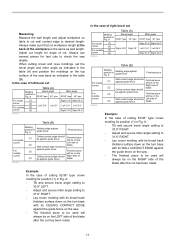
Owners Manual - Page 22
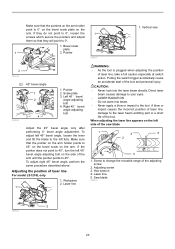
...tighten the locking screw clockwise and pull the lock lever toward yourself to release the positive stops.
(1) 0° bevel angle
1. Triangular rule
1
2. Turn the turn base using a triangular rule, try -square, etc. Triangular rule
1
009509
Make sure that the pointer points to ... scale. Then securely tighten the hex socket bolts on the right side of the tool. Pointer
3.
Owners Manual - Page 23
... scale
plate
1
2. Scale plate 3. To adjust left 45° bevel angle adjusting bolt on the side of the tool and personal injury.
If they will point to 0°.
1. If the pointer does not point to 45°, turn the left 45° bevel angle, loosen the lever and tilt the blade to 45°...
Owners Manual - Page 24
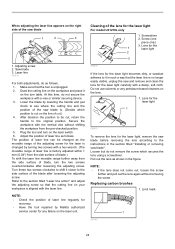
...the lens for the laser is changed as follows. 1. Secure the workpiece with the laser line. Plug the tool and turn table. NOTE: • If the lens does not come out, loosen the screw
further and pull out the... removing the lens according to it closer to be changed by Makita authorized
service center for the laser light For model LS1216L only
1. Screwdriver
2. Saw blade 3.
Owners Manual - Page 25
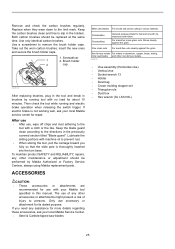
... box • Hex wrench (for LS1216L)
CAUTION: • These accessories or attachments are
recommended for repair. Replace when they wear down to the
tool with your local Makita Service Center. • Steel &... inserted into the turn base.
Both carbon brushes should be replaced at the same time. Brush holder
2
cap
009516
After replacing brushes, plug in the tool and break in ...
Parts Breakdown - Page 6
...
POSITION PLATE, LS1016
1
ARM HOLDER COVER, LS1016
1
TAPPING SCREW 4X16, 9524NB
1
SQUARE ROD CPL., LS1016
1
HEX. SPRING 11, LS1016
1
F. S. H. WASHER 8, LS1040
1
TURN BASE CPL., LS1216L
1
TAPPING SCREW 4X12,5477NB
1
INDICATION PLATE, LS1016
1
RACK BLOCK, LS1016
1
TAPPING SCREW 4X14, GA7021
1
F. WASHER 4, 4390DW,2705
1
TAPPING SCREW BIND CT 4X20, 9046
1
CASE, LS1016...
Flyer (English) - Page 2
...-Polished Micro-Polished Micro-Polished Micro-Polished
No. recommends that end users register their tool on hand. All models and accessories subject to stock on its electronic warranty card database as soon as possible. As a result, Makita U.S.A., Inc. Makita offers a wide variety of end user contact information. of Teeth 40 60 80 100...
Similar Questions


Cut Depth Know Is Stuck. Will Not Turn.
How can I get this knob to turn and work
How can I get this knob to turn and work
(Posted by tomartist2004 4 years ago)
Cut You Make Makita Mitresaw With Digitall Lcd Screen For Right Angle Cuting?
that is my idea
that is my idea
(Posted by Zioma1975 6 years ago)

My Base Lockup Up At 45 Degrees And Now It Won't Turn
The base on my Miter saw seems to have locked it self at 45 degrees and now I can't make it turn ,I'...
The base on my Miter saw seems to have locked it self at 45 degrees and now I can't make it turn ,I'...
(Posted by ajthree1 11 years ago)

Tool Not Working
I bought a new makita LXPH01 Hammer Drill. I put a fully charged lit-ion battery 3.0a but when I pr...
I bought a new makita LXPH01 Hammer Drill. I put a fully charged lit-ion battery 3.0a but when I pr...
(Posted by shiki98 11 years ago)