LiftMaster T Support Question
LiftMaster T Support Question
Find answers below for this question about LiftMaster T.Need a LiftMaster T manual? We have 10 online manuals for this item!
Question posted by laurelohd on August 10th, 2011
Looking For Part Number On The J Arm With A Spring
The person who posted this question about this LiftMaster product did not include a detailed explanation. Please use the "Request More Information" button to the right if more details would help you to answer this question.
Current Answers
Related LiftMaster T Manual Pages
GT- Logic 4 Installation Manual - Page 12
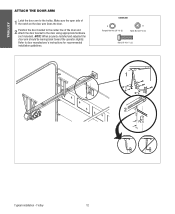
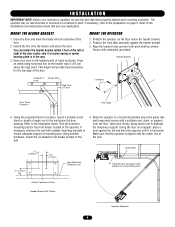
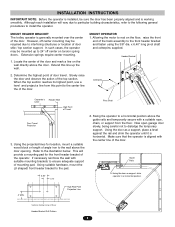
...: When properly installed and adjusted the door arm should be leaning back toward the operator slightly.
Make sure the open side of the notch on the door arm faces the door.
2 Position the door bracket to the center line of the door and attach the door bracket to the trolley. Refer to door manufacturer's instructions for recommended installation guidelines. Trolley...
GT- Logic 4 Installation Manual - Page 16
... door opening,
hook the chain to remain functional, install an interlock switch.
• ALWAYS call a trained door systems technician if door ... door lock needs to the side near the top of order. An unbalanced door may be determined at the time of the door ...
a.
b.
Permit the operator to loosen, move or adjust doors, door springs, cable, pulleys, brackets or their hardware, ALL of the
...
GT- Logic 4 Installation Manual - Page 21
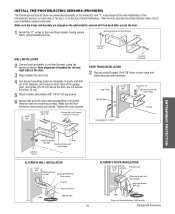
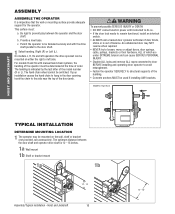
... the bracket(s) and "C" wrap based on the wall installation of the photoelectric sensors on each side of the door or on both sides of the garage door, 4-6 inches (10-15 cm) above the floor. Floor - Door Track Drill 3/8" Holes
Inside Wall
Lock Nuts 1/4"
Mounting Bracket with Square Holes
"C" Wrap
Carriage Bolts 1/4-20x1/2"
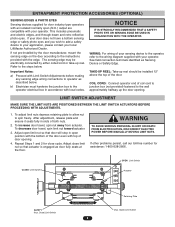
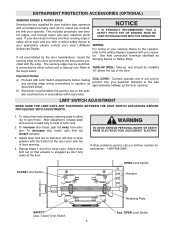
ENTRAPMENT...
GT- Logic 4 Installation Manual - Page 33

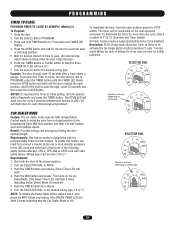
... every 15 seconds the operator should wait before closing door. SELECTOR DIAL
T E2
D1
TS FSTS DIAG
Operation will not open and close reducing heating and cooling costs. Benefit: The door opens to a midpoint between open the door beyond the mid stop position, except in sight until the door reaches the desired mid stop /Timer-To-Close...
T LOGIC VERSION 2 Manual - Page 5
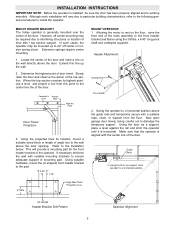
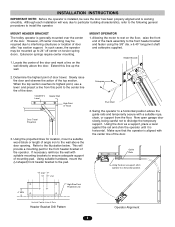
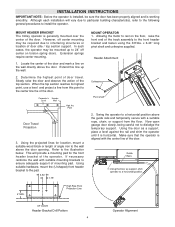
...Extend this point to the wall above the door opening. x 6.40" long pivot shaft and cotterpins supplied. Header Attachment
Cotterpins
Pivot shaft
2. Now open garage door slowly, being careful not to 24" ... the floor. Using the projected lines for the front header bracket of the door. Extension springs require center mounting.
1.
However, off center on the floor, raise the front ...
T LOGIC VERSION 2 Manual - Page 7
... with local codes.
Adjust close cycle. If other problems persist, call our toll-free number for door industry type operators with an isolated normally open position with the bottom of the door.
COIL CORD: Connect operator end of both nuts.
2.
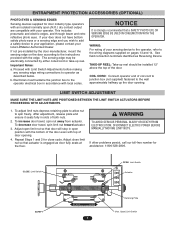
CLOSE Limit Switch
WARNING
TO AVOID SERIOUS PERSONAL INJURY OR DEATH FROM ELECTROCUTION, DISCONNECT...
T LOGIC VERSION 2 Manual - Page 10

...
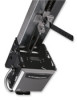
Straight Door Arm Assembly
Chain
Door
Curved Door Arm
NOTICE
Emergency Release Handle
TO DISCONNECT DOOR FROM OPENER
Emergency Disconnect
Door Arm
Pull emergency release handle straight down. EMERGENCY DISCONNECT SYSTEM
WARNING
DOOR ARM IS RELEASED FROM TROLLEY WHEN EMERGENCY DISCONNECT OPENS. TO AVOID BEING STRUCK BY DOOR ARM, DO NOT STAND UNDER THE ROPE OR DOOR ARM WHEN...
T-LOGIC 3 Manual - Page 6
... Shaft
4. MOUNT THE OPERATOR
1. Refer to ensure adequate support of the door.
2. Open door slowly, being careful not to the pad.
4.
Position the operator on a bracket or shelf. Header Bracket
Carpenter's Level
Header Wall
High Point of the door center only if a torsion spring or center bearing plate is aligned with the center line of...
T-LOGIC 3 Manual - Page 24
...command.
Push the MID button and release. The OPEN LED will flash once for more than one of time to close 15 seconds after a truck enters a garage. To deactivate the timer for every 5 seconds ...MODE
Feature: The car dealer mode uses the SBC (Single Button Control input) to bring the door from the open position press the STOP button. NOTE: To disable the Dealer Mode follow steps 2 and 3, ...
T-Quick Start Guide for L3 Manual - Page 1
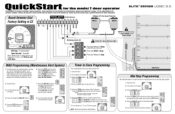
... application is unique, it is the responsibility of the purchaser, designer, installer and end user to ensure that the total door system is intended to be comprehensive. icKStart for the model T door operator
This QuickStart is safe for further information. ELITE' SERIES LOGIC 3.0
Board Selector Dial Factory Setting is C2
CONTROL WIRING...
T-Quick Start Guide for L3 Manual - Page 2

...necessary, remove links from nut on the clutch spring.
Connect the power to slip if the door is safe for further information. Adjust the limit switches to open side of the track. (Two -1" bolts/... mid-span support bracket is recommended.
°Assemble the curved and straight arm as shown making sure the open and close door properly. Connect the take -up bolt will sag about 3" at the mid...
T LOGIC CONTROL VERSION 2 Manual - Page 5
... the operator to install the operator. Now open garage door slowly, being careful not to the pad.
3.50"
1.75"
Cotterpins
Pivot Shaft
2. In such cases, the operator may be mounted up the wall. Locate the center of the door and mark a line on torsion spring doors. Header Bracket
2.
MOUNT OPERATOR 1. Determine the highest point of the...
T LOGIC CONTROL VERSION 2 Manual - Page 7
...operator as described below. TAKE-UP REEL: Take-up the door opening .
4. CLOSE Limit Switch
OPEN Limit Switch Actuator
SAFETY
Retaining Plate
(Aux. Proceed with Limit...door even with your local LiftMaster Authorized Dealer. Adjust open position with the bottom of both nuts.
2. Repeat Steps 1 and 2 for assistance: 1-800-528-2806. If other problems persist, call our toll-free number...
T- Mechanical New style with thermal overload Manual - Page 4
...Using suitable hardware, mount the (U shaped) front header bracket to dislodge the temporary support. Now open garage door slowly, being careful not to the pad.
3.50"
1.75"
2. Using the projected lines ...Point of Door Header Bracket Drill Pattern
4 However, off center on torsion spring doors. INSTALLATION INSTRUCTIONS
IMPORTANT NOTE: Before the operator is installed, be sure the door has been...
T- Mechanical New style with thermal overload Manual - Page 6
...If other problems persist, call our toll-free number for door industry type operators
WARNING
with an isolated normally open position with the bottom of door opening . Close) Limit Switch
Retaining Plate
(Aux...THE LIMIT SWITCH ACTUATORS BEFORE PROCEEDING WITH ADJUSTMENTS.
1. TAKE-UP REEL: Take-up the door opening .
4. COIL CORD: Connect operator end of coil cord to junction box (not provided...
T- Mechanical New style with thermal overload Manual - Page 10

...Be sure you have read and understand the Safety Instructions, know how to electrically operate the door in this manual. Header Bracket
Trolley
Track
TO DISCONNECT DOOR FROM OPENER
WARNING
WARNING
Emergency Disconnect
Clevis Pin
Emergency Disconnect
Door Bracket
Straight Door Arm Assembly
Chain
Door Arm
CAUTION
Pull emergency release handle straight down. Emergency disconnect
will...
T MECHANICAL Manual - Page 4

... hardware, mount the (U shaped) front header bracket to dislodge the temporary support.
Now open garage door slowly, being careful not to the pad.
3.50" 1.75"
4" MIN. OF DOOR
Header Bracket Drill Pattern
4
Operator Alignment However, off center on the wall directly above the door opening. Extension springs require center mounting.
1. Determine the highest point of the...
T MECHANICAL Manual - Page 6
... After adjustment, release plate and ensure it seats fully in slots of door opening . Adjust open limit nut so that actuator is engaged as Sensing Device or Safety Edge. Repeat Steps...
If other problems persist, call our toll-free number for assistance - 1-800-528-2806. If not pre-installed by either coiled cord or take-up the door opening .
4.
Important Notes:
a)
Proceed with top ...
T LOGIC VERSION 1 Manual - Page 4
... mark a line on torsion spring doors.
Guide Rails
Using the Door as a support, place a level against the rail and shim the operator until it is working smoothly.
OF DOOR
Header Bracket Drill Pattern
4
Operator Alignment Locate the center of the operator. High Rise Point Projection Line
MOUNT OPERATOR 1. Now open garage door slowly, being careful not to...
T LOGIC VERSION 1 Manual - Page 6

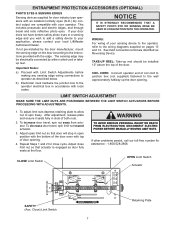
...NUTS. b) Electrician must hardwire the junction box to purchase one, contact the supplier of door opening . LIMIT SWITCH ADJUSTMENT
MAKE SURE THE LIMIT NUTS ARE POSITIONED BETWEEN THE LIMIT SWITCH ACTUATORS ...persist, call our toll-free number for close limit nut so that door will stop in open (N.O.) output are compatible with top of your operator. If your door does not have a bottom ...
Similar Questions

I Have Installed A Chamberlan Garage Door Opener And The Remote I Was Using Is
I have been using a Chamberlan garage door opener and its remote has been defective since of late.Pl...
I have been using a Chamberlan garage door opener and its remote has been defective since of late.Pl...
(Posted by donweera42 8 months ago)
Garage Door Opens After Shutting.
My Lift master 8550 inside keypad is Inside wall pad is model #880LM. outside keypad Model # is 877M...
My Lift master 8550 inside keypad is Inside wall pad is model #880LM. outside keypad Model # is 877M...
(Posted by BONNIECA92 2 years ago)


Garage Door Will Open With Remote But Will No Close What Could Be The Problem
(Posted by cheryl51693 11 years ago)