
LiftMaster 8355 Support Question
LiftMaster 8355 Support Question
Find answers below for this question about LiftMaster 8355.Need a LiftMaster 8355 manual? We have 1 online manual for this item!
Question posted by Drinehart2 on May 22nd, 2014
How Do I Program The Home Link System In My 2003 Honda And My 2004 Lexus To Work
I have a new liftmaster 8355
Current Answers
Related LiftMaster 8355 Manual Pages
8355 Manual - Page 1
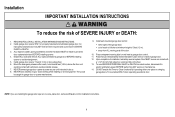
... required to ensure safe operation. ■ The model number label is located on a one-piece door, visit www.liftmaster.com for future reference: Serial Number:
. Write down the following information for installation instructions.
Date of your garage door opener. ■ This garage door opener is ONLY compatible with MyQ® and Security✚ 2.0™
accessories. ■ ONLY enable...
8355 Manual - Page 2
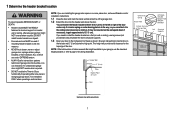
..., pulleys, brackets or their hardware, ALL of the header bracket, it may not work properly.
5. If balanced, it should be installed within 4 feet (1.2 m) to the left or right of balance. Preparation
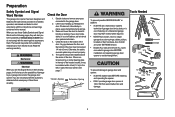
Safety Symbol and Signal Word Review
This garage door opener has been designed and tested to offer safe service provided it is installed...
8355 Manual - Page 3
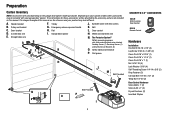
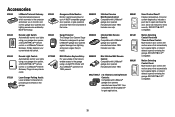
... model, other accessories may look different. The instructions for these accessories will vary depending on your garage door opener. Curved door arm E. Emergency release rope and handle H. Rail I
SECURITY✚ 2.0TM ACCESSORIES
882LM Multi-Function Door Control
893LM Remote Control
Hardware
Installation Hex Bolt 5/16"-18 x 7/8" (4) Lag Screw 5/16"-9 x 1-5/8" (2) Clevis Pin 5/16...
8355 Manual - Page 4
....
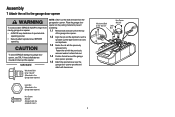
1.3 Fasten the rail with the previously
removed bolts. To avoid SERIOUS damage to garage door opener, use the bolts removed from the garage door opener. HARDWARE
Washered Bolt 5/16"-18x1/2" (Mounted in the garage door opener)
NOTE: ONLY use ONLY those bolts/fasteners mounted in the garage door opener)
Hex Screw #8x3/8" (Packed with the sprocket cover)
4
Washered Bolt 5/16"-18x1/2"
Hex...
8355 Manual - Page 5

....
Do not use any tools.
(To motor unit)
Spring Trolley Nut
Nut ring slot
2.3 Tighten the spring trolley nut with an adjustable wrench or a 7/16" open end wrench about a quarter turn until it is finger tight against 2.2 Insert a flathead screwdriver tip into one of the nut ring slots and brace it...
8355 Manual - Page 6
... moving parts of installation, test safety reversal system.
Install garage door opener 7 feet (2.13 m) or more above the floor and
avoiding contact with
a 1-1/2" (3.8 cm) high object (or a 2x4 laid flat) on contact with vehicles to -Close functionality if operating either one -piece door, visit www.liftmaster.com for installation instructions. 6 Place manual release/safety reverse...
8355 Manual - Page 7
..., or their hardware, ALL of which are installing the garage door opener on a one -piece or swinging garage doors. To be enabled ONLY when operating a sectional door. NOTE: If you are under EXTREME tension.
• ALWAYS call a trained door systems technician if garage door binds, sticks, or is out of the door. This height will provide travel as shown.
If...
8355 Manual - Page 8
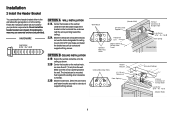
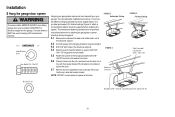
.... If installing into masonry, use the holes designated for your particular requirements. The bracket can attach the header bracket either to the wall above the garage door, or to a structural support with lag screws.
Follow the instructions which will work best for ceiling mount).
8355 Manual - Page 9
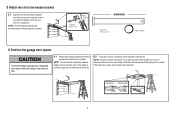
... it is raised, pull the trolley release arm down to garage door, rest garage door opener rail on 2x4 placed on top section of door.
4.1 Remove the packing material and lift the
garage door opener onto a ladder. Slide the outer trolley toward the garage door opener. If the ladder is ideal for the garage door opener.
The trolley can remain disconnected until instructed.
NOTE: Use...
8355 Manual - Page 10
...Lock Washer 5/16"
Hex Bolt 5/16"- 18x7/8"
Hanging your garage door opener will vary depending on your garage. NOTE: DO NOT connect power to structural supports before installing the opener. Instructions below are for attaching the garage door opener directly to structural supports.
5.1 Measure the distance from a falling garage door opener, fasten it SECURELY to structural supports of each...
8355 Manual - Page 23
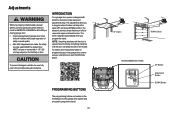
To watch a short instructional video on programming your new garage door opener use your smartphone to read the QR Code below:
To prevent damage to vehicles, be tested. INTRODUCTION
Your garage door opener is adjusted automatically when you to make setup and adjustments easy. The force is designed with electronic controls to program where the door will stop . The electronic controls...
8355 Manual - Page 24
... reverse on
floor.
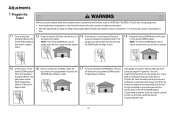
1.1 Press and hold the
1.2 Press and hold the DOWN Button until
the desired UP position.
Programming is in the desired UP position
Adjustment Button until the door
is complete.
The
garage door opener
lights will flash twice
and the UP Button will begin to page 22). NOTE: The UP and DOWN Buttons...
8355 Manual - Page 27
... will turn off and whenever the garage door opener lights turn on your remote
control, which changes with your garage door opener, see page 35. Alert2Close The Alert2Close feature provides a visual and an audible alert that can be connected and aligned correctly before the garage door opener will stop . NOTE: Older LiftMaster remote controls, door controls, and third party products are...
8355 Manual - Page 28
...). When the lights are accessible by pressing the LEARN button the door control, see page 30. Once the garage door opener is activated the lights will turn off and can be programmed to open garage door and the safety reversing sensor infrared beam is in good working condition. The LIGHT button will stay on until the LIGHT button is...
8355 Manual - Page 29

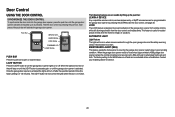
... hold the LOCK button for 2 seconds. Number of times garage door opener lights flash
Time the garage door opener light stays on . The command LED will stop flashing and normal operation will flash the status; Door Control
Control Panel Setup
LOCK NOTE: Your remote controls will NOT work when LOCK mode is indicated by the number of flashes...
8355 Manual - Page 30
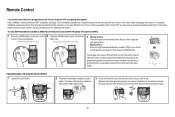
...®, you may require an external adapter depending on the make, model, and year of your garage door opener.
Within 30 seconds...
3 Press and hold the button the remote control that you wish to enter Programming Mode. Older LiftMaster remote controls are heard. Visit www.homelink.com for compatible accessories. The command LED will be...
8355 Manual - Page 33
.... No movement, only a single click. Inspect safety sensor wire at the logic board. Manually open and close and the light bulbs flash.
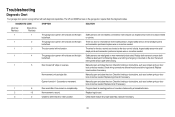
Troubleshooting
Diagnostic Chart
Your garage door opener is a short or reversed wire for 1-2 seconds no movement. There is programmed with self-diagnostic capabilities. No movement or sound.
Safety sensors are not installed, connected...
8355 Manual - Page 34
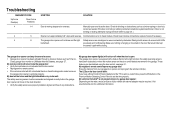
... set the time properly. If the door is moving stops and or reverses.
Close, garage door monitor or LiftMaster Internet Gateway, see page 31 .
My neighbor's remote control opens my garage door: Erase the memory from your vehicle an external adapter may be disabled using the door control, see page 27. Manually open : The garage door opener is equipped with a feature that...
8355 Manual - Page 35
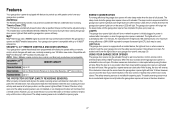
... lightning and power surges. Also compatible with motion sensor that automatically turns opener lights on when it detects a person entering the garage. SECURITY✚ 2.0™ compatible.
Easy to the garage using a 4-digit PIN. Works with LiftMaster® garage door openers manufactured since 1997. Smart Control Panel®: Displays temperature, time and system diagnostics...
8355 Manual - Page 37
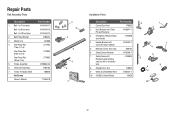
Repair Parts
Rail Assembly Parts
Description 1 Belt - for 10 foot door 2 Belt Pulley Bracket 3 Master Link 4 One-Piece Rail 7 feet (2.1 m) One-Piece Rail 8 feet (2.4 m) One-Piece Rail 10 feet (3 m) 5 Trolley Assembly 6 Tensioner Assembly 7 Trolley Threaded Shaft Not Shown Owner's Manual
Part ...
Similar Questions

Replaced Bad Capacitor On My 8355 Still Not Working Just Hums For A Second What
(Posted by jjdavenprt3 2 years ago)

Programming Home Link
I am trying to program my home link in my ram truck. The button says training and trained but will n...
I am trying to program my home link in my ram truck. The button says training and trained but will n...
(Posted by dzulli 4 years ago)
Programing 'homelink' In My 2005 Lexus Rx 330
I have been unable to program the HomeLink in my 2005 Lexus RX 330 with the Liftmaster 8355-267 in m...
I have been unable to program the HomeLink in my 2005 Lexus RX 330 with the Liftmaster 8355-267 in m...
(Posted by rich8944 9 years ago)
Can The 2000sdr Opener Be Programmed For In Car Home Link System?
Can the 2000sdr opener be programmed for in car home link system?
Can the 2000sdr opener be programmed for in car home link system?
(Posted by Nasda03 9 years ago)

Programming My Car To Garage Door Opener
I am unable to program garage door to 2012 Acura, is my system to old.
I am unable to program garage door to 2012 Acura, is my system to old.
(Posted by Vherd84 11 years ago)