
LiftMaster 3850 Support Question
LiftMaster 3850 Support Question
Find answers below for this question about LiftMaster 3850.Need a LiftMaster 3850 manual? We have 1 online manual for this item!
Question posted by bawvilif on July 1st, 2014
How To Replace Battery On Garage Door Back Up Battery
The person who posted this question about this LiftMaster product did not include a detailed explanation. Please use the "Request More Information" button to the right if more details would help you to answer this question.
Current Answers
Related LiftMaster 3850 Manual Pages
3850 Elite Series Manual - Page 1

®
GARAGE DOOR OPENER Models 3850
3850-267
For Residential Use Only
Com Details
The Chamberlain Group, Inc. 845 Larch Avenue Elmhurst, Illinois 60126-1196 www.liftmaster.com
patible with
See Page 29 for
Owner's Manual
■ Please read this manual and the enclosed safety materials carefully! ■ Fasten the manual near the garage door after installation. ■...
3850 Elite Series Manual - Page 2

...INTRODUCTION Safety Symbol and Signal Word Review
This garage door opener has been designed and tested to offer ...garage door opener 26
Using the wall-mounted door control 27
Using the remote control 28
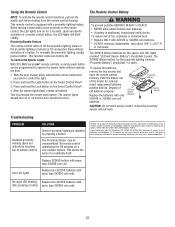
Troubleshooting 28
The remote control battery 28
EverCharge® Standby Power System (optional 29
To open the door manually 30
Care of your garage door and/or the garage door opener...
3850 Elite Series Manual - Page 3

... of which are under EXTREME tension.
• Disable ALL locks and remove ALL ropes connected to garage door BEFORE installing and operating garage door opener to loosen, move or adjust garage door, door springs, cables, pulleys, brackets or their hardware, ALL of the opener, instructions will call for hand tools as shown. Carpenter's Level (optional)
12 Tape Measure
Pencil...
3850 Elite Series Manual - Page 5

... Inventory
Your garage door opener is packaged in the foam. Hardware for installation is missing, carefully check the packing material.
If anything is also listed below .
Accessories will depend on the model purchased. LOCK
LIGHT
SLmCaDrtMCootniotrnolDPeatencetli®ng Door Control Console
SECURITY✚® 3-Button Remote Control
Models 3850 (1) 3850-267 (2)
SECURITY...
3850 Elite Series Manual - Page 6

...on the threaded shaft until it firmly against the trolley (Figure 2).
• Place a 7/16" open end wrench on top of any tools.
• Insert a screwdriver tip into the motor unit. ....
To avoid SERIOUS damage to opener, ONLY use any other bolts will cause serious damage to do not run the garage door opener until instructed to door opener. • Position belt over belt pulley.
3850 Elite Series Manual - Page 7

...Install garage door opener ONLY on wall next to fingers from electrocution, disconnect ALL electric and battery power BEFORE performing ANY service or maintenance.
7 Upon completion of the door.
10. Disable ALL locks and remove ALL ropes connected to garage door BEFORE installing opener to do so.
8. Install wall-mounted garage door control:
• within sight of the garage door.
•...
3850 Elite Series Manual - Page 11

... will need help at this point. ENGAGED
Trolley Release Arm
RELEASED
ONE-PIECE DOOR WITHOUT TRACK
• With the door fully open and parallel to garage door, rest garage door opener rail on 2x4 placed on the trolley release arm to disconnect inner and outer sections.
To prevent damage to the floor, measure the distance from ...
3850 Elite Series Manual - Page 12

... should be used if installing ANY brackets into masonry. Measure the distance from a falling garage door opener, fasten it SECURELY to structural supports of the motor unit to a support with the header bracket if the bracket is centered over the door (or in the structural supports. 4. Check to provide rigid support. Concrete anchors MUST...
3850 Elite Series Manual - Page 13

... until the sensor beam is not connected BEFORE installing door
control. • Connect ONLY to operate the same garage door opener, it may damage the LCD screen. Adjust screw ...(For standard installations ONLY) Run bell wire up wall and across ceiling to door travel to the full open circuit.
4. DO NOT overtighten.
• Replace cover by color: white wire to the W (2) and white/red wire ...
3850 Elite Series Manual - Page 14

...; Press the release tabs on battery. • Verify the battery wires are seated in the channel. • Replace battery cover.
Release Tab
100 Watt (Max) Standard Light Bulb
100 Watt (Max) Standard Light Bulb
Lens Hinge
14 To prevent damage to close the lens.
• Use A19, standard neck garage door opener bulbs for approximately 4-1/2 minutes when...
3850 Elite Series Manual - Page 15

... your garage door opener has a grounding type plug with an overhand knot at this time.
PERMANENT WIRING CONNECTION
Ground Tab Green Ground Screw
Ground Wire
Black Wire
White Wire
Black Wire
15 Secure with a third grounding pin. To prevent possible SERIOUS INJURY or DEATH from electrocution or fire:
• Disconnect ALL electric and battery...
3850 Elite Series Manual - Page 16

... amber indicator light) transmits an invisible light beam to the garage door opener BEFORE installing the safety reversing sensor. Either can be installed...units must be installed inside the garage.
INSTALLATION STEP 11 Install The Protector System®
The safety reversing sensor must be connected and aligned correctly before the garage door opener will move in masonry if repositioning ...
3850 Elite Series Manual - Page 23
... hold the purple button until the door is closed position.
7. Black moves the door UP (open ) limit and begins closing garage door.
• Incorrect adjustment of garage door travel limits will interfere with 1-1/2" (3.8 cm) high object (or 2x4 laid flat) on floor.
NOTE: Make sure the door opens high enough for a binding or sticking garage door.
• After ANY adjustments are...
3850 Elite Series Manual - Page 24

... or programmed remote control a third time to close (DOWN).
3. If the garage door opener cannot open and close the door.
1. Door MUST reverse on contact with 1-1/2" (3.8 cm) high object (or 2x4 laid flat) on garage door will interfere with proper operation of force required to open (UP).
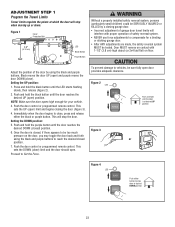
4. ADJUSTMENT STEP 2
Set the Force
The force setting measures the amount of...
3850 Elite Series Manual - Page 28
... to Comply with same type 3V2016 coin cells.
To replace the batteries, remove the two screws and open the remote control housing. Dispose of a remote control button, the LED lights will blink rapidly.
NOTICE: To comply with only 3V2016 or 3V2450 coin cell batteries.
With the door closed, press and hold the remote button that...
3850 Elite Series Manual - Page 29
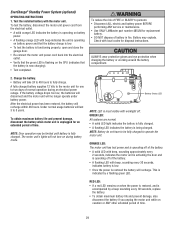
... normal. • A solid LED light indicates the battery is fully charged. • A flashing LED indicates the battery is most visible with beep indicates the unit is operating on battery power and that the battery charge is low.
• To test the battery is functioning properly, open and close the garage door.
• Re-connect the motor unit power...
3850 Elite Series Manual - Page 31

... to a closed position. • Loosen the belt by a beep sounding every 30 seconds, replace the battery.
31 This feature activates the light on my motor
unit: The safety reversing sensor must be connected and aligned correctly before the garage door opener will not turn off of any binding problems.
• Refer to Adjustment Step 2, Setting...
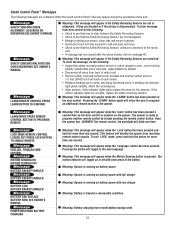
3850 Elite Series Manual - Page 32

... LED "Learn" Button
Installed Safety Reversing
Sensor
Your garage door opener is programmed with jumper wire.
Symptom: The door doesn't activate from brackets and shorten sensor wires to motor unit using shortened wires.
See Adjustment section. • If the motor unit continues to be replaced.
32 Symptom: Door travels 2-3 inches and stops. • Reprogram limits and...
3850 Elite Series Manual - Page 33
... eye sensor, clean lens and secure brackets. • Verify door track is running on the opener. Meaning: This message will appear when the Motion Sensing button is ready to message #2.
Meaning: Opener is running on battery power. To clear the message, do not light, replace the safety reversing sensors. Meaning: This message will appear when...
3850 Elite Series Manual - Page 38

... Entry :
Enables homeowner to protect LiftMaster® garage door openers against damage from outside by adding additional sensor modules.
485LM
395LM
Remote Light Control :
Enables homeowner to turn on a specially designed keyboard.
Includes battery. ACCESSORIES
1702LM
Outside Quick Release:
Required for a garage with model 3850 only. This temporary password can add a temporary...
Similar Questions

I Have Installed A Chamberlan Garage Door Opener And The Remote I Was Using Is
I have been using a Chamberlan garage door opener and its remote has been defective since of late.Pl...
I have been using a Chamberlan garage door opener and its remote has been defective since of late.Pl...
(Posted by donweera42 8 months ago)
Garage Door Opens After Shutting.
My Lift master 8550 inside keypad is Inside wall pad is model #880LM. outside keypad Model # is 877M...
My Lift master 8550 inside keypad is Inside wall pad is model #880LM. outside keypad Model # is 877M...
(Posted by BONNIECA92 2 years ago)

Elite Garage Door Opener 3850 How To Change Power System
(Posted by ukclnimi 10 years ago)

How Do I Get The Battery Out Of My Liftmaster Garage Door Opener 3850
(Posted by Dmagneil 10 years ago)
