Get support for LiftMaster 3595

LiftMaster 3595 Support Question

LiftMaster 3595 Support Question

Find answers below for this question about LiftMaster 3595.
Need a LiftMaster 3595 manual? We have 1 online manual for this item!
Question posted by Bobbaxter6 on August 19th, 2023

Wiring Motor For 3595s

3 wires come out of motor: red, white, blue. Capacitor has a yellow and purple wire coming from circuit board to two terminals on the capacitor. Which color wire from motor goes where?

Current Answers

Answer #1: Posted by INIMITABLE on August 19th, 2023 9:31 AM
This answer was accepted by the poster of the original question.
INIMITABLE

Member since:
April 3rd, 2020

Points: 2,085,520
1,100
points
Follow the steps on this video link; https://www.youtube.com/watch?v=DIM_QJBeoy8


I hope this is helpful? PLEASE "ACCEPT" and mark it "HELPFUL" to complement my little effort. Hope to bring you more detailed answers

-INIMITABLE
Answer #2: Posted by SonuKumar on August 19th, 2023 11:37 AM
SonuKumar

Member since:
May 9th, 2021

Points: 16,633,680
100
points
The LiftMaster 3595 uses a capacitor to help the motor start. The capacitor has two terminals, labeled "C" and "FAN". The "C" terminal is the common terminal, and it is connected to the power source. The "FAN" terminal is connected to the motor.

The red wire from the motor is connected to the "C" terminal on the capacitor. The white wire from the motor is connected to the "FAN" terminal on the capacitor. The blue wire from the motor is not connected to the capacitor.

The yellow wire from the circuit board is connected to the "C" terminal on the capacitor. The purple wire from the circuit board is connected to the "FAN" terminal on the capacitor.

Here is a diagram of the wiring:

[Image of a wiring diagram showing the connection of the capacitor to the motor and circuit board]

The "C" terminal is usually marked with a black wire, and the "FAN" terminal is usually marked with a brown wire. However, it is always best to check the wiring diagram for the specific motor and capacitor you are using.

It is important to connect the wires to the correct terminals on the capacitor. If the wires are connected incorrectly, the motor may not start or it may overheat.

If you are not comfortable connecting the wires yourself, it is best to have a qualified electrician do it for you.


Please respond to my effort to provide you with the best possible solution by using the "Acceptable Solution" and/or the "Helpful" buttons when the answer has proven to be helpful.

Regards,
Sonu
Your search handyman for all e-support needs!!

Related LiftMaster 3595 Manual Pages

3595 Elite Series Manual - Page 1

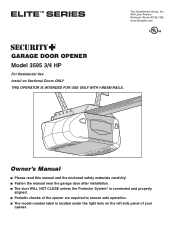
... Elmhurst, Illinois 60126-1196 www.liftmaster.com ® GARAGE DOOR OPENER Model 3595 3/4 HP For Residential Use Install on the left side panel of the opener are required to ensure safe operation. ■ The model number label is connected and properly aligned. ■ Periodic checks of your opener. Owner's Manual ■ Please read this manual and...
3595 Elite Series Manual - Page 2

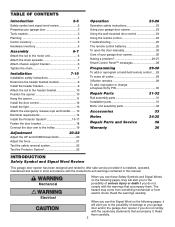
...Motor unit assembly parts 32 Accessories 33 Notes 34-35 Repair Parts and Service 36 Warranty 36 INTRODUCTION Safety Symbol and Signal Word Review This garage door opener...garage door and/or the garage door opener if you do not comply with the warnings that accompany it. Read the warnings carefully. Mechanical Electrical When you see this manual. Read them . The hazard may come...
3595 Elite Series Manual - Page 3

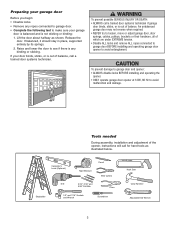
... which are under EXTREME tension. • Disable ALL locks and remove ALL ropes connected to garage door BEFORE installing and operating garage door opener to avoid entanglement. Lift the door about halfway as illustrated below. Carpenter's Level (Optional) 12 Tape Measure Pencil Wire Cutters Drill 3/16", 5/16" and 5/32" Drill Bits Pliers Stepladder 1/2" and 7/16" Sockets and...
3595 Elite Series Manual - Page 4

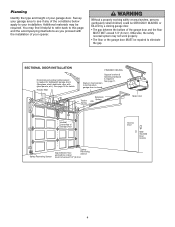
... and the floor MUST NOT exceed 1/4" (6 mm). Torsion Spring Extension Spring OR Motor Unit --- --- -- Planning Identify the type and height of door Reversing Sensor must not exceed 1/4" (6 mm) Access Door Wallmounted Door Control 4 See page 18 for lightweight garage doors (fiberglass, steel, aluminum, door with the installation of your installation. Slack in chain tension is...
3595 Elite Series Manual - Page 5

..., carefully check the packing material. Carton Inventory Your garage door opener is packaged in the foam. contain the motor unit and all parts illustrated below . Parts may ... Header Bracket Chain Motor Unit With Light Lenses Chain Spreader Door Bracket Rail 2 Conductor Bell Wire White & White/Red Chain Pulley Bracket Trolley Safety Sensor Bracket (2) Curved Door Arm Section The ...
3595 Elite Series Manual - Page 6

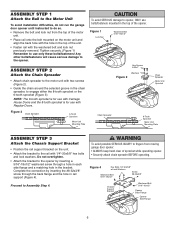
... Assembly Step 4. ASSEMBLY STEP 1 Attach the Rail to the Motor Unit To avoid installation difficulties, do not run the garage door opener until instructed to do so. • Remove the bolt and lock nut from moving garage door opener: • ALWAYS keep hand clear of sprocket while operating opener. • Securely attach chain spreader BEFORE operating. ASSEMBLY STEP...
3595 Elite Series Manual - Page 7

.... Disable ALL locks and remove ALL ropes connected to garage door BEFORE installing opener to do not re-adjust the chain. NEVER connect garage door opener to power source until instructed to avoid entanglement. 5. Install wall-mounted garage door control: • within sight of the garage door. • out of reach of garage door. 12. ASSEMBLY STEP 4 Tighten the Chain Outer Nut...
3595 Elite Series Manual - Page 10

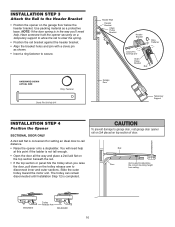
...the opener securely on top section of door. Slide the outer trolley toward the motor unit. Rail Door 2x4 is convenient for setting an ideal door-to-rail distance. • Raise the opener onto ...material as shown. • Insert a ring fastener to secure. To prevent damage to garage door, rest garage door opener rail on 2x4 placed on a temporary support to allow the rail to clear the spring...
3595 Elite Series Manual - Page 11

... ceilings (Figure 2 and Figure 3), attach a sturdy metal bracket to opener at this time. Measure the distance from a falling garage door opener, fasten it SECURELY to structural supports of the motor unit to the hanging brackets with the header bracket if the bracket is centered over the door (or in the structural supports. 4. Drill 3/16" pilot holes...
3595 Elite Series Manual - Page 12

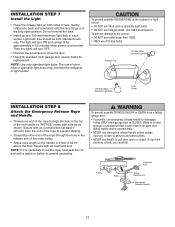
... overtighten. • Replace cover by color: white wire to the W (2) and white/red wire to the R (1) (Figure 2). 2. NOTE: If you have any trouble with door control push buttons or remote control transmitters. • Activate door ONLY when it can be seen clearly, is properly adjusted and there are desired to operate the same garage door opener, it may damage the LCD...
3595 Elite Series Manual - Page 13

... STEP 7 Install the Light • Press the release tabs on both sides of the red handle so "NOTICE" reads right side up to pull door open door falling rapidly and/or unexpectedly. • NEVER use emergency release handle unless garage doorway is clear of the outer trolley. • Adjust rope length so the handle is...
3595 Elite Series Manual - Page 14

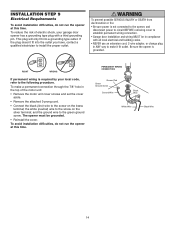
... CONNECTION Ground Tab Green Ground Screw Ground Wire Black Wire White Wire Black Wire 14 To reduce the risk of electric shock, your local code, refer to establish permanent wiring connection. • Garage door installation and wiring MUST be grounded. • Reinstall the cover. Be sure the opener is required by your garage door opener has a grounding type plug with all local...
3595 Elite Series Manual - Page 15

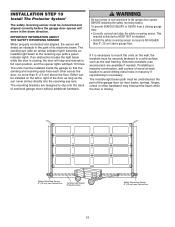
..., the sensor will detect an obstacle in the down direction. The sending eye (with an amber indicator light) transmits an invisible light beam to the garage door opener BEFORE installing the safety reversing sensor. Extension brackets (see accessories) are designed to a solid surface such as the sun never shines directly into the receiving...
3595 Elite Series Manual - Page 22

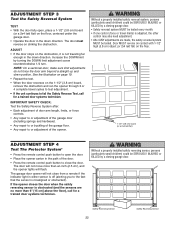
... a 2x4 laid flat) on the 1-1/2" (3.8 cm) board, remove the obstruction and run the opener through 3 or 4 complete travel limits) is misaligned or obstructed). Increase the DOWN limit by a closing garage door. The door will not move more than an inch (2.5 cm), and the opener lights will not close the door. The garage door opener will flash. Safety Reversing Sensor 22...
3595 Elite Series Manual - Page 23

... on, then press and hold the light button for 10 seconds, until the light goes on again. 23 NEVER use emergency release handle to garage door opener BEFORE making any of SEVERE INJURY or DEATH: 1. If obstructed while opening , the door will open door falling rapidly and/or unexpectedly. 7. If you can be turned off as follows: With...
3595 Elite Series Manual - Page 26

...ONLY when garage door is unbalanced or binding, call a trained door systems technician. • Check to be sure door opens and closes fully. Once a Year • Oil door rollers, bearings and hinges. Review Installation Step 6, page 12. 3. Weak or broken springs or unbalanced door could fall. Disconnect trolley first. If the opener runs, check for a faulty wire connection...
3595 Elite Series Manual - Page 27

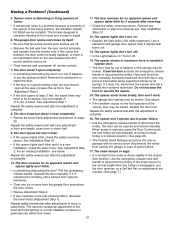
...the opener. • If the door opens at least 5 feet, the travel limits. Repeat the safety reverse test after adjustments to disconnect the trolley. See Adjustment Step 2. The opener motor hums ...; Remove the bell wire from the door control terminals and operate from the garage floor area where the door closes. • Review Adjustment Step 2. • If door reverses in any obstruction...
3595 Elite Series Manual - Page 29

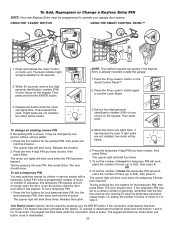
...Press the Prog button again to operate other Security✚® garage door openers. 29 Press the button on motor unit until the learn " button on the hand-held remote*... hold the "learn indicator light goes out (approximately 6 seconds). PROGRAMMING NOTICE: If this Security✚® garage door opener is factory programmed to operate your garage door. 4. The owner of the ...
3595 Elite Series Manual - Page 30

... not installed, two clicks will blink twice. Test by pressing the four buttons for your garage door opener. To activate or deactivate this temporary PIN will work , press the number of your choice... To change an existing, known PIN If the existing PIN is active. When the motor unit lights blink, it may authorize access by pressing only the ENTER button if the one button...
3595 Elite Series Manual - Page 33

... visor clip. 990LM 370LM 3-Button Mini-Remote Control with NO access door. Enables homeowner to open or closed. Garage Door Monitor: Security for the largest door of garage door opener from outside by adding additional sensor modules. Surge Protector: The Garage Door Opener Surge Protector is open garage door manually from portable remotes and a light feature for constant light...

Similar Questions

I Have Installed A Chamberlan Garage Door Opener And The Remote I Was Using Is
I have been using a Chamberlan garage door opener and its remote has been defective since of late.Pl...
(Posted by donweera42 8 months ago)
Garage Door Opens After Shutting.
My Lift master 8550 inside keypad is Inside wall pad is model #880LM. outside keypad Model # is 877M...
(Posted by BONNIECA92 2 years ago)
Dog Chewed Through Sensor Wires, Wont Close On Own.
Hi,    My puppy decided it would be fun to chew through the sensor wires, as well as break one o...
(Posted by tjmims 11 years ago)
Opener Light Turns On By Itself
Hi, I have a LiftMaster 3595 and I would enter the garage from time to time and notice that the lig...
(Posted by michael47837 12 years ago)
Ask a New Question
Use the box below to post a new question about this LiftMaster product .
Points & Prizes
  • You can earn points for nearly everything you do on HelpOwl.com
  • You can trade in those points for gift cards at leading retailers such as Amazon.com and Walmart
  • It's that simple!
See How it Works
Create a Free Account

LiftMaster Manuals

Find free LiftMaster 3595 manuals and user guides available at ManualOwl.com. Try out our unique manual viewer allowing you to interact with manuals from directly within your browser!

LiftMaster Reviews

View thousands of LiftMaster user reviews and customer ratings available at ReviewOwl.com.

Contact Information

Complete LiftMaster customer service contact information including steps to reach representatives, hours of operation, customer support links and more from ContactHelp.com.

Scoreboard Ratings

See detailed LiftMaster customer service rankings, employee comments and much more from our sister site.