
LiftMaster 3280 Support Question
LiftMaster 3280 Support Question
Find answers below for this question about LiftMaster 3280.Need a LiftMaster 3280 manual? We have 1 online manual for this item!
Question posted by Tja231 on June 12th, 2012
Garage Code
Hi I have a lift master security + formula 1 garage door opener. I would like to change my password but not sure how. Seemed to have misplaced my owners manual
Current Answers
Related LiftMaster 3280 Manual Pages
3280 Manual - Page 1
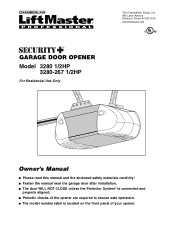
®
GARAGE DOOR OPENER Model 3280 1/2HP
3280-267 1/2HP
For Residential Use Only
The Chamberlain Group, Inc. 845 Larch Avenue Elmhurst, Illinois 60126-1196
www.liftmaster.com
Owner's Manual
■ Please read this manual and the enclosed safety materials carefully! ■ Fasten the manual near the garage door after installation. ■ The door WILL NOT CLOSE unless the Protector System&#...
3280 Manual - Page 2

... instructions 26
Using your garage door opener 26
Using the wall-mounted door control 27
To open the door manually 27
Care of your garage door opener 28
Having a problem 29
Diagnostic chart 30
Programming
31-32
To add or reprogram a hand-held remote control .....31
To erase all codes 31
3-Button remotes 31
To add, reprogram or change a Keyless Entry PIN...
3280 Manual - Page 3
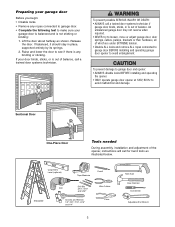
... entirely by its springs. 2. Raise and lower the door to avoid entanglement. To prevent damage to garage door and opener: • ALWAYS disable locks BEFORE installing and operating
the opener. • ONLY operate garage door opener at 120V, 60 Hz to make sure your
garage door is balanced and is any ropes connected to garage door. • Complete the following test to
avoid...
3280 Manual - Page 4
...
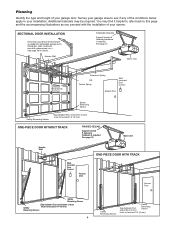
Safety Reversing Sensor
Gap between floor and bottom of door
Reversing Sensor
must not exceed 1/4" (6 mm)
ONE-PIECE DOOR WITHOUT TRACK
FINISHED CEILING
Support bracket & fastening hardware is required. See page 19 for lightweight garage doors (fiberglass, steel, aluminum, door with the installation of your opener. Header Wall
FINISHED CEILING Support bracket & fastening hardware is...
3280 Manual - Page 5
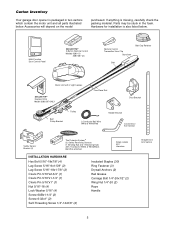
... the packing material.
LOCK
LIGHT
Multi-Function Door Control Panel
SECURITY✚® 3-Button Remote Control
Models 3280 (1)
3280-267 (2)
Remote Control Transmitter Visor Clip
Styrofoam
Belt...(2) Wing Nut 1/4"-20 (2) Rope Handle
Straight Door Arm Section
5 Accessories will depend on the model
purchased. Carton Inventory
Your garage door opener is packaged in the foam.
3280 Manual - Page 6

ASSEMBLY STEP 1
Attach the Rail to the Motor Unit
To avoid installation difficulties, do not run the garage door opener until instructed to do so. • Remove the two washered bolts mounted in top of
motor unit. • Align rail and styrofoam over the motor ...
3280 Manual - Page 7
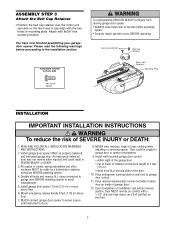
... minimum height of 5 feet (1.5 m).
• away from moving parts of the door.
10. Place manual release/safety reverse test label in plain view on inside of sprocket while operating opener.
• Securely attach sprocket cover BEFORE operating.
You have now finished assembling your garage door opener. To avoid possible SERIOUS INJURY to cables, spring assemblies and other...
3280 Manual - Page 8
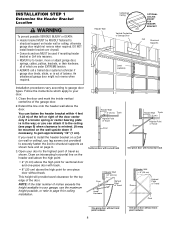
... Point of inches exceeds the height available in the way;
Open your garage, use lag screws (not provided) to securely fasten the 2x4 to the highest point of the door.
You can attach it to the ceiling (see page 9) when clearance is in your door to structural supports as shown.
Header Wall
Unfinished Ceiling
2x4...
3280 Manual - Page 10
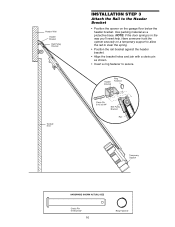
... Support
HARDWARE SHOWN ACTUAL SIZE
Clevis Pin 5/16"x2-3/4"
10
Ring Fastener Header Wall Header Bracket Belt Pulley Bracket
Garage Door
INSTALLATION STEP 3
Attach the Rail to secure. Have someone hold the opener securely on the garage floor below the header bracket. Use packing material as shown.
• Insert a ring fastener to the Header Bracket
•...
3280 Manual - Page 11
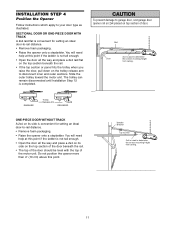
... will need help at this point. Slide the outer trolley toward the motor unit. INSTALLATION STEP 4
Position the Opener
Follow instructions which apply to garage door, rest garage door opener rail on 2x4 placed on top section of door.
SECTIONAL DOOR OR ONE-PIECE DOOR WITH TRACK
A 2x4 laid flat is completed. ENGAGED
Trolley Release Arm
RELEASED
ONE-PIECE...
3280 Manual - Page 12
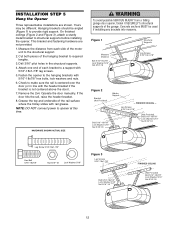
... supports before installing the opener. On finished ceilings (Figure 2 and Figure 3), attach a sturdy metal bracket to provide rigid support. Operate the door manually. If the door hits the rail, raise... distance from a falling garage door opener, fasten it SECURELY to the structural support. 2. Fasten the opener to make sure the rail is not centered above the door). 7. Check to the...
3280 Manual - Page 13
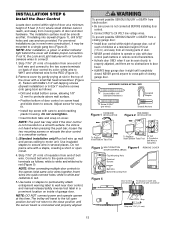
... or open position but will travel . • ALWAYS keep garage door in the top of the cover with door control push buttons or remote control transmitters. • Activate door ONLY when it may stick if the door control is not connected BEFORE installing door
control. • Connect ONLY to red (Figure 5). The trolley will not return to secure...
3280 Manual - Page 14
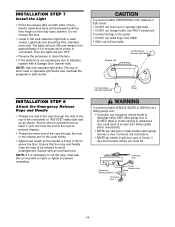
... lit for approximately 4-1/2 minutes when power is clear of all vehicles to disengage trolley ONLY when garage door is in the top of the rope to vibration, replace with a Garage Door Opener bulb. Secure with a match or lighter to pull door open position. Then the lights will turn OFF.
• Reverse the procedure to close the lens.
•...
3280 Manual - Page 15
... the proper outlet.
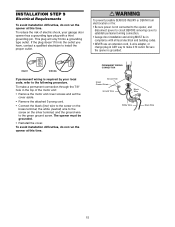
If the plug doesn't fit into a grounding type outlet. Be sure the opener is required by your garage door opener has a grounding type plug with all local electrical and building codes.
• NEVER use an extension cord, 2-wire adapter, or change plug in ANY way to the screw on the silver terminal;
To make...
3280 Manual - Page 16
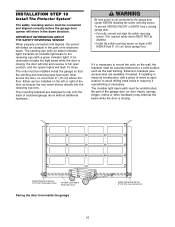
... electronic beam.
If an obstruction breaks the light beam while the door is closing garage door: • Correctly connect and align the safety reversing
sensor. Be sure power is NO HIGHER than 6" (15 cm) above garage floor. Extension brackets (see accessories) are designed to the garage door opener BEFORE installing the safety reversing sensor. To prevent SERIOUS INJURY...
3280 Manual - Page 26
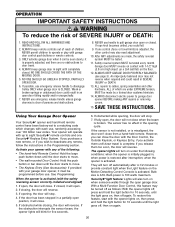
... use , randomly accessing over 100 billion new codes. ALWAYS KEEP GARAGE DOOR PROPERLY BALANCED (see page 3). SAVE THESE INSTRUCTIONS. Using Your Garage Door Opener
Your Security✚® opener and hand-held remote control have been factory-set to a matching code which are made, the safety reversal system MUST be made by a trained door systems tehnician.
14. See Programming. If...
3280 Manual - Page 27
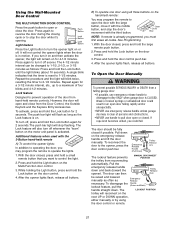
... release handle and lift the door manually. The door can be changed to 1-1/2, 2-1/2, or 3-1/2 minutes as follows: Press and hold the Light button on the
next UP or DOWN operation,
either manually or by using all codes. Using the Wall-Mounted Door Control
THE MULTI-FUNCTION DOOR CONTROL
Press the push button to open or close from the Door Control, the...
3280 Manual - Page 30
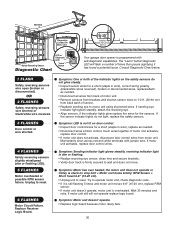
...Sensor
Diagnostic Chart
LED or Diagnostic LED
"Learn" Button
Your garage door opener is not lit on door control. • Inspect door control/wires for a short (staple in wire), correct wiring... • Realign receiving eye sensor, clean lens and secure brackets. • Verify door track is firmly secured to operate motor unit, check diagnostic code. • If it has found a potential issue...
3280 Manual - Page 31

...30 seconds.
2. The owner of the copyright in the garage door opener does not authorize the purchaser or supplier of the non-rolling code transmitter to operate with ...your garage door opener, the large button is operated with a non-rolling code transmitter, the technical measure in the receiver of the garage door opener, which provides security against code-theft devices, will open and...
3280 Manual - Page 32
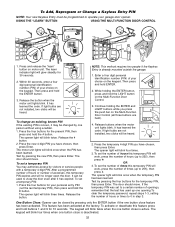
... the number of your garage door opener. Press the four buttons for the temporary PIN, then press Enter. Release the # button. 2. Test by visitors or service people with a temporary 4-digit PIN. After a programmed number of hours or number of times (up to 255), then press ✽. It has learned the code. Press the temporary...
Similar Questions

Chamberlain 3280 Lift Master Professional Formula 1
Frequency for outside door opener?
Frequency for outside door opener?
(Posted by saintgeodragon 2 years ago)

Lift Master Trouble With Door Opening All The Way
My lift master only opens up to the sensors and that's it my sensor lights are not flickering or off...
My lift master only opens up to the sensors and that's it my sensor lights are not flickering or off...
(Posted by Anonymous-118903 10 years ago)

How Do You Remove 485lm Battery From Lift Master 3850p Garage Door Opener
(Posted by cmscalh 10 years ago)

Keyless Entry Pad Model 3280-267
The Keyless Entry Pad for model 3280-267 is not working. Consequently, I was locked out of my house....
The Keyless Entry Pad for model 3280-267 is not working. Consequently, I was locked out of my house....
(Posted by Lrn2See 10 years ago)

Opener Shuts Door Then Opens Door With No Flashing Lights
MY OPENER SHUTS THE DOOR. THEN OPENS IT BACK UP AGAIN WITH NO FLASHING LIGHTS. LIFT MASTER 3280
MY OPENER SHUTS THE DOOR. THEN OPENS IT BACK UP AGAIN WITH NO FLASHING LIGHTS. LIFT MASTER 3280
(Posted by JCCO1017 12 years ago)