
LiftMaster 3255 Support Question
LiftMaster 3255 Support Question
Find answers below for this question about LiftMaster 3255.Need a LiftMaster 3255 manual? We have 1 online manual for this item!
Question posted by ironmantkw on June 8th, 2012
Light Quit Working - Blb Good - Push Light-on Btn And Hear Unit Click - No Go ?
The person who posted this question about this LiftMaster product did not include a detailed explanation. Please use the "Request More Information" button to the right if more details would help you to answer this question.
Current Answers
Related LiftMaster 3255 Manual Pages
3255 Manual - Page 2

... parts 33
Installation parts 33
Motor unit assembly parts 34
Accessories
35
Repair Parts and Service
36
Warranty
36
INTRODUCTION
Safety Symbol and Signal Word Review
This garage door opener has been designed and tested to the possibility of your garage door opener 26
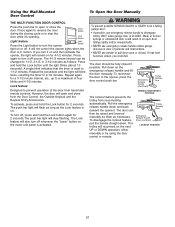
Using the wall-mounted door control 27
To open the door manually 27
Care of serious...
3255 Manual - Page 5

... 1 Receiving Eye) with Light Lens
CEILING MOUNT ONLY UP
Header Bracket
2 Conductor Bell Wire White & White/Red?
Parts may be stuck in two cartons which If anything is missing, carefully check the packing material. Hardware for installation
Accessories will depend on the model purchased.
Carton Inventory
Your garage door opener is packaged in the...
3255 Manual - Page 9
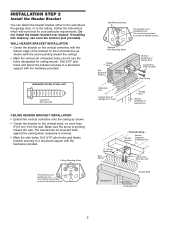
... the wall. The bracket can attach the header bracket either to the wall above the garage door, or to mount the header bracket. You must use the holes designated for positioning only. Follow the instructions which will work best for positioning only. Drill 3/16" pilot holes and fasten bracket securely to a structural support...
3255 Manual - Page 13
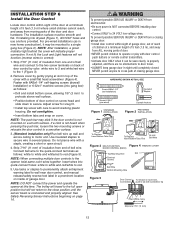
... secure. To prevent possible SERIOUS INJURY or DEATH from end of garage door. Fasten with door control push buttons or remote control transmitters. • Activate door ONLY when it may stick if the door control is not mounted on cover. If a click is NOT connected BEFORE installing door
control. • Connect ONLY to the two screw terminals on...
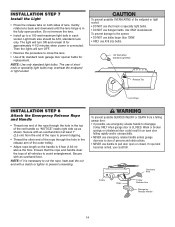
3255 Manual - Page 14
...
Trolley
Rope
NOTICE
Trolley Release Arm
Emergency Release Handle
14 Then the lights will turn OFF.
• Reverse the procedure to close the lens.
• Use A19, standard neck garage door opener bulbs for approximately 4-1/2 minutes when power is in the fully open or closed. To prevent possible SERIOUS INJURY or DEATH from the end...
3255 Manual - Page 16
... Accessories) are designed to the garage door opener BEFORE installing the safety reversing sensor. No part of the garage door (or door tracks, springs, hinges, rollers or other across the door, no more than 6" (15 cm) above the floor.
Be sure power is NO HIGHER
than 6" (15 cm) above garage floor. The invisible light beam path must be disabled...
3255 Manual - Page 17
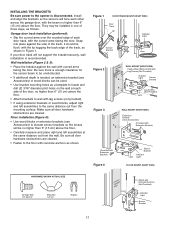
... will face each other across the garage door, with concrete anchors as follows. It should lie flush, with lag screws (not provided).
• If using extension brackets or wood blocks, adjust right and left assemblies at each door track, with Concrete Anchors (Not Provided)
Indicator Light
Sensor Bracket
17 Be sure there is enough...
3255 Manual - Page 18

...the opener. When the green indicator light glows steadily, tighten the wing nut. If the door is already open wire...opener connections.
• Incorrect wiring between sensors and opener.
• A broken wire.
2. Use wing nuts to fasten sensors to the opener. Use insulated staples to secure wire to the receiving eye.
3. Twist like colored wires together
3.
To release or insert wire, push...
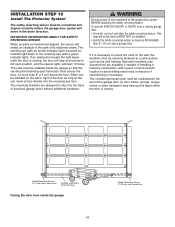
3255 Manual - Page 19

...opener installation door reinforcement kit.
Note correct UP placement, as the horizontal brace. Wood Doors:
• Use top and bottom or side to Step 12. Contact your garage door ...16" holes through the door and secure bracket with your door manufacturer for direct attachment of door bracket. SECTIONAL DOORS
1. Metal, insulated or light weight factory reinforced doors:
• Drill 3/...
3255 Manual - Page 23

... and DOWN Travel Limits
Limit adjustment settings regulate the points at which the door will stop . To operate the opener, press the Door Control push bar. Run the opener through a complete travel . If your door passes both of garage door travel (including binding or unbalanced doors), it will reverse. Read the procedures carefully before proceeding to make limit adjustments...
3255 Manual - Page 24
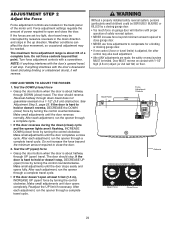
...unit.
HOW AND WHEN TO ADJUST THE FORCES
1. Make small adjustments until door opens completely. The door should reverse. Make small adjustments until the door completes a close cycle. After each adjustment, run the opener through a complete cycle.
• If the door reverses during the down (close) cycle and the opener lights...the UP (open ) force by a closing garage door.
• ...
3255 Manual - Page 25
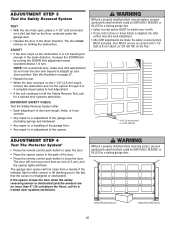
... garage door. • Safety reversal system MUST be tested every month. • If one control (force or travel cycles to test adjustment. • If the unit continues to fail the Safety Reverse Test, call for a trained door systems technician.
The door will not move more than an inch (2.5 cm), and the opener lights will not close the door...
3255 Manual - Page 26
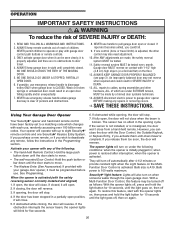
... SEVERE INJURY or DEATH:
1. When the opener is CLOSED. ONLY activate garage door when it can close from a hand-held remote control have been factory-set to a matching code which are under the following : • The hand-held Remote Control: Hold the large push
button down until the light goes off, then on , then off...
3255 Manual - Page 27
... not control the opener lights when the
door is activated. The push bar light will flash as long as necessary. The door should be raised and lowered manually as often as the Lock feature is on the motor unit panel is in an open door falling rapidly and/or unexpectedly.
• NEVER use emergency release handle unless garage doorway is...
3255 Manual - Page 29
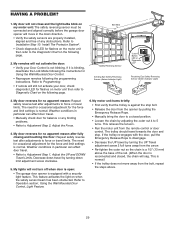
... any obstructions. Weather conditions in particular can affect door travel. • Manually check door for flashes on motor unit then refer to the Diagnostic Chart on my motor unit: The safety reversing sensor must be connected and aligned correctly before the garage door opener will not close and the light bulbs blink on the following page.
2. The trolley...
3255 Manual - Page 30
... do not light, replace the safety sensors. RPM Sensor = Short travel 6-8" (15-20 cm). • Unplug unit to wall and does not move. Wait 30 minutes and retry. Bell Wire
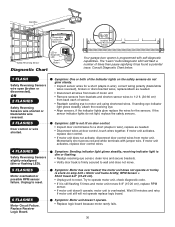
Diagnostics Located On Motor Unit
Safety Reversing Sensor
LED or Diagnostic LED
"Learn" Button
Diagnostic Chart
Installed Safety Reversing
Sensor
Your garage door opener is programmed...
3255 Manual - Page 31
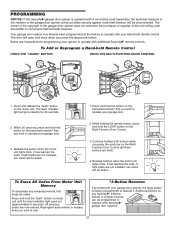
... are not installed, two clicks will be programmed to operate with your hand-held remote* that technical measure. Release the button when the motor unit lights blink. If light bulbs are now erased. It has learned the code. Additional buttons on motor unit until the learn indicator light will be heard. Your garage door opener has already been programmed...
3255 Manual - Page 32
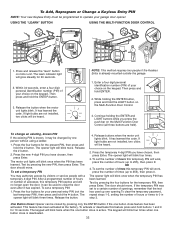
... garage door opener. This feature has been activated at the factory. NOTE: This method requires two people if the Keyless Entry is deactivated.
32 While holding the ENTER and LIGHT buttons while you have chosen, then press Enter. It has learned the code. Press the temporary 4-digit PIN you press the push bar on motor unit...
3255 Manual - Page 35

... visor clip. Includes battery.
Wireless Door Control: Push bar, light feature and auxiliary button. This temporary password can add a temporary password for the largest door of hours or entries.
370LM 378LM
Garage Door Monitor:
Security for visitors or service persons. Surge Protector: The Garage Door Opener Surge Protector is open garage door manually from outside by disengaging...
3255 Manual - Page 36
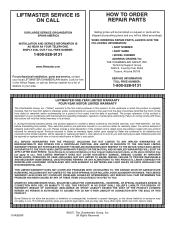
... THIS PRODUCT), LABOR CHARGES FOR REINSTALLING A REPAIRED OR REPLACED UNIT, REPLACEMENT OF BATTERIES AND LIGHT BULBS OR UNITS INSTALLED FOR NON-RESIDENTIAL USE. ANY SERVICE CALL THAT DETERMINES ... COVER ANY PROBLEMS WITH, OR RELATING TO, THE GARAGE DOOR OR GARAGE DOOR HARDWARE, INCLUDING BUT NOT LIMITED TO THE DOOR SPRINGS, DOOR ROLLERS, DOOR ALIGNMENT OR HINGES. Selling prices will be shipped at...
Similar Questions

Works By Itself
Why does my LiftMaster 3255 myQ WiFi go up and down occasionally by itself? I do not touch anything ...
Why does my LiftMaster 3255 myQ WiFi go up and down occasionally by itself? I do not touch anything ...
(Posted by rileymackallar 11 months ago)


Liftmaster 3255 Light Will Not Come On
Liftmaster 3255 light will not come on. Replaced bulb still won't work when turn light on at wall he...
Liftmaster 3255 light will not come on. Replaced bulb still won't work when turn light on at wall he...
(Posted by Schneidj53 11 years ago)
Garage Door Opener Light
We just purchased our house and the light was out in the door opener. When we replaced the bulb the ...
We just purchased our house and the light was out in the door opener. When we replaced the bulb the ...
(Posted by smokiesgirl 12 years ago)