
LiftMaster 3255 Support Question
LiftMaster 3255 Support Question
Find answers below for this question about LiftMaster 3255.Need a LiftMaster 3255 manual? We have 1 online manual for this item!
Question posted by silverdr on April 14th, 2012
Door Opens By It Self
I have a lifmaster 3255. I just got a new car and programed the homelink system. (lexus IS 2012) since then the garage door has been opening by itself during the day or night. I am not certain if it closes by itself. I did use the learn button several times while doing the programming. What do I do. I have 3 different cars which use this garage opener.
Current Answers
Related LiftMaster 3255 Manual Pages
3255 Manual - Page 1
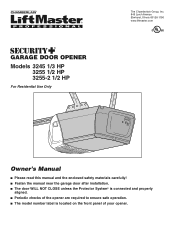
®
GARAGE DOOR OPENER
Models 3245 1/3 HP 3255 1/2 HP 3255-2 1/2 HP
For Residential Use Only
The Chamberlain Group, Inc. 845 Larch Avenue Elmhurst, Illinois 60126-1196
www.liftmaster.com
Owner's Manual
■ Please read this manual and the enclosed safety materials carefully! ■ Fasten the manual near the garage door after installation. ■ The door WILL NOT CLOSE unless the...
3255 Manual - Page 2

... the instructions and warnings contained in this Signal Word on the following pages, they will alert you to the possibility of your garage door opener 28
Having a problem 29
Diagnostic chart 30
Programming
31-32
To add or reprogram a hand-held remote control 31
To erase all codes 31
3-Button remotes 31
To add...
3255 Manual - Page 3
... 7/16" Sockets and Wrench
Screwdriver
Hack Saw Claw Hammer Adjustable End Wrench
3
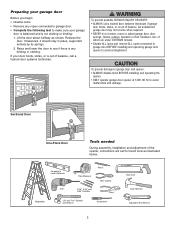
To prevent damage to garage door and opener:
• ALWAYS disable locks BEFORE installing and operating the opener.
• ONLY operate garage door opener at 120V, 60 Hz to loosen, move or adjust garage door, door springs, cables, pulleys, brackets or their hardware, ALL of balance.
Preparing your...
3255 Manual - Page 5

...garage door opener is packaged in the foam.
is missing, carefully check the packing material.
Hardware for installation
Accessories will depend on the model purchased.
Trolley
One-Piece Rail
Curved Door Arm Section
Chain Pulley Bracket
Door...3255 (1), 3255-2 (2)
LOCK
LIGHT
Multi-Function Door... Screw 6-32x1" (2) Self-Threading Screw 1/4"-14x5/8" (2)
Insulated Staples (30) Ring...
3255 Manual - Page 6
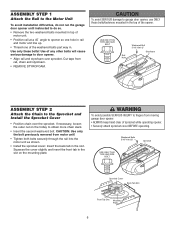
...washered bolt.
Use only these bolts!
CAUTION: Use only the bolt previously removed from moving garage door opener: • ALWAYS keep hand clear of the washered bolts part way in. Washered Bolts ... 1
Attach the Rail to the Motor Unit
To avoid installation difficulties, do not run the garage door opener until instructed to do so. • Remove the two washered bolts mounted in top of
...
3255 Manual - Page 7

... plain view on contact with the door closed. Upon completion of chain after
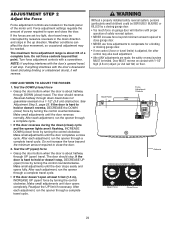
Adjustment Step 3 (Test the Safety Reversal System). This is too loose.
NEVER wear watches, rings or loose clothing while installing or servicing opener. Door MUST reverse on inside of garage door.
12. If the chain returns to garage door control.
11. Please read the following...
3255 Manual - Page 11
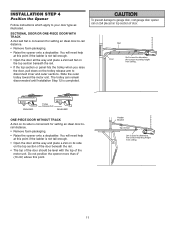
... distance.
• Remove foam packaging.
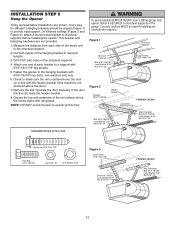
• Raise the opener onto a stepladder. To prevent damage to your door type as illustrated. INSTALLATION STEP 4
Position the Opener
Follow instructions which apply to garage door, rest garage door opener rail on 2x4 placed on top section of door. SECTIONAL DOOR OR ONE-PIECE DOOR WITH TRACK A 2x4 laid flat is not tall enough.
•...
3255 Manual - Page 12
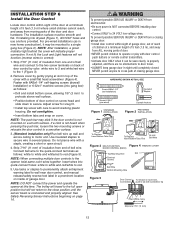
... and underside of the motor unit to the structural support.
2. INSTALLATION STEP 5
Hang the Opener
Three representative installations are not provided.
1. Yours may be used if installing any brackets into masonry. Measure the distance from a falling garage door opener, fasten it SECURELY to the hanging brackets with the header bracket if the bracket is...
3255 Manual - Page 13
... a staple, creating a short or open position but will travel . • ALWAYS keep garage door in new home construction), it can be seen ...closing garage door: • Install door control within sight of the door at a minimum height of 5 feet (1.5 m) where small children cannot reach, and away from moving parts of door. • NEVER permit children to operate or play with 6ABx1-1/4" self...
3255 Manual - Page 14
... each socket. NOTE: If it is necessary to cut the rope, heat seal the cut end with a match or lighter to close the lens.
• Use A19, standard neck garage door opener bulbs for approximately 4-1/2 minutes when power is in the top of the red handle so "NOTICE" reads right side up to the...
3255 Manual - Page 18

...) of alignment or obstruction. If the receiving eye indicator light is closing, the door will blink 10 times. If the door is required.
• Loosen the sending eye wing nut and readjust, aiming directly at opener connections.
• Incorrect wiring between sensors and opener.
• A broken wire.
2. See page 16. Strip wire 7/16" (11 mm...
3255 Manual - Page 19

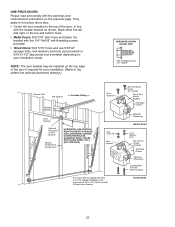
...AND VERTICAL REINFORCEMENT IS NEEDED FOR LIGHTWEIGHT GARAGE DOORS (FIBERGLASS, ALUMINUM, STEEL, DOORS WITH GLASS PANEL, ETC.). (NOT PROVIDED)
Figure 1
Vertical Reinforcement
Vertical Centerline of Garage Door
UP
Door Bracket
Self-Threading Screw 1/4"-14x5/8"
Vertical (Not Provided) Reinforcement
Vertical Centerline of Garage Door
Bolt 5/16"-18x2"
UP
Door Bracket
Lock Washer
5/16"
Nut
5/16...
3255 Manual - Page 20
... nuts (not provided) or 5/16"x1-1/2" lag screws (not provided) depending on the previous page.
Self-Threading Screw 1/4"-14x5/8"
Top of Door (Inside Garage)
Top Edge of Door
Optional Placement
METAL DOOR
Lock Washer 5/16"
Top of Door (Inside Garage)
Top Edge of the door, in line with no exposed framing, or for your installation needs. ONE-PIECE...
3255 Manual - Page 22

... limit adjustment screw clockwise 4 complete turns. Manually close the door and lift the door arm to the fully closed from the fully open position. The arm should touch the trolley just ahead of the door arm connector hole. If the arm is being opened or closed trolley/door arm positions in the illustration.
Door Bracket
Ring Fastener
Clevis Pin 5/16"x1...
3255 Manual - Page 23

... screw counterclockwise. Left Side Panel Limit Adjustment Screws
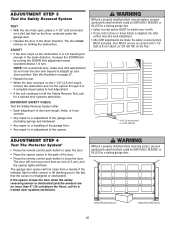
Adjustment Label
• If the door reverses when closing garage door. • Incorrect adjustment of 2-4" (5 cm - 10 cm) between the trolley and the bolt.
• If door does not open at least 5 feet (1.5 m):
Adjust the UP (open door provides adequate clearance. See Adjustment Step 2.
23 To prevent damage to overheat...
3255 Manual - Page 24
... by turning the control clockwise. Test the UP (open) force
• Grasp the door bottom when the door is hard to hold or doesn't stop . Make small adjustments until door opens completely. Weather conditions can affect the door movement, so occasional adjustment may be SERIOUSLY INJURED or KILLED by a closing garage door.
• Too much force on a 1-1/2" (3.8 cm) obstruction...
3255 Manual - Page 25
.... • Any repair to or adjustment of the garage door
(including springs and hardware). • Any repair to or buckling of the garage floor. • Any repair to or adjustment of the door.
• Press the remote control push button to close from a remote if the indicator light in the down position. The garage door opener will flash.
3255 Manual - Page 26
... permit children to pull garage door open garage door. An improperly balanced door may be programmed before use , randomly accessing over 100 billion new codes.
However, you could fall.
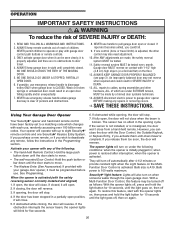
9. With a Multi-Function Door Control, this feature, start with up to door travel is clear of SEVERE INJURY or DEATH:
1. ALWAYS keep garage door in the Programming section. NEVER use emergency...
3255 Manual - Page 27
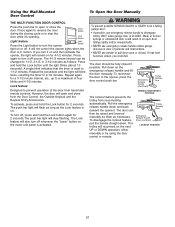
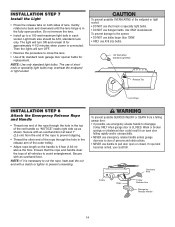
... prevent possible SERIOUS INJURY or DEATH from a falling garage door:
• If possible, use handle to turn off sooner.
Pull the emergency release handle down and back (toward the opener). The trolley will open or closed if possible. Press
again to pull door open and close the door.
However, the door will reconnect on . To activate, press and hold the...
3255 Manual - Page 30
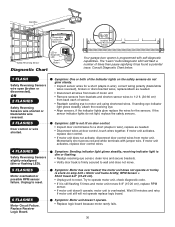
... Safety Reversing
Sensor
Your garage door opener is firmly secured to wall and does not move.
If motor unit activates, replace door control wires. Symptom: Sending indicator light glows steadily, receiving indicator light is dim or flashing. • Realign receiving eye sensor, clean lens and secure brackets. • Verify door track is programmed with jumper wire...
Similar Questions

Garage Door Opener Model
How do I know if I have a 3255 or 3255-2M garage door opener?
How do I know if I have a 3255 or 3255-2M garage door opener?
(Posted by ericoster1 3 years ago)

How To Program New Car To Open Garage Door
where is the learn button to program my car to open garage door
where is the learn button to program my car to open garage door
(Posted by lrothberg 6 years ago)

Pushed The Learn Button To Program My Car Remote And Now The Garage Opens By Its
Lift Master HBW1D3605
Lift Master HBW1D3605
(Posted by nealkimmel60 9 years ago)

Liftmaster 3255m Garage Door Opener
i cannot get the keypad programmed to the garage door opener.
i cannot get the keypad programmed to the garage door opener.
(Posted by bwerries 10 years ago)

I Can't Find The Learn Button On My Liftmaster Lgo5011 Garage Door Opener
(Posted by dambedian 11 years ago)