Lexmark X204N Support Question
Lexmark X204N Support Question
Find answers below for this question about Lexmark X204N - X B/W Laser.Need a Lexmark X204N manual? We have 4 online manuals for this item!
Question posted by stephCheec on September 23rd, 2013
How To Remove Cartridge From Lexmark X204n
The person who posted this question about this Lexmark product did not include a detailed explanation. Please use the "Request More Information" button to the right if more details would help you to answer this question.
Current Answers
Related Lexmark X204N Manual Pages
Quick Reference - Page 8
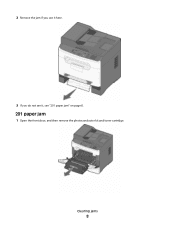
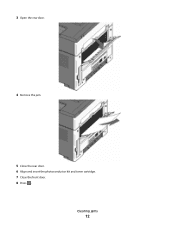
2 Remove the jam if you see it here.
3 If you do not see it, see "201 paper jam" on page 8.
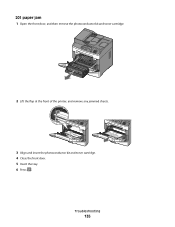
201 paper jam
1 Open the front door, and then remove the photoconductor kit and toner cartridge. Clearing jams
8
Quick Reference - Page 9
Clearing jams
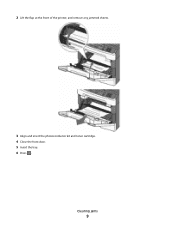
9 2 Lift the flap at the front of the printer, and remove any jammed sheets.
3 Align and insert the photoconductor kit and toner cartridge. 4 Close the front door. 5 Insert the tray. 6 Press .
Quick Reference - Page 10
Clearing jams
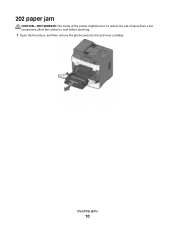
10 202 paper jam
CAUTION-HOT SURFACE: The inside of injury from a hot component, allow the surface to cool before touching.
1 Open the front door, and then remove the photoconductor kit and toner cartridge. To reduce the risk of the printer might be hot.
Quick Reference - Page 12
Clearing jams
12
3 Open the rear door.
4 Remove the jam.
5 Close the rear door. 6 Align and insert the photoconductor kit and toner cartridge. 7 Close the front door. 8 Press .
Quick Reference - Page 14

251 paper jam
A sheet of it is not visible, then complete the following steps:
1 Remove the photoconductor kit and toner cartridge. Part of paper or specialty media failed to feed completely from the front of the manual feeder. If the sheet is visible, then gently pull the jammed sheet from the manual feeder.
If it may be still visible.
Clearing jams
14
Quick Reference - Page 15

Clearing jams
15 2 Lift the flap at the front of the printer, and then remove any jammed sheets.
3 Align and insert the photoconductor kit and toner cartridge. 4 Press .
User's Guide - Page 1

Lexmark X203n and X204n Series
User's Guide
March 2009
Machine type(s): 7011 Model(s): 200, 215
www.lexmark.com
User's Guide - Page 2

......24
Using recycled paper...24 Conserving supplies...24
Saving energy...25
Using Eco-Mode ...25 Adjusting Power Saver...26
Recycling...26
Recycling Lexmark products...26 Recycling Lexmark packaging...26 Returning Lexmark cartridges for reuse or recycling...27
Reducing printer noise...27
Loading paper and specialty media 29
Setting the Paper Size and Paper Type...
User's Guide - Page 27
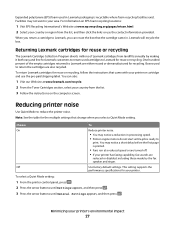
... first page is recyclable where foam recycling facilities exist. To return Lexmark cartridges for reuse or recycling
The Lexmark Cartridge Collection Program diverts millions of the empty cartridges returned to Lexmark, you select a Quiet Mode setting. This setting supports the
performance specifications for recycling. Lexmark will recycle the box. Boxes used to reduce the printer noise...
User's Guide - Page 45
...
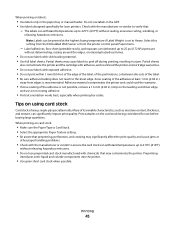
45 Select this setting from the Embedded Web Server or from edges is not possible, remove a 1.6 mm (0.06 in the paper tray or manual feeder. The labels can significantly... jam. When printing on the card stock being considered for laser printers. Adhesive material contaminates the printer and could void the printer and cartridge warranties.
• Do not use a non-oozing adhesive....
User's Guide - Page 117

...near its end of life.
Recommended toner cartridge part numbers
Part name Toner cartridge
Regular cartridge X203A21G
Lexmark Return Program Cartridge X203A11G
Ordering a photoconductor kit
When 84 PC...
1 Remove the toner cartridge. 2 Firmly shake the cartridge side-to-side and front-to-back several times to redistribute toner.
3 Reinsert the cartridge and continue printing. The Device Status ...
User's Guide - Page 118

...
6 MNO
*
9 WXYZ
0
#
2 Press the button on the left in your cartridge by printing a menu settings page. Firmly shake it side-to-side and front-to-back... or when you experience faded print, remove the toner cartridge. Replacing supplies
Replacing the toner cartridge
When 88 Cartridge is left side of the photoconductor kit, and then pull the toner cartridge out using the handle. 1
1@!.
...
User's Guide - Page 127
...the paper tray with
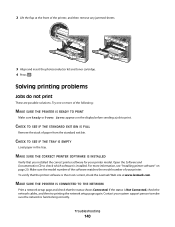
Try one or more of the following :
• Replace the toner cartridge, and then press to clear the message and continue printing. • Press to clear ... aligned correctly. Troubleshooting
127
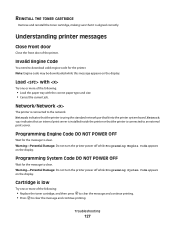
Cartridge is using the standard network port built into the printer system board. REINSTALL THE TONER CARTRIDGE
Remove and reinstall the toner cartridge, making sure that it ...
User's Guide - Page 128
... printing. • Make sure the paper size setting matches the size of the paper in the tray.
37 Insufficient memory to clear the message. Remove the toner cartridge, and then install a new one.
32 Replace unsupported cartridge
Remove the toner cartridge, and then install a supported one or more of the paper that entered the printer.
User's Guide - Page 135
Troubleshooting
135 201 paper jam
1 Open the front door, and then remove the photoconductor kit and toner cartridge.
1@!.
4 GHI
2 ABC 5 JKL
3 DEF
7 PQRS
8 TUV
6 MNO
*
9 WXYZ
0
#
2 Lift the flap at the front of the printer, and remove any jammed sheets.
3 Align and insert the photoconductor kit and toner cartridge. 4 Close the front door. 5 Insert the tray. 6 Press .
User's Guide - Page 136

... sheets. Troubleshooting
136 To reduce the risk of injury from a hot component, allow the surface to cool before touching.
1 Open the front door, and then remove the photoconductor kit and toner cartridge.
1@!.
4 GHI
2 ABC 5 JKL
3 DEF
7 PQRS
8 TUV
6 MNO
*
9 WXYZ
0
#
2 Lift the flap at the front of the printer might be hot...
User's Guide - Page 137

3 Open the rear door.
4 Remove the jam.
5 Close the rear door. 6 Align and insert the photoconductor kit and toner cartridge. 7 Close the front door. 8 Press . Troubleshooting
137
User's Guide - Page 140
...SEE IF THE STANDARD EXIT BIN IS FULL
Remove the stack of the printer, and then remove any jammed sheets.
3 Align and insert the photoconductor kit and toner cartridge. 4 Press .
Contact your system support ... the display before sending a job to check which software is the most current, check the Lexmark Web site at the front of paper from the standard exit bin. To verify that you installed...
User's Guide - Page 161

... the information herein; these available in all countries in this statement may be used instead. For Lexmark technical support, visit support.lexmark.com. Changes are periodically made at any time. Notices
Product information
Product name: Lexmark X203n, Lexmark X204n Machine type: 7011 Model(s): 200, 215
Edition notice
March 2009 The following paragraph does not apply...
User's Guide - Page 166

...you if the product you may be required to present proof of Limited Warranty
Lexmark X203n, Lexmark X204n
Lexmark International, Inc., Lexington, KY
This limited warranty applies to , a product...of all print cartridges, programs, data, and removable storage media (unless directed otherwise by Lexmark). The replacement may be a new or repaired item. Limited warranty
Lexmark warrants that ...
Similar Questions

How To Change Ink Cartridge In Lexmark Printer X204n
(Posted by ayalcor 9 years ago)

How To Change The Cartridge On A Lexmark X204n
(Posted by roazzy 10 years ago)

How To Refill Toner Cartridge In Lexmark X204n
(Posted by josdoqu 10 years ago)
The Lexmark X2670 Won't Recognise New Genuine Colour Cartridge
My new colour cartridge will not work. this is a genuine Lexmark cartridge. I have used the same bef...
My new colour cartridge will not work. this is a genuine Lexmark cartridge. I have used the same bef...
(Posted by heatherhaynes00 11 years ago)