
Lexmark T652 Support Question
Lexmark T652 Support Question
Find answers below for this question about Lexmark T652.Need a Lexmark T652 manual? We have 9 online manuals for this item!
Question posted by Lazaypacke on August 5th, 2014
How To Get To Diagnostics Mode On A T652 Lexmark
The person who posted this question about this Lexmark product did not include a detailed explanation. Please use the "Request More Information" button to the right if more details would help you to answer this question.
Current Answers
Related Lexmark T652 Manual Pages
Service Manual - Page 4
... service check ...2-177
Diagnostic aids ...3-1
Understanding the printer control panel (models T650, T652, and T654) ...3-1 Accessing service menus (models T650, T652, and T654) ...3-2 Diagnostics mode (models T650, T652, and T654) ...3-3 Entering Diagnostics mode (models T650, T652, and T654) ...3-3 Available tests ...3-3 Exiting Diagnostics mode (models T650, T652, and T654) ...3-5 REGISTRATION...
Service Manual - Page 25
... repair the failure.
Use the service error codes, user status messages, user error messages, service checks, and diagnostic aids to verify the repair. After you to most computer networks. The Lexmark laser printers are letter-quality page printers designed to attach to personal computers and to the correct field replaceable unit (FRU) or part. 4062...
Service Manual - Page 36
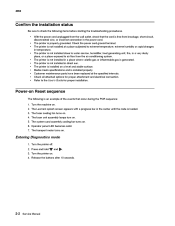
...turn on . 4. The system card assembly cooling fan turns on . Entering Diagnostics mode
1. Press and hold 3. and .
2-2 Service Manual The printer is not installed in direct sun. Power-on a level and stable surface.... 4. Check the power cord ground terminal. • The printer is not installed at the specified intervals. The Lexmark splash screen appears with a progress bar in the center until ...
Service Manual - Page 160

... to step 2. Enter the diagnostic mode 2.
Enter the diagnostic mode 2. The sensor is working properly
Go to "Sensor (input) removal (T650, T652, T654)" on the operator panel...above sensor connected properly?
The sensor is working properly
Go to "Fuser unit assembly removal (T650, T652, T654)" on the operator panel, change every time the sensing area of the above sensor is...
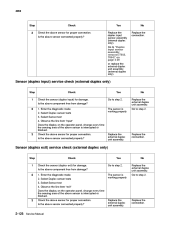
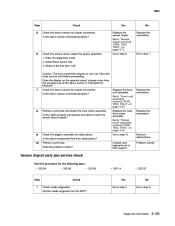
Service Manual - Page 161
... the fuser unit assembly.
Is the above sensor is interrupted or blocked. Enter the diagnostic mode 2. 4062
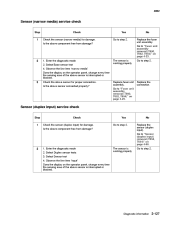
Sensor (narrow media) service check
Step 1 Check Check the sensor (narrow media) for damage.
Go to "Fuser unit assembly removal (T650, T652, T654)" on page 4-23. The sensor is working properly
Go to step 2. Select Base...
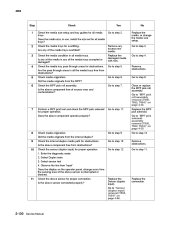
Service Manual - Page 162
Go to step 2.
2
1. Enter the diagnostic mode 2. The sensor is working properly
3
Check the above sensor for proper connection. Is the ... above component free from damage? No Replace the external duplex unit assembly. Go to "Duplex input sensor assembly removal (T652, T654)" on the operator panel, change every time the sensing area of the above sensor is interrupted or blocked. ...
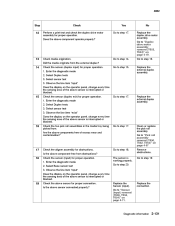
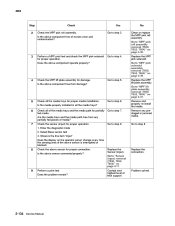
Service Manual - Page 164
...Are the pass through areas for proper operation. Go to "MPF pick solenoid assembly removal (T650, T652, T654)" on page 4-38.
5 6
Check media origination. Is the above sensor is interrupted...duplex? Go to "MPF pick roll assembly removal (T650, T652, T654)" on page 4-39.
8 9 10
Check media origination. Enter the diagnostic mode 2. Go to step 12.
Did the media originate from ...
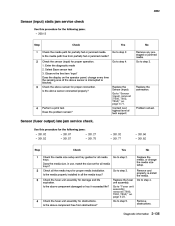
Service Manual - Page 165
... the sensing area of the above sensor for proper operation.
Go to "Sensor (input) removal (T650, T652, T654)" on page 4-19.
12
13 14
Check media origination. Is the above sensor connected properly? Enter the diagnostic mode 2. The sensor is interrupted or blocked. Remove obstructions.
Observe the line item "input" Does the display...
Service Manual - Page 166
... the above component free of the media tray? Go to "Fuser unit assembly removal (T650, T652, T654)" on the operator panel, change the media size setup. Contact next highest level of... guides for all media trays? Check the fuser unit assembly for proper operation. 1. Enter the diagnostic mode 2.
Go to step 22.
22
Perform a print test.
Replace the main drive motor assembly....
Service Manual - Page 167
...of the above component free from the MPF?
Did the media originate from obstructions?
Enter the diagnostic mode 2. Observe the line item "exit" Caution: The area around the actuator is interrupted or ... tech support. Go to "Sensor (input) removal (T650, T652, T654)" on page 4-54. Go to "Output cover assembly removal (T650, T652, T654)" on page 4-71. Replace the fuser unit assembly....
Service Manual - Page 168
...the diagnostic mode 2. Go to step 9.
8
Check the above component free of excess wear and contamination?
No Clean or replace the MPF pick roll assembly. Go to "Sensor (input) removal (T650, T652, ...the MPF pick solenoid.
Does the problem remain? Go to "MPF pick solenoid assembly removal (T650, T652, T654)" on page 4-37.
5 6
Check all the media trays for partially fed media.
Remove...
Service Manual - Page 169
... unit assembly for proper operation. 1. Is the media path free from obstructions? Enter the diagnostic mode 2. No Replace the media, or change every time the sensing area of tech support. ...prestaged or jammed media. Replace the Sensor (input). Go to "Fuser unit assembly removal (T650, T652, T654)" on page 4-71. Replace the connection.
4
Perform a print test. Does the problem...
Service Manual - Page 170

...
Check Check the sensor (fuser output) for proper connection.
Go to step 8. Enter the diagnostic mode 2. Go to step 9. Go to "Output cover assembly removal (T650, T652, T654)" on page 4-23.
Go to "Transfer roll assembly removal (T650, T652, T654)" on the operator panel, change every time the sensing area of tech support. Go...
Service Manual - Page 189
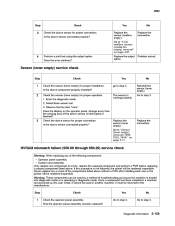
...Replace the sensor (toner empty).
Enter the diagnostic mode 2. If this procedure is not followed, the printer will be returned to the manufacturer. It must...mode, it cannot be rendered inoperable. Is the above sensor is interrupted or blocked? Yes go to step 3. Observe the line item "toner" Does the display on page 4-71.
No Go to "Sensor (toner empty) removal (T650, T652...
Service Manual - Page 214
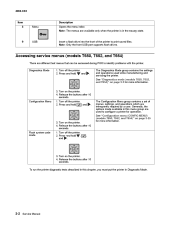
... for operation. Note: Only the front USB port supports flash drives. Diagnostics Mode 1. See "Diagnostics mode (models T650, T652, and T654)" on the printer. 4. The Configuration Menu group contains a set of the printer to identify problems with the printer. Release the buttons after 10 seconds. Generally, the options made available in the Ready state.
9
USB
Insert a flash drive...
Service Manual - Page 215

4062-XXX
Diagnostics mode (models T650, T652, and T654)
Entering Diagnostics mode (models T650, T652, and T654)
1....Mode" on page 3-9 See "RFID Option Test" on page 3-10 See "Print quality pages (Prt Quality Pgs)" on page 3-7 See "Input source tests" on page 3-7 See "Quick Test" on page 3-6 See "REGISTRATION" on . 3. Release the buttons after 10 seconds. Turn the printer on page 3-5
Diagnostic...
Service Manual - Page 217
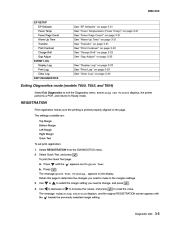
... To print the Quick Test page: .
Use 4.
Resetting the Printer displays, the printer performs a POR, and returns to reset the value. REGISTRATION
Print registration makes sure the printing is printed properly aligned on page 3-22
Exiting Diagnostics mode (models T650, T652, and T654)
Select Exit Diagnostics to the margins settings. 3. The message Quick Test Printing...appears...
Service Manual - Page 236
....
Press Back to return to normal mode.
3-24 Service Manual
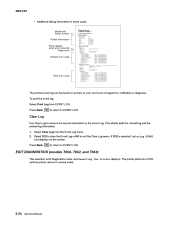
The printer performs a POR, and the printer returns to EVENT LOG. Clear Log
Use Clear Log to Lexmark or your next level of support for verification or diagnosis. EXIT DIAGNOSTICS (models T650, T652, and T654)
This selection exits Diagnostics mode, and Resetting the Printer displays. To print the event...
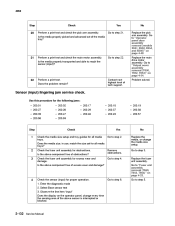
Service Manual - Page 324
...the mounting screws centered in the slots in the printhead frame assembly.
Turn the printer off. 2. Leave the screws loose enough to allow the printhead to move from ...skew
Printhead misalignment
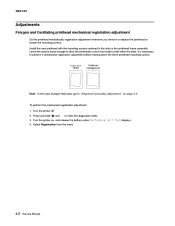
Note: In the case of paper feed skew, go to enter the diagnostic mode. 3. 4062-XXX
Adjustments
Polygon and Oscillating printhead mechanical registration adjustment
Do the printhead mechanically ...
Service Manual - Page 325
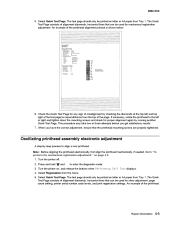
... shown below:
Lexmark Hd Quick Test
Device Information
Page Cou nt Installed Memory Processor Speed Serial Number TDS Calibration Engine ID System Card ID
Printer Revision Levels
31... setting, printer serial number code levels, and print registration settings. Turn the printer on letter or A4 paper from Tray 1. If necessary, rotate the printhead to enter the diagnostic mode. 3. ...
Similar Questions


Lexmark Ms711 Laser Printer Weight
what does the ms711 laser printer weigh without additional trays?
what does the ms711 laser printer weigh without additional trays?
(Posted by cathyrose2 10 years ago)

Can Not Get Printer To Go Into Diagnostics Mode
ALREADY REPLACED MAIN BOARD. GOES INTO CONFIGURATION MODE FINE
ALREADY REPLACED MAIN BOARD. GOES INTO CONFIGURATION MODE FINE
(Posted by TGILBERT510 11 years ago)