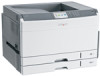
Lexmark C925 Support Question
Lexmark C925 Support Question
Find answers below for this question about Lexmark C925.Need a Lexmark C925 manual? We have 30 online manuals for this item!
Question posted by simon89634 on September 29th, 2014
Imaging Unit Replaced But Printer Not Registering.. Why???
The person who posted this question about this Lexmark product did not include a detailed explanation. Please use the "Request More Information" button to the right if more details would help you to answer this question.
Current Answers
Answer #1: Posted by TommyKervz on September 29th, 2014 1:15 AM
TommyKervz

Member since:
January 10th, 2013 Points: 17,776,783

Member since:
January 10th, 2013 Points: 17,776,783
Restore factory default settings
Settings > General Settings > Factory Defaults > Restore Now
Related Lexmark C925 Manual Pages
Compatibility Guide - Page 11

Supported maximum configurations
11
Printer stand 39V4339:
Supported printer: C925
Placement Printer stand 24Z0031 Printer stand converted to caster base 24Z0031
Desktop Floor
Optional 550-sheet drawers
1
2
3
Floor
Lexmark C950
Lexmark C950 with tandem‑tray module, high‑capacity feeder, and booklet finisher:
Compatibility Guide - Page 39

....
All paper-handling options must always be installed under the printer. - An optional 500-sheet drawer is installed, then: - The duplex unit must be installed directly under the duplex unit. - Printer stand 16N1708 with or without scanner shelf 21J0055 A printer without MFP option can also support a maximum combination of one optional 2,000-sheet drawer
and...
Compatibility Guide - Page 40

... option can also support a maximum combination of the listed configurations.
- All paper-handling options must be installed under the duplex unit.
• A printer without a printer stand. The duplex unit must be directly under the duplex unit, is installed, then:
- Scanner shelf
Use the following shelves to place an MFP option on top of a supported mono...
Background and Idle Screen Admin Guide - Page 3

... the application 5
Accessing the Embedded Web Server...5 Licensing the application...5 Configuring Background and Idle Screen 8 Exporting and importing configuration files 8
Using the application from the printer control panel 10
Changing the background image using the printer control panel 10
Troubleshooting 11
Background and Idle Screen troubleshooting 11
Index...12
Contents
3
Maintenance Guide - Page 2

... 7
Ordering supplies...7
Ordering toner cartridges...7 Ordering imaging units...8 Ordering a fuser or a transfer module...8 Ordering a waste toner bottle...8
Replacing Supplies...9
Replacing an imaging unit...9 Replacing a toner cartridge...11 Replacing the waste toner bottle...13
Moving the printer...15
Before moving the printer...15 Moving the printer to another location...15 Shipping the...
Maintenance Guide - Page 4

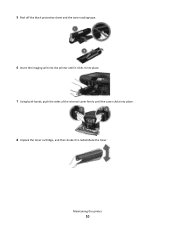
Make sure it is in the correct position. 3 Remove the imaging unit: a Open the internal cover. b Push the imaging unit lock lever up and pull out the imaging unit.
4 Locate the LED wipe at the end of the imaging unit. Maintaining the printer
4
Maintenance Guide - Page 5
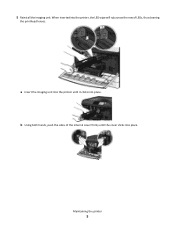
b Using both hands, push the sides of LEDs, thus cleaning
the printhead lenses.
Maintaining the printer
5 a Insert the imaging unit into the printer until the cover clicks into place. When inserted into the printer, the LED wipe will rub across the row of the internal cover firmly until it clicks into place. 5 Reinstall the imaging unit.
Maintenance Guide - Page 6
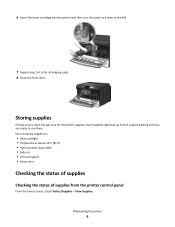
Storing supplies
Choose a cool, clean storage area for all imaging units. 8 Close the front door. Store supplies right side up in their original packing until you are ready to for the printer supplies. 6 Insert the toner cartridge into the printer and then turn the toner lock lever to the left.
7 Repeat step 2-6 to use them...
Maintenance Guide - Page 8
...name Waste toner bottle
Part number C925X76G
Maintaining the printer
8
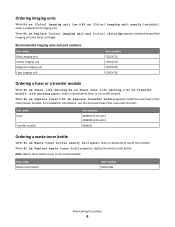
When 80.xx Replace fuser or 83.xx Replace transfer module appears, install the new fuser or the new transfer module. Recommended imaging units and part numbers
Part name Black imaging unit Yellow imaging unit Magenta imaging unit Cyan imaging unit
Part number C925X72G C925X75G C925X74G C925X73G
Ordering a fuser or...
Maintenance Guide - Page 9
Maintaining the printer
9
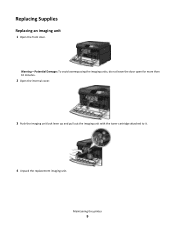
Warning-Potential Damage: To avoid overexposing the imaging units, do not leave the door open for more than 10 minutes.
2 Open the internal cover.
3 Push the imaging unit lock lever up and pull out the imaging unit with the toner cartridge attached to it.
4 Unpack the replacement imaging unit. Replacing Supplies
Replacing an imaging unit
1 Open the front door.
Maintenance Guide - Page 10
Maintaining the printer
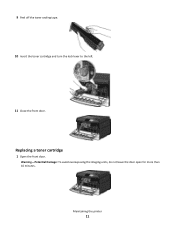
10 5 Peel off the black protective sheet and the toner sealing tape.
6 Insert the imaging unit into the printer until it clicks it into place. 7 Using both hands, push the sides of the internal cover firmly until the cover clicks into place. 8 Unpack the toner cartridge, and then shake it to redistribute the toner.
Maintenance Guide - Page 11
Maintaining the printer
11 9 Peel off the toner sealing tape.
10 Insert the toner cartridge and turn the lock lever to the left.
11 Close the front door.
Replacing a toner cartridge
1 Open the front door. Warning-Potential Damage: To avoid overexposing the imaging units, do not leave the door open for more than 10 minutes.
Menu Map - Page 1
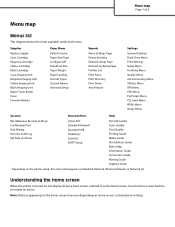
Supplies
Replace Supply Cyan Cartridge Magenta Cartridge Yellow Cartridge Black Cartridge Cyan Imaging Unit Magenta Imaging Unit Yellow Imaging Unit Black Imaging Unit Waste Toner... list
This diagram shows the items available under each menu.
Understanding the home screen
When the printer is turned on home screen customization settings.
Note: Buttons appearing on the home screen may vary...
Print Defects Guide - Page 1
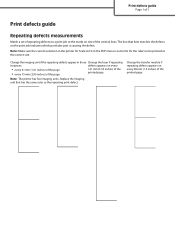
Note: The printer has four imaging units. Replace the imaging unit that best matches the defects on the print job indicates which particular part is set...same color as the repeating print defect. Change the imaging unit if the repeating defects appear in the PDF menu is causing the defect.
Note: Make sure the current selection in the printer for the rulers to Fit in these Change the ...
Print Quality Guide - Page 4
... side-to-side and front-to-back several times to redistribute the toner. 3 Reinsert the toner cartridge.
If the problem continues, the printer may affect the print quality of 13
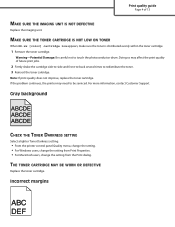
MAKE SURE THE IMAGING UNIT IS NOT DEFECTIVE
Replace the imaging unit. For more information, contact Customer Support. THE TONER CARTRIDGE MAY BE WORN OR DEFECTIVE...
Print Quality Guide - Page 5

MAKE SURE THE IMAGING UNIT IS NOT DEFECTIVE
Replace the defective imaging unit.
Try one or more of the following :
CHECK THE PAPER GUIDES
Move the guides in the tray:
1 From the printer control panel Paper menu, check the Paper Size setting. 2 Before sending the job to the correct positions for the paper size loaded.
Print quality...
Print Quality Guide - Page 7
...replacement part. For more of 13
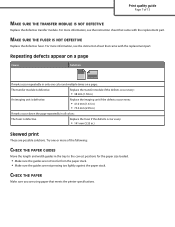
MAKE SURE THE TRANSFER MODULE IS NOT DEFECTIVE
Replace the defective transfer module.
Replace... appear on a page:
The transfer module is defective. Replace the imaging unit if the defects occur every: • 41.0 mm ... page repeatedly in .)
An imaging unit is defective.
MAKE SURE THE FUSER IS NOT DEFECTIVE
Replace the defective fuser. Print quality...
Print Quality Guide - Page 8

...replace the toner cartridge.
• If the problem continues, the printer may need to be replaced.
Streaked horizontal lines appear on prints
ABCDE ABCDE ABCDE
Try one or more of the following :
SELECT ANOTHER TRAY OR FEEDER
• From the printer.... 3 Reinsert the toner cartridge. If the problem continues, the imaging unit may affect the print quality of future print jobs.
2 Firmly shake...
Print Quality Guide - Page 10
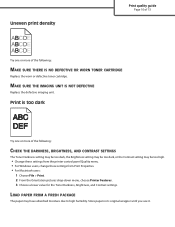
... • For Macintosh users:
1 Choose File > Print. 2 From the Orientation pictures drop-down menu, choose Printer Features. 3 Choose a lower value for the Toner Darkness, Brightness, and Contrast settings. Store paper in its original... DEFECTIVE OR WORN TONER CARTRIDGE
Replace the worn or defective toner cartridge. MAKE SURE THE IMAGING UNIT IS NOT DEFECTIVE
Replace the defective imaging unit.
Print Quality Guide - Page 13

... worn or defective. Fuser may be worn or defective.
Replace the fuser.
Replace the fuser.
Print quality guide
Page 13 of 13
Cause The imaging unit may be defective or installed incorrectly. If necessary,
of paper being used . Fuser is selected. Printer may not have recalibrated recently. Replace the transfer module.
Open the side door. Call...
Similar Questions

Imaging Unit Reset
Can the imaging unit 52D0Z00 be reset on a Lexmark MS810n printer until a new unit can be pur
Can the imaging unit 52D0Z00 be reset on a Lexmark MS810n printer until a new unit can be pur
(Posted by glj11611 3 years ago)

Replace Black Imaging Unit
I would like to replace the 4 imaging units. Do I replace them after or before I replace the 4 color...
I would like to replace the 4 imaging units. Do I replace them after or before I replace the 4 color...
(Posted by wmrogerclark 8 years ago)
Lexmark Ms810dtn Imaging Unit Replacement
I just replaced my imaging unit and get an error code that the printer isn't recognizing the imaging...
I just replaced my imaging unit and get an error code that the printer isn't recognizing the imaging...
(Posted by amills2135 10 years ago)

Cannot Close Front Door On Printer, It Is A Brand New Printer
(Posted by simonglynn 11 years ago)

On/off Switch Keeps Tripping On Startup. Original Report Fuser Error/replaced
(Posted by terry54767 11 years ago)