Konica Minolta bizhub C550 Support Question
Konica Minolta bizhub C550 Support Question
Find answers below for this question about Konica Minolta bizhub C550.Need a Konica Minolta bizhub C550 manual? We have 15 online manuals for this item!
Question posted by christianlasha28912 on May 3rd, 2014
How To Install My Drivers For Konica Minolta C550
Current Answers
Answer #1: Posted by waelsaidani1 on May 4th, 2014 5:25 AM

Member since:
May 12th, 2013 Points: 19,501,777

For details on installing the printer driver in a network environment, refer to "Setting up network printing" on
page 4-3. Because it is necessary to specify other network settings in advance when installing the printer
driver using a network connection, install it using a local connection at this time.
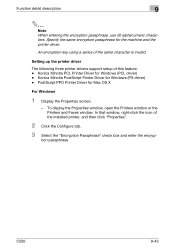
For Windows XP/Server 2003
1 Insert the printer driver CD-ROM into the computer’s CD-ROM drive.
2 Click the [Start] button, and then click "Printers and Faxes".
– If "Printers and Faxes" does not appear in the Start menu, open the Control Panel from the Start
menu, select "Printers and Other Hardware", and then select "Printers and Faxes".
3 For Windows XP, click "Add a printer" on the "Printer Tasks" menu.
For Windows Server 2003, double-click the "Add Printer" icon.
The Add Printer Wizard starts up.
4 Click the [Next] button.
5 Select "Local printer attached to this computer", and then click the [Next] button.
– Clear the "Automatically detect and install my Plug and Play printer" check box.
6 The Select a Printer Port dialog box appears. Select "LPT1" here, and then click the [Next] button.
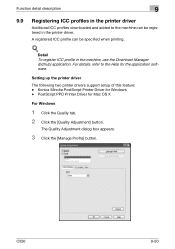
7 Click the [Have Disk] button.
8 Click the [Browse] button.
9 Specify the desired folder on the CD-ROM that contains the printer driver, and then click the [OK]
button.
– Select the specified folder according to the printer driver to be used, the operating system, and the
language.
– Printer drivers that can be selected:
Windows XP/Server 2003: PCL driver, PS driver, FAX driver
10 Click the [OK] button.
The "Printers" list appears.
11 Click the [Next] button.
12 Follow the on-screen instructions.
– When the Digital Signature dialog box appears, click the [Continue Anyway] button.
– When using a network connection, perform a test print after the network settings have been
specified.
13 When installation is complete, make sure that the icon of the installed printer appears in the Printers
and Faxes window.
14 Remove the CD-ROM from the CD-ROM drive.
This completes the printer driver installation.
For Windows Vista
1 Insert the printer driver CD-ROM into the computer’s CD-ROM drive.
2 Click the [Start] button, and then click "Control Panel".
3 Click "Hardware and Sound", and then click "Printers".
– If the control panel is in the classic view, double-click "Printers".
The Printers window appears.
4 Click "Add a printer" on the toolbar.
The "Add Printer" dialog box appears.
5 Click "Add a local printer".
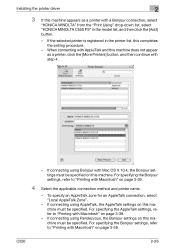
– For details on installing the printer driver in a network environment, refer to "Setting up network
printing" on page 4-3. Because it is necessary to specify other network settings in advance when
installing the printer driver using a network connection, install it using a local connection at this time.
– If an IP address is specified on this machine, the machine can be installed by retrieving it on the
network by clicking "Add a network, wireless or Bluetooth printer".
The Choose a printer port dialog box appears.
6 Select "LPT1: (Printer Port)" from "Use an existing port", and then click the [Next] button.
7 Click the [Have Disk] button.
8 Click the [Browse] button.
9 Specify the desired folder on the CD-ROM that contains the printer driver, and then click the [OK]
button.
– Select the specified folder according to the printer driver to be used, the operating system, and the
language.
Printer drivers that can be selected:
Windows Vista: PCL driver, PS driver, Fax driver
10 Click the [OK] button.
The "Printers" list appears.
11 Select the printer to be installed, and then click the [Next] button.
12 Follow the on-screen instructions.
– If the User Account Control dialog box appears, click the [Continue] button.
– If the Windows Security dialog box appears, click "Install this driver software anyway".
– When using a network connection, perform a test print after the network settings have been
specified.
13 When installation is complete, make sure that the icon of the installed printer appears in the Printers
window.
14 Remove the CD-ROM from the CD-ROM drive.
This completes the printer driver installation.
MORE INFORMATION ON PAGES 3- 17 OF THE PRINT OPERATION MANUAL
Related Konica Minolta bizhub C550 Manual Pages


Similar Questions


