Get support for Konica Minolta ProJet 660Pro

Konica Minolta ProJet 660Pro Support Question

Konica Minolta ProJet 660Pro Support Question

Find answers below for this question about Konica Minolta ProJet 660Pro.
Need a Konica Minolta ProJet 660Pro manual? We have 2 online manuals for this item!
Question posted by camillegibson30 on November 9th, 2023

I Need To Install A Projet660 Tiamat Load Cell Assy

The person who posted this question about this Konica Minolta product did not include a detailed explanation. Please use the "Request More Information" button to the right if more details would help you to answer this question.

Current Answers

Answer #1: Posted by SonuKumar on November 9th, 2023 10:18 AM
SonuKumar

Member since:
May 9th, 2021

Points: 16,621,300
100
points
https://www.manualslib.com/manual/864569/3d-Systems-Projet-660pro.html

Here are the steps on how to install a Projet660 Tiamat Load Cell Assy:

Prepare the installation area. Make sure that the installation area is clean, level, and free of debris. The area should also be large enough to accommodate the load cell assembly.

Mount the load cell assembly. There are two ways to mount the load cell assembly: using the included mounting brackets or by welding the load cell assembly to the structure.

Connect the load cell assembly to the electrical system. Connect the load cell assembly to the electrical system using the included wiring harness.

Calibrate the load cell assembly. Once the load cell assembly is installed and connected to the electrical system, it must be calibrated. Calibration ensures that the load cell assembly is accurate and will provide accurate readings.

Here are some additional tips for installing a Projet660 Tiamat Load Cell Assy:

Make sure that the load cell assembly is properly aligned before mounting it.

Use the correct mounting bolts and washers.

Tighten the mounting bolts to the specified torque.

Use a torque wrench to tighten the mounting bolts to the specified torque.

Make sure that the wiring harness is properly secured.

Use a cable tie to secure the wiring harness to the load cell assembly.

Avoid routing the wiring harness through areas where it could be damaged.

Calibrate the load cell assembly before using it.

Here are some safety precautions to keep in mind when installing a Projet660 Tiamat Load Cell Assy:

Always wear safety glasses when working with load cell assemblies.

Be careful not to overtighten the mounting bolts. Overtightening the mounting bolts can damage the load cell assembly.

Be careful not to damage the wiring harness. A damaged wiring harness can cause inaccurate readings or even failure of the load cell assembly.

Always calibrate the load cell assembly before using it. An uncalibrated load cell assembly may not provide accurate readings.

If you are unsure about how to install a Projet660 Tiamat Load Cell Assy, it is always best to consult a qualified professional.


Please respond to my effort to provide you with the best possible solution by using the "Acceptable Solution" and/or the "Helpful" buttons when the answer has proven to be helpful.

Regards,
Sonu
Your search handyman for all e-support needs!!

Related Konica Minolta ProJet 660Pro Manual Pages

Cube3 User Guide - Page 2

... 4 Cube 3D Printer Properties 4 4 AT A GLANCE 5 5 SPECIFICATIONS AND REQUIREMENTS 6 Weight 6 Software 6 OpenGL Version 6 Windows Requirements 6 MAC OS X Requirements 6 Android 6 iOS 6 Wireless Options 6 USB Mass Storage Device 6 Electrical Requirements 6 Material Storage 6 Dimensions 7 6 UNPACKING AND SETTING UP YOUR CUBE 8 Contents 8 Unpacking and Installing your Cube 8 Initial...
Cube3 User Guide - Page 3

Draft 52 Connecting Cubify To Your Printer 54 Connecting Cubify To Your Printer Manually 54 Printing A Model Via Wireless Connection 62 Printing ...Supports 31 9 CUBIFY SOFTWARE 32 Cubify Software Installation 32 Installing Cubify Software for Windows 32 Installing Cubify Software For Apple OS X 34 Installing Cubify for Android 35 Installing Cubify for iOS 37 Cubify Software Overview ...
Cube3 User Guide - Page 5

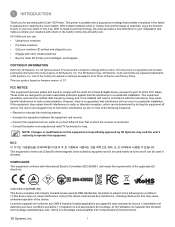
...Thank you share your creations with other creative partners • Buy the Cube 3D Printer, print cartridges, and supplies COPYRIGHT INFORMATION ©2014 by 3D Systems, Inc. At...COMPLIANCE This equipment conforms with a plug and print design that enables everybody in a residential installation. However, there is no guarantee that to comply with Industry Canada license-exempt RSS ...
Cube3 User Guide - Page 6

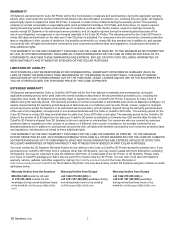
...Cube 3D Printer will be free from defects in materials and workmanship, during the applicable warranty period, when used under the normal conditions described in the documentation provided to you may need to the...during the warranty term. THIS WARRANTY IS THE ONLY WARRANTY PROVIDED FOR THE CUBE OR CUBEPRO 3D PRINTER. Warranty Hotline from Europe +44 1442 279 839 (UK) or +49 6151 357 499 (DE...
Cube3 User Guide - Page 10

... 3.2 library of GLU) WINDOWS REQUIREMENTS • Cubify software runs on your printer. and 64-bit operating systems • Windows 7, 8 and 8.1 • Minimum screen resolution: 1024 x 768 • Windows is needed. • Store at 50/60 Hz 24V DC, 5 amp. The following conditions ensure the material remains high quality: • Do not unpack...
Cube3 User Guide - Page 12

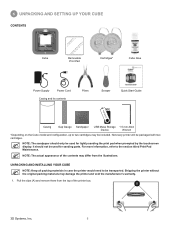
... included. Pull the clips (A) and remove them from the top of the contents may damage the printer and void the manufacturer's warranty. 1. UNPACKING AND INSTALLING YOUR CUBE NOTE: Keep all packing materials in case the printer would need to the section titled Print Pad Maintenance. It should only be transported. For more information, refer...
Cube3 User Guide - Page 13

... support. 4. Front 4" (102 mm) Build Plate Travel Area 3D Systems, Inc. 9 Open the box. 3. Place the printer on either side of the printer. NOTE: When installing the printer there must be a minimum of 8" (203 mm) of and behind the printer. Front View 8" (203 mm) Top View 4" (102 mm) Back 8" (203 mm) 8" (203 mm) Hand Clearance...
Cube3 User Guide - Page 18

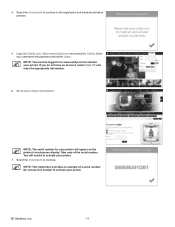
... serial number. Go to www.cubify.com/activate. Go to www.cubify.com and select My Cubify. Do not use this number to activate your printer will need it to activate your username and password and select Login. NOTE: You must be logged in to activate your...
Cube3 User Guide - Page 19

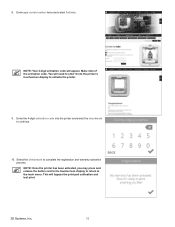
... and select Activate. This will appear. Enter the 4-digit activation code into the printer's touchscreen display to the main menu. 8. NOTE: Your 4-digit activation code will...checkmark to continue. 10. You will need to enter it into the printer and select the checkmark to complete the registration and warranty activation process. NOTE: Once the printer has been activated, you may press...
Cube3 User Guide - Page 20

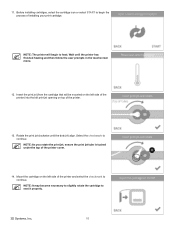
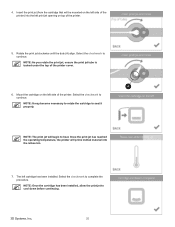
.... Mount the cartridge on the left print jet opening on the left side of the printer) into the left side of the printer. 13. A 14. Wait until the dots (A) align. Select the checkmark to continue. Before installing cartridges, select the cartridge icon or select START to begin to seat it properly. 3D Systems...
Cube3 User Guide - Page 21

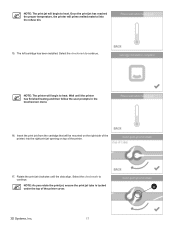
... been installed. NOTE: The printer will begin to heat. Insert the print jet (from the cartridge that will prime melted material into the right print jet opening on top of the printer cover.... to continue. Once the print jet has reached the proper temperature, the printer will be mounted on the right side of the printer) into the refuse bin. 15. A 3D Systems, Inc. 17 NOTE...
Cube3 User Guide - Page 22

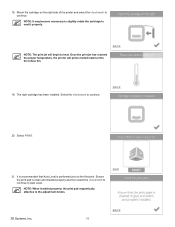
... the cartridge to continue. 20. Select the checkmark to seat it properly. NOTE: When installed properly, the print pad magnetically attaches to continue. The right cartridge has been installed. Mount the cartridge on the right side of the printer and select the checkmark to the adjustment knobs. 3D Systems, Inc. 18 It is...
Cube3 User Guide - Page 24

...When the print pad is the absolute print pad position. NOTE: The printer will secure the print pad to perform Auto Level again. NOTE: The... is centered properly, magnets will perform an automated gap measurement. 24. Select the checkmark to the adjustment knobs. Install the print pad and select the checkmark to continue. 23. Select the checkmark to perform Auto Gap. NOTE: ...
Cube3 User Guide - Page 25

.... NOTE: Apply enough glue to cover a square area of the installed print cartridges, the printer will assign an installed cartridge color to the print pad. Select AUTO LEVEL to continue. 26...successful the second time, select PLATE MAINTENANCE. You can print this test print. NOTE: The printer will begin to the System 1 screen and select TEST PRINT. Select the checkmark to printing....
Cube3 User Guide - Page 27

... Navigation between the print pad and the print jets. Print / Setup PRINT PRINT allows the user to print a creation stored either on the printer, touch the display to install cartridges in the cartridge. It also displays the estimated amount of the material that measures the level of specification, the touchscreen will void...
Cube3 User Guide - Page 29

... heat and then follow the user prompts in the printer. Installing the cartridge without following procedure. Select the left material cartridge. INSTALLING A MATERIAL CARTRIDGE Before the printer will print a creation, there must be installed by performing the following the prompts from the printer menu can damage the printer and print jets and void the manufacturer's warranty. 1. Caution...
Cube3 User Guide - Page 30

... you rotate the print jet, ensure the print jet tube is tucked under the top of the printer. 5. NOTE: It may become necessary to rotate the cartridge to continue. NOTE: Once the cartridge has been installed, allow the print jet to continue. Select the checkmark to cool down before continuing. 3D Systems...
Cube3 User Guide - Page 82

...Cube, including the print pad and anywhere else you might find pieces of the printer. CAUTION: When removing or installing the purge bin assemblies, be emptied regularly. REMOVING WASTE FROM THE JET WIPER ... purge bin. As the purge bin assemblies fill, they will need to be careful not to fit into a slot for proper installation. This tab is designed to damage the bottom tabs. 11 ...
Cube3 User Guide - Page 98

.... REPACKING THE PRINTER If the printer should ever need to the section titled Print Pad Calibration. NOTE: The power supply cable is designed to pull the cable from the printer. To remove ... RETRY to attempt to the touchscreen display. 2. Power off the printer by pressing and holding the button next to install the firmware again. Disconnect the power cord from utility power and disconnect ...
Cube3 Quick Start Guide - Page 13

... an example of the serial number. NOTE: If you have not activated your username and password and select Login. NOTE: The serial number for your printer. 10 Do not use this number to continue. Take note of a serial number. Go to www.cubify.com/activate. Log in to activate your...

Similar Questions

Ask a New Question
Use the box below to post a new question about this Konica Minolta product .
Points & Prizes
  • You can earn points for nearly everything you do on HelpOwl.com
  • You can trade in those points for gift cards at leading retailers such as Amazon.com and Walmart
  • It's that simple!
See How it Works
Create a Free Account

Konica Minolta Manuals

Find free Konica Minolta ProJet 660Pro manuals and user guides available at ManualOwl.com. Try out our unique manual viewer allowing you to interact with manuals from directly within your browser!

Konica Minolta Reviews

View thousands of Konica Minolta user reviews and customer ratings available at ReviewOwl.com.

Contact Information

Complete Konica Minolta customer service contact information including steps to reach representatives, hours of operation, customer support links and more from ContactHelp.com.

Scoreboard Ratings

See detailed Konica Minolta customer service rankings, employee comments and much more from our sister site.

Konica Minolta Recalls

Find comprehensive Konica Minolta recall information updated hourly on RecallOwl.com.