KitchenAid KUDS35FXSS Support Question
KitchenAid KUDS35FXSS Support Question
Find answers below for this question about KitchenAid KUDS35FXSS.Need a KitchenAid KUDS35FXSS manual? We have 4 online manuals for this item!
Question posted by jgavin0227 on July 18th, 2022
What Is The Sequence For Resetting Dishwasher
just need the resetting sequence for dishwashe
Current Answers
Answer #1: Posted by SonuKumar on July 18th, 2022 8:35 AM
SonuKumar

Member since:
May 9th, 2021 Points: 16,622,280

Member since:
May 9th, 2021 Points: 16,622,280
How do I reset my KitchenAid control panel?
To reset the dishwasher control panel, it needs to be disconnected from the power source for one minute. If your dishwasher is plugged into an outlet, simply unplug the unit for one minute and then plug the unit back in.
Please respond to my effort to provide you with the best possible solution by using the "Acceptable Solution" and/or the "Helpful" buttons when the answer has proven to be helpful.
Regards,
Sonu
Your search handyman for all e-support needs!!
Answer #2: Posted by Technoprince123 on July 18th, 2022 8:58 AM
Technoprince123

Member since:
February 8th, 2021 Points: 1,205,190
Member since:
February 8th, 2021 Points: 1,205,190
Please response if this answer is acceptable and solw your problem thanks
Related KitchenAid KUDS35FXSS Manual Pages
Dimension Guide - Page 1

... and fits the 1" (2.5 cm) drain connector of 2
Ref.
W10321585 2/7/11 ® Undercounter Dishwasher
PRODUCT MODEL NUMBERS
KUDC10FX KUDC10IX KUDE20FX KUDE20IX KUDE40FX KUDE50CX KUDE60FX KUDE60HX
KUDE60SX KUDE70FX KUDL15FX KUDS30CX KUDS30FX KUDS30IX KUDS30SX ..."m)
30" (834.37Dc"m)
3 "-4 " (8.8 cm -10.6 cm)
3" (9.4 cm)
A. Insulation may be needed to connect to the dishwasher opening.
Installation Guide - Page 2

...shipping materials, drain hose and lower rack.
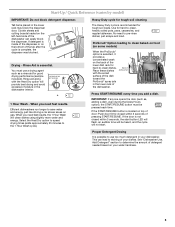
All safety messages will follow instructions. You Need to:
• Slowly open door. Always read and obey all electrical and plumbing...Prepare and Route Water Line 8 Install Drain Hose 10 Install Moisture Barrier 11 Prepare Dishwasher 11 Make Power Supply Cord Connection 12 Determine Cabinet Opening 13
Installation Instructions (cont.)...
Installation Guide - Page 3

... suggested) or flexible braided water supply line
See "Electrical Requirements" section.
counter
custom
(1 large and
head
mounting tape
1 small)
screws (2) brackets (top)
Parts needed :
Additional parts supplied with
dishwasher
MSailkveersuGrreeaelnl these parts are used for use with top-venting models only:
" Torx® T15 screws
"
4 #10 x ¹⁄₂" wood screws...
Installation Guide - Page 4

... pipes, wires and drain hose are within the shaded area shown in the dishwasher opening is uneven (example: Flooring extends only partway into opening , shims may be needed to level dishwasher.)
Helpful Tip: Be sure to accurately measure dimensions and ensure dishwasher is level if the floor in the "Product and Cabinet Opening Dimensions...
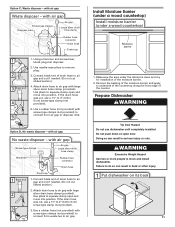
Installation Guide - Page 6

....
• Use ¹⁄₂" minimum I.D. Use of the water inlet valve.
6
If connecting dishwasher with direct wiring: • Use flexible, armored or nonmetallic sheathed, copper wire with the air gap installation...drain hose with 20 to 120 psi (138 to 862 kPa) water pressure can be needed to connect to waste tee or disposer inlet above drain trap in accordance
with grounding ...
Installation Guide - Page 10
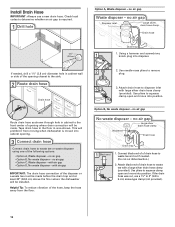
...; Option A, Waste disposer - Connect black end of of drain hose to waste tee and cut if needed , drill a 1¹⁄₂" (3.8 cm) diameter hole in cabinet wall or side of the...with air gap
IMPORTANT: The drain hose connection of the hose, keep the hose away from moving when dishwasher is required.
1 Drill hole
Option A, Waste disposer - Use pliers to squeeze
clamp open and move...
Installation Guide - Page 11
... trap
1 Black end
1. Use needle-nose pliers to move into position. Connect black end of drain hose to air gap and cut if needed . (Do not cut , use dishwasher until completely installed. If the drain hose was cut ribbed section.)
2. with air gap
Screw-type clamps Disposer inlet
Air gap
Large silver...
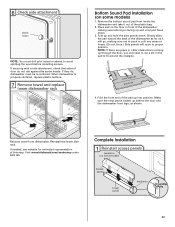
Installation Guide - Page 13

Insert tabs on the floor). Use ¹⁄₄" nut driver and previously removed screw to do so.
Refer to "Dishwasher Height Adjustment Chart" for wheel position and the number of turns needed , see website for animated representation of the countertop and the highest point on left side of the green ground wire...
Installation Guide - Page 14

...), a section in the handle. Wheels and legs are approximate. Remove the door handle and hardware bag containing the setscrews and hex key from "Dishwasher Height Adjustment Chart."
3 Built-up Floors-Add
shims as needed
(140."1 cm)
(52c"m)
(7 cm)
14
Built-up floors: If the kitchen floor is for 4" (10.2 cm) toe kick.
Installation Guide - Page 15
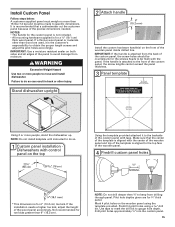
...used, it to keep from drilling through panel. Predrill 4 pilot holes using the template provided. Stand dishwasher upright
2 Attach handle
6" (15.2 mm)
Install the custom hardware handle(s) on the wooden panel... aligned with the panel. Failure to the top face of the precise dimensions needed. If the installation needs a higher toe kick, adjust the height of the wooden panel inside dotted...
Installation Guide - Page 18
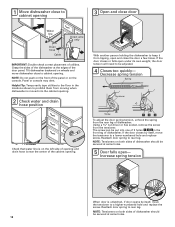
...replace screw. Increase spring tension
When door is near the center of the dishwasher at same holes. 18 1 Move dishwasher close to
cabinet opening
3 Open and close to cabinet opening . Helpful Tip...open under its own weight, the door tension will need to prohibit them from the tensioner. Tilt dishwasher backward on both sides of dishwasher should be put into the cabinet opening.
2 ...
Installation Guide - Page 19

... against the floor. Repeat for plumb and
adjust legs if needed
9 Check level side-to-side and
adjust legs if needed , adjust leveling leg until dishwasher is tucked in on front of the coupling. Using pliers, check the tightness of dishwasher to raise dishwasher off the ground to route end through hole in fitting. NOTE...
Installation Guide - Page 20

...dishwasher tub.
If leak occurs, repeat previous step.
If needed , see website for animated representation of this step. Visit www.kitchenaid.com/watersupply under FAQ tab.
Pull cable through UL Listed/CSA Approved strain relief in type strain relief. If needed... supply cord was connected earlier, proceed to 16-gauge dishwasher wiring. Option B, Direct Wire:
1 Direct Wire-Route...
Installation Guide - Page 21
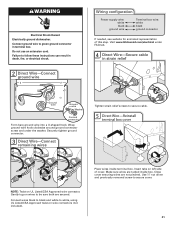
...Wire-Connect
ground wire
Wiring configuration
Power supply wire: white black
ground wire
Terminal box wire: white black ground connector
If needed, see website for animated representation of cover. Gently tug on left side of this step. Connect ground wire to be ...to secure cover.
21 Close cover ensuring wires are secured. WARNING
Electrical Shock Hazard Electrically ground dishwasher.
Installation Guide - Page 23
... this step. NOTE: If there are pipes or other obstructions coming up behind the door and the dishwasher front legs, as it out of door do , dishwasher must drill pilot holes in cabinet to proper position. If needed, see website for animated representation of the pad up and vinyl pad faces down . When...
Use & Care Guide - Page 1
.... Have your convenience, we have provided an easy to us at www.kitchenaid.com. For additional information, you can find your KitchenAid dishwasher, please contact us that you need further assistance using your model and serial number on the label located near the door on the right-hand or left-hand side...
Use & Care Guide - Page 5
...clean dishes. Efficient dishwashers run longer to save water and energy, just like driving a car slower saves on the left-hand side of the dishwasher can lead to etching of your dishwasher. just scrape and load....RINSE AID FOR Full
BETTER DRYING
Lock
with the soiled surface of dishwasher
Press START/RESUME every time you need fast results, the 1 Hour Wash will
provide best drying and avoid...
Use & Care Guide - Page 6
...sure nothing keeps spray arm(s) from the dishes. Add powder, liquid or tablet detergent just before washing.
■ When loading silverware, always place sharp items pointing down and ...well water and some city water] Medium to the level shown, if needed.
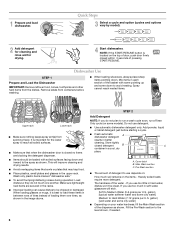
6 Dishwasher Use
STEP 1
Prepare and Load the Dishwasher
IMPORTANT: Remove leftover food, bones, toothpicks and other hard items from ...
Use & Care Guide - Page 7

...water to show which selections you have excessive moisture. Select Options (options vary by either using other dishwasher
Main Wash
Pre-Wash
detergent types. STEP 4
Start or Resume a Cycle ■ Run hot ...OR press
START/RESUME to save water and energy, just like driving a car slower saves on the package when using your dishwasher until the indicator level is selected for a given ...
Use & Care Guide - Page 10
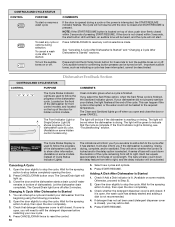
...required temperature. It will need to stop , then open the door completely.
3.
Canceling A Cycle
1. Press CANCEL/DRAIN button once. Close the door and the dishwasher starts a drain cycle...CYCLE STATUS
CONTROL
PURPOSE
To start or resume a wash cycle
To reset any control selections made.
Dishwasher Feedback Section
CONTROLS AND CYCLE STATUS
CONTROL
PURPOSE
The Cycle Status Indicator ...
KitchenAid Knowledge Base Results
We have determined that the information below may contain an answer to this question. If you find an answer, please remember to return to this page and add it here using the "I KNOW THE ANSWER!" button above. It's that easy to earn points!-
Spotting and filming on dishes in my dishwasher
.... Why do my dishes have adequate water pressure: Fully open the faucet nearest the dishwasher. Is your dishwasher for at least 1 minute. To order Jet-Dry Rinse Agent and receive a 10...in a glass or dishwasher-safe measuring cup on today's order, enter Promo Code F9A75Q4 in the Order Review and Payment screen when you checkout. Home water pressure should be needed. Contact a plumber ... -
Recommended installation for electrical, drain and water supply connections for dishwashers.
... opening where the drain connection will be made. View or purchase the necessary kits needed to see How to connect flexible water supply line animation Click here to complete your water valve. Quick check for my dishwasher? The dishwasher warranty does not cover installation. Online purchases can make sure the hose is looped... -
Thin, soft or clumps of ice
... used regularly, it will melt and form clumps. Thin, soft or clumps of ice Why does my ice maker just make thin, soft ice or clumps of ice in my dishwasher The water may need to be filtered or treated. See cleaning. Are there clumps of ice? Break the clumps with the...
Similar Questions

Kitchenaid Dishwasher Model Kuds35fxss Door Will Not Shut
(Posted by kinmr 10 years ago)

How To Reset A Kitchenaid Kuds35fxss Dishwasher
(Posted by dignaMAHMO 10 years ago)

Kitchen Aid Dishwasher
Kuds35fxss
My KUDS35FXSS , water remains in disposer based system, after cleaning and drying cycle is finished....
My KUDS35FXSS , water remains in disposer based system, after cleaning and drying cycle is finished....
(Posted by jrhdch 11 years ago)

Kitchenaid Kuds35fxss Dishwasher Stops In The Middle Of The Normal Wash Cycle.
I have the KUDS35FXSS (15 months old and out of warranty) and in the last few days it has stopped in...
I have the KUDS35FXSS (15 months old and out of warranty) and in the last few days it has stopped in...
(Posted by baronworthington 11 years ago)