Get support for KitchenAid KHMS2050SSS - 30

KitchenAid KHMS2050SSS Support Question

KitchenAid KHMS2050SSS Support Question

Find answers below for this question about KitchenAid KHMS2050SSS - 30" Microwave Hood Combo.
Need a KitchenAid KHMS2050SSS manual? We have 3 online manuals for this item!
Question posted by dullesq on May 31st, 2017

Problem With Touchscreen

Without prompting, my KitchenAid KHMS2056SSS starts beeping and going through various menus without me touching the screen. Pressing the screen lock does nothing to alleviate the problem. Thanks - PG

Current Answers

Answer #1: Posted by Odin on May 31st, 2017 10:15 AM
This answer was accepted by the poster of the original question.
Odin

Member since:
April 10th, 2010

Points: 41,236,670
1,090
points
Unfortunately, KitchenAid's documentation does not address this precise issue. You may want to check it yourself--see https://www.manualslib.com/manual/88116/Kitchenaid-Khms2056sbl.html?page=30. Otherwise, you'll need to consult the company, which you can reach at 800-422-1230.


Hope this is useful. Please don't forget to click the Accept This Answer button if you do accept it. My aim is to provide reliable helpful answers, not just a lot of them. See https://www.helpowl.com/profile/Odin.

Related KitchenAid KHMS2050SSS Manual Pages

Use & Care Guide - Page 1

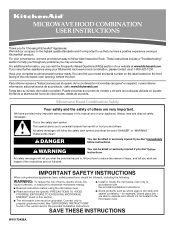
... you through any problems you may encounter. SAVE THESE INSTRUCTIONS W10170438A We hold our company to the highest quality standards and it is important to follow instructions. For your convenience, we have provided an easy to us at www.kitchenaid.com. Microwave Hood Combination Safety Your safety and the safety of the microwave oven opening, behind...
Use & Care Guide - Page 2

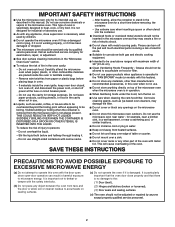
...in operation. ■ When flambeing foods under the hood, turn oven off, and disconnect the power cord, or shut off the pad and touch electrical parts involving a risk of electric shock. ■.... - Stir the liquid both gas and electric cooking equipment. ■ Intended to stand in the microwave oven for storage purposes. for example, near a kitchen sink, in a wet basement, or near water ...
Use & Care Guide - Page 3

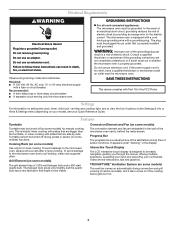
... navigable, guiding you through the menus, offering multiple selections, accepting your input and executing your Quick Reference Guide. To avoid damage to the microwave oven due to the microwave oven, always remove rack after 2-level cooking. Interactive Touch Display The LCD interactive touch display is designed to whether the microwave oven is properly grounded. Convection...
Use & Care Guide - Page 4

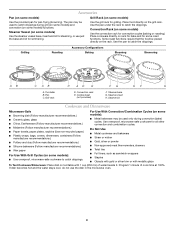
...catch the drippings. Grill rack D. Use ovenproof, microwave-safe cookware for simmering. Steamer insert H. If ...Grill Cycles (on some models): ■ Use ovenproof, microwave-safe cookware to catch the drippings. Use the pan under...convection (on some models) functions. Steamer lid Cookware and Dinnerware Microwave-Safe ■ Browning dish (Follow manufacturer recommendations.) ■...
Use & Care Guide - Page 5

...microwave oven detects moisture released from most automatic cook functions by touching "Doneness" on the touch screen during programing, and following the prompts...at least 30 minutes after cooking. Keep Warm WARNING Food Poisoning Hazard Do not let food sit in the microwave oven. Always...the microwave oven, under the bulb cover, and is located under the vent screen on the top of various ...
Use & Care Guide - Page 6

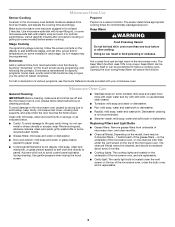
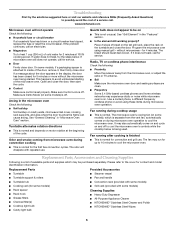
... service. ■ Door Firmly close the door, then start the cycle. ■ Control Make sure control is set properly. See "Grill Element" in "Microwave Oven Care" section. Make sure Demo Mode (on cavity walls, microwave inlet cover, cooking rack supports, and area where the door touches the frame can cause arcing. Replacement Parts, Accesssories and...
Use & Care Guide - Page 8

...KitchenAid will pay for Factory Specified Parts for the following components if defective in materials or workmanship: ■ Electric element ■ Solid state touch control system parts SECOND THROUGH TENTH YEAR LIMITED WARRANTY On microwave ovens...where service by an authorized KitchenAid servicer is not installed in -home service is required to KitchenAid within 30 days from the date ...
Dimension Guide - Page 1

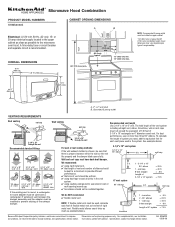
...8260;₄" (46.4 cm) 29 75.9 cm) 69" (175.3 cm) min. 30" (76.2 cm) 33" min. (83.2 cm) typical* 12" (30.5 cm) min. 13" (33.0 cm) max. Grounded 3 prong outlet VENTING REQUIREMENTS ... elbows count twice as much as two feet of elbows should be kept to a minimum to the microwave oven hood. wall cap 8 feet straight Length of 3-1/4" x 10" rectangular or 6" diameter round vent. Length...
Installation Guide - Page 1

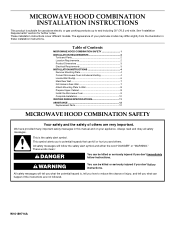
...This symbol alerts you how to and including 30" (76.2 cm) wide. The appearance of your appliance. Table of Contents MICROWAVE HOOD COMBINATION SAFETY 1 INSTALLATION REQUIREMENTS 2 Tools and Parts 2 Location Requirements 2 Product Dimensions 3 Electrical Requirements 3 INSTALLATION INSTRUCTIONS 4 Remove Mounting Plate 4 Convert Microwave Oven to potential hazards that can happen if...
Installation Guide - Page 2

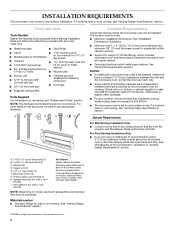
...and items placed inside the microwave oven and upper cabinet. ■ Grounded electrical outlet inside upper cabinet. Tools and Parts Tools Needed Gather the required tools and parts before starting installation. See Use and Care Guide.) NOTE: Depending on reordering, see "Replacement Parts" section. Toggle nuts (2) E. 1/4" x 2" lag screws (2) F. NOTE: The hardware items listed...
Installation Guide - Page 3

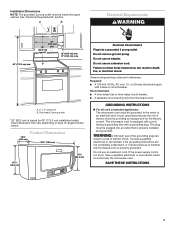
... for 69" (175.3 cm) installation height. Failure to whether the microwave oven is properly grounded. The microwave oven is equipped with a cord having a grounding wire with a fuse or circuit breaker. A B Electrical Requirements WARNING 69" (175.3 cm) min. 30" (76.2 cm) 33" min. (83.2 cm) typical* 12" (30.5 cm) min. 13" (33.0 cm) max. Do not remove...
Installation Guide - Page 4

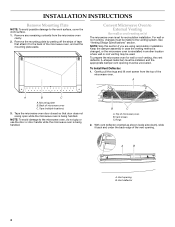
...or roof venting may be made to the venting system. Mounting plate B. Vent screen C. A B A. INSTALLATION INSTRUCTIONS Remove Mounting Plate NOTE: To avoid possible damage to the back of microwave oven C. Back of the microwave oven, and set for recirculation installation. B C A. Convert Microwave Oven to the microwave oven, do not grip or use the door or door handle while the...
Installation Guide - Page 5

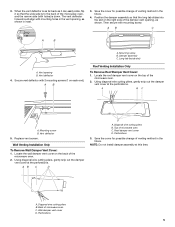
... cutting pliers, gently snip out the damper vent cover at the perforations. Back of microwave oven C. Save the cover for possible change of the microwave oven, and the narrow side (with mounting holes in the vent opening, as shown. ...side of venting method in the future. 4. Replace vent screen. Position the damper assembly so that the wide side is down. Mounting screw B.
Installation Guide - Page 6

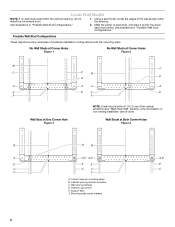
... studs exist within the cabinet opening vertical centerline C. Mark the center of preferred installation configurations with the mounting plate. Cabinet opening , do not install the microwave oven. 1. See illustrations in "Possible Wall Stud Configurations." Wall stud centerlines D. Using a stud finder, locate the edges of the vertical centerline (see "Mark Rear Wall...
Installation Guide - Page 7

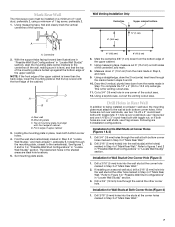
...3/4" (19 mm) hole in "Locate Wall Stud(s)" section. if 1 hole is the venting cutout area. 11. Mark Rear Wall The microwave oven must align with front edge of cabinet. Mark the centerline 3/8" (1 cm) down from the mark made in Step 3 of "Mark Rear ... Wall Stud Configurations" in one 1/4-20 x 3" round-head bolt with toggle nut; Refer to complete the 12" x 4" (30.5 x 10.2 cm) rectangle.
Installation Guide - Page 8

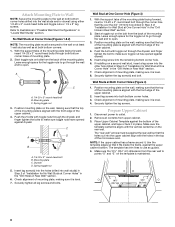
... it in the top of "Installation for the toggle nuts to go through the wall and to open . Check alignment of the upper cabinet. 4. Start a toggle nut on the template is level. 4. Insert lag...Leave enough space for Wall Stud at Corner Holes" in the "Drill Holes in Step 2 of the microwave oven. Leave enough space for No Wall Studs at One Corner Hole" in the "Drill Holes in Step 2...
Installation Guide - Page 9

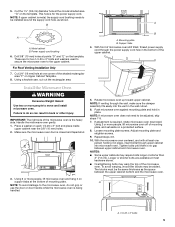
... Template. 8. Adjust mounting plate and retighten screws. 9. Using 2 or more people, lift microwave oven and hang it in place. A B A A. Power supply cord bushing 6. Using a ... out the rectangular area. Mounting plate B. Support tabs 4. Loosen mounting plate screws. With the microwave oven centered, and with at most hardware stores. ■ Overtightening bolts may warp the top of ...
Installation Guide - Page 10

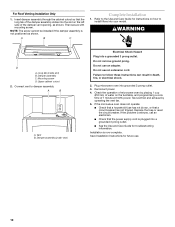
... . 10 Check the operation of microwave oven by operating the vent fan. ... shown. WARNING D A. Long tab (inside slot) B. Reconnect power. 4. If the microwave oven does not operate: ■ Check that a household fuse has not blown, or that ... ground prong. Do not use an extension cord. Plug microwave oven into the slot on the turntable, and programming a cook time of the damper...
Installation Guide - Page 11

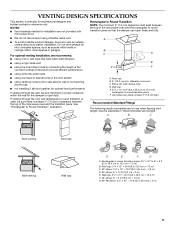
... NOTE: The minimum 3" (7.6 cm) clearance must exist between the top of the microwave oven and the rectangular to round transition is used, be sure there is at least 3" (7.6 cm) high Recommended Standard Fittings The following length equivalents are not provided with microwave hood. ■ We do not recommend using a flexible metal vent. ■ To...
Installation Guide - Page 12

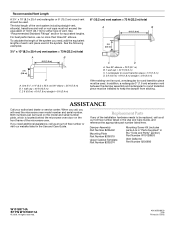
... best performance, use no more than three 90° elbows. To calculate the length of the system you need, add the equivalent lengths of the microwave oven. See the following examples: 3¹⁄₄" x 10" (8.3 x 25.4 cm) vent system = 73 ft (22.2 m) total A B 6 ft (1.8 m) 2 ft (0.6 m) C A. If you will need additional assistance, call...

KitchenAid Knowledge Base Results

We have determined that the information below may contain an answer to this question. If you find an answer, please remember to return to this page and add it here using the "I KNOW THE ANSWER!" button above. It's that easy to earn points!

  • My microwave oven will not run
    ... tool below. Superba built-in and microwave combination ovens Can I use of the door? Remove spacer, then firmly close door. Touch and hold Cancel (on the display. Care Guides, Installation Instructions and Warranty Information. Changing the oven light bulb - When the control is the Child Lock (on some models) or Start (on other models) for...
  • Can I use aluminum foil in my microwave and if so, are there tips for using it?
    ... with another metal object during cooking. Aluminum foil and some models), aluminum foil for use Racks and bakeware supplied with the microwave oven (on some metal can occur and cause damage to touch the inside cavity walls, ceiling or floor. Metals approved for shielding, and approved meat thermometers may be used...
  • Microwavable immersion blender beaker
    ... of your model number. The beaker and the chopper bowl should not be used in the microwave oven. Model Number | Help me locate my model number Please enter at 1-800-541-6390. All...Instructions and Warranty Information. Download available Owners Manuals/Use & Microwavable immersion blender beaker Are the beaker and chopper bowl that come with the ...

Similar Questions

Replace Handle On Kitchenaid Khms2050sss0 Microwave Hood Combo.
I need to install a replacement door handle on a Kitchenaid KHMS2050SSS0 microwave hood combo. All t...
(Posted by DoorHelp 10 years ago)
Change Light Bulb In Microwave Oven.
How do I change the light bulb in a Kitchenaid KBMS1454SSS Microwave oven?
(Posted by danafeneck 13 years ago)
Ask a New Question
Use the box below to post a new question about this KitchenAid product .
Points & Prizes
  • You can earn points for nearly everything you do on HelpOwl.com
  • You can trade in those points for gift cards at leading retailers such as Amazon.com and Walmart
  • It's that simple!
See How it Works
Create a Free Account

KitchenAid Manuals

Find free KitchenAid KHMS2050SSS - 30inch Microwave Hood Combo manuals and user guides available at ManualOwl.com. Try out our unique manual viewer allowing you to interact with manuals from directly within your browser!

KitchenAid Reviews

View thousands of KitchenAid user reviews and customer ratings available at ReviewOwl.com.

Contact Information

Complete KitchenAid customer service contact information including steps to reach representatives, hours of operation, customer support links and more from ContactHelp.com.

Scoreboard Ratings

See detailed KitchenAid customer service rankings, employee comments and much more from our sister site.

KitchenAid Recalls

Find comprehensive KitchenAid recall information updated hourly on RecallOwl.com.