Get support for KitchenAid KHMS2050SSS - 30

KitchenAid KHMS2050SSS Support Question

KitchenAid KHMS2050SSS Support Question

Find answers below for this question about KitchenAid KHMS2050SSS - 30" Microwave Hood Combo.
Need a KitchenAid KHMS2050SSS manual? We have 3 online manuals for this item!
Question posted by meyoHab on January 31st, 2014

Tutorial How To Clean In Between Glass Of Superba Kitchenaid Microwave

The person who posted this question about this KitchenAid product did not include a detailed explanation. Please use the "Request More Information" button to the right if more details would help you to answer this question.

Current Answers

There are currently no answers that have been posted for this question.
Be the first to post an answer!

Remember that you can earn up to 1,100 points for every answer you submit. The better the quality of your answer, the better chance it has to be accepted.

Related KitchenAid KHMS2050SSS Manual Pages

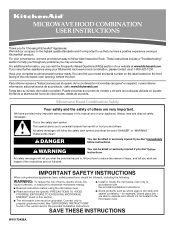
Use & Care Guide - Page 1

...number on the label located on your appliance. Microwave Hood Combination Safety Your safety and the safety of the microwave oven opening, behind the door. We have provided ...your convenience, we have a positive experience owning a KitchenAid® product. MICROWAVE HOOD COMBINATION USER INSTRUCTIONS Thank you for example, closed glass jars - If you need further assistance using electrical...
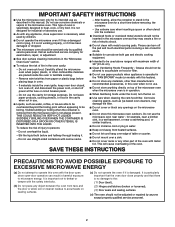
Use & Care Guide - Page 2

... the microwave oven. Call an authorized service company for example, near a kitchen sink, in a wet basement, or near water - Do not leave paper products, cooking utensils, or food in the cavity when not in use as lye-based oven cleaners, may create a fire or risk of 36" (91.44 cm). ■ Clean Ventilating Hoods Frequently...
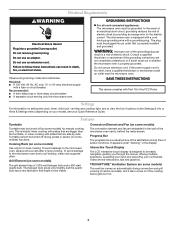
Use & Care Guide - Page 3

... the event of an electrical short circuit, grounding reduces the risk of sensor functions. To avoid damage to soil buildup, clean rack supports often. Observe all cord connected appliances: The microwave oven must be turned off during convection and grill cooking (on some models) Use only for manual cooking only. Settings For information...
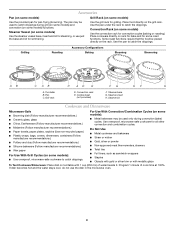
Use & Care Guide - Page 4

... convection (bake) cycles. Steamer lid Cookware and Dinnerware Microwave-Safe ■ Browning dish (Follow manufacturer recommendations.) ■ Ceramic glass, glass ■ China, Earthenware (Follow manufacturer recommendations.) For... use just the base and lid for steaming, or use the dish in the microwave oven. 4 The pan may be placed directly on some models) functions. Use the ...
Use & Care Guide - Page 5

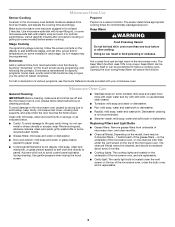
..., or glass cleaner applied to paper towel. ■ Control panel/interactive touch display: mild soap, water and washcloth, or glass cleaner applied...clean. The sensor determines appropriate cooking times for each of the microwave oven. Keep Warm can result in for at least 30 minutes after cooking. The charcoal filter(s) cannot be cleaned, and should be kept warm in the microwave oven...
Use & Care Guide - Page 6

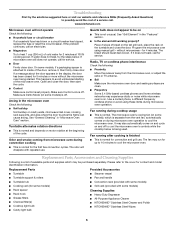
..., and area where the door touches the frame can cause arcing. www.kitchenaid.com Microwave oven will dissipate with some models) is separate from the microwave oven, or adjust the radio or TV antenna. ■ Soil Make sure the microwave oven door and sealing surfaces are clean. ■ Frequency Some 2.4 GHz-based cordless phones and home wireless networks...
Use & Care Guide - Page 8

... On microwave ovens only, in the second through fifth years from the date of purchase, when this appliance is operated and maintained according to instructions attached to parts or systems resulting from warranty coverage. 3. All rights reserved. ®Registered Trademark/TM Trademark of consumables or cleaning products not approved by an authorized KitchenAid servicer...
Dimension Guide - Page 1

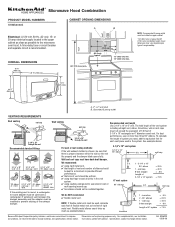
...;" (46.4 cm) 29 75.9 cm) 69" (175.3 cm) min. 30" (76.2 cm) 33" min. (83.2 cm) typical* 12" (30.5 cm) min. 13" (33.0 cm) max. Grounded 3 prong outlet VENTING...;" (39.4 cm) A. 2" x 4" wall stud B. transition 2 ft. 1 - Specifications subject to the microwave oven hood. or 20-amp electrical supply located in the system. To calculate the length of system you need, add the equivalent...
Installation Guide - Page 1

... to Wall 8 Prepare Upper Cabinet 8 Install the Microwave Oven 9 Complete Installation 10 VENTING DESIGN SPECIFICATIONS 11 ASSISTANCE 12 Replacement Parts 12 MICROWAVE HOOD COMBINATION SAFETY Your safety and the safety of your ... messages will follow instructions. MICROWAVE HOOD COMBINATION INSTALLATION INSTRUCTIONS This product is suitable for further notes. This symbol alerts...
Installation Guide - Page 2

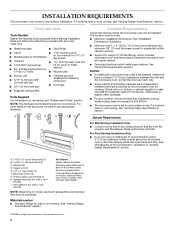
...; Stud finder ■ Pencil ■ 7/16" socket wrench ■ Masking tape or thumbtacks (or box wrench) for recirculation installation. The location must be free of microwave oven) Aluminum grease filters Charcoal filters (Depending on model, charcoal filters may be included. A B C D E FG Special Requirements H I . For Roof Venting Installation Only: ■ If you are...
Installation Guide - Page 3

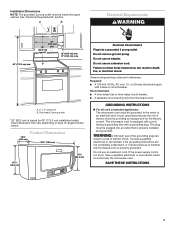
.... 30" (76.2 cm) 33" min. (83.2 cm) typical* 12" (30.5 cm) min. 13" (33.0 cm) max. Exact dimension may vary depending on type of electric shock. Failure to whether the microwave oven is...A time-delay fuse or time-delay circuit breaker. ■ A separate circuit serving only this microwave oven. Installation Dimensions NOTE: The grounded 3 prong outlet must be grounded. Do not use of the...
Installation Guide - Page 4

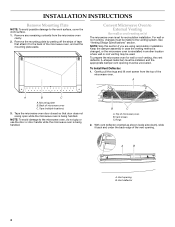
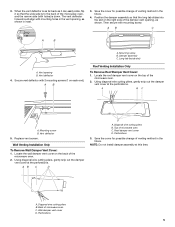
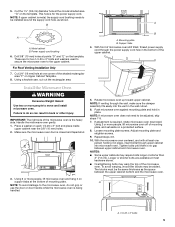
...Skip this section if you are using recirculation installation. To prepare the microwave oven for wall or roof venting, the vent deflector (L-shaped metal bar)...made to External Venting (for recirculation installation. Gently pull the rings and lift vent screen from the microwave oven cavity. 2. Tape (multiple locations) 3. With vent deflector oriented as shown (wide side down), ...
Installation Guide - Page 5

... 3. NOTE: Do not install damper assembly at the perforations. Back of the microwave oven. 2. Wall Venting Installation Only To Remove Wall Damper Vent Cover: 1. Perforations ... vent cover at the perforations. Replace vent screen. Save the cover for possible change of the microwave oven, and the narrow side (with mounting screw. Mounting screw B. Then secure with holes) is...
Installation Guide - Page 6

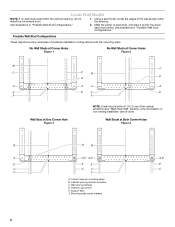
... at One Corner Hole Figure 3 NOTE: If wall stud is within 6" (15.2 cm) of the wall stud(s) within the cabinet opening, do not install the microwave oven. 1. Locate Wall Stud(s) NOTE: If no wall studs exist within the opening. Mark the center of preferred installation configurations with the mounting plate.
Installation Guide - Page 7

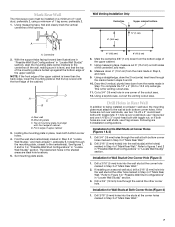
...6, and mark. 9. Measure down from the marks made in Step 7 to complete the 12" x 4" (30.5 x 10.2 cm) rectangle. Drill Holes in Rear Wall In addition to being installed on at least 1 ...C. This is level with toggle nuts; If the holes are 3 installation configurations. Mark Rear Wall The microwave oven must attach to the wall at the hole(s) marked in Step 4 of "Mark Rear Wall." NOTE:...
Installation Guide - Page 8

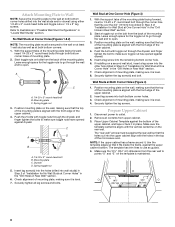
... the vertical centerline on the template is aligned with the holes in place. Make sure the template centerline aligns with the front edge of the microwave oven. Insert lag screw(s) into the holes drilled into the wall studs and/or drywall using either 1/4-20 x 3" round-head bolts and toggle nuts or 1/4 x 2" lag...
Installation Guide - Page 9

...To avoid damage to do not grip or use the door or door handle while the microwave oven is being handled. Metal cabinet B. Drill 3/8" (10 mm) holes at most hardware ... bolts may warp the top of the shaded rectangular area "F" on Upper Cabinet Template. 8. With the microwave oven centered, and with at the bottom of mounting plate, and set aside on the template. A. 1/4-20...
Installation Guide - Page 10

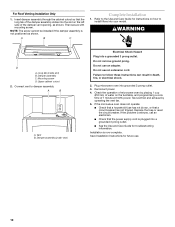
...Do not use an extension cord. Mounting screw D. Vent B. Do not use an adapter. Plug microwave oven into a grounded 3 prong outlet. Test vent fan and exhaust by placing 1 cup (250 ... troubleshooting information. WARNING D A. Long tab (inside slot) B. Check the operation of microwave oven by operating the vent fan. 5. Damper assembly C. Reconnect power. 4. NOTE: The ...
Installation Guide - Page 11

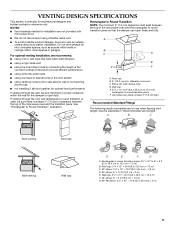
...cm) high Recommended Standard Fittings The following length equivalents are not provided with microwave hood. ■ We do not recommend using a flexible metal vent. ■...to Round Transition NOTE: The minimum 3" (7.6 cm) clearance must exist between the top of the microwave oven and the rectangular to round transition piece so that there is intended for architectural designer and builder/...
Installation Guide - Page 12

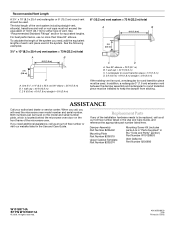
...;⁄₄" x 10" (8.3 x 25.4 cm) vent system = 73 ft (22.2 m) total A B 6 ft (1.8 m) 2 ft (0.6 m) C A. When you call, you will need , add the equivalent lengths of the microwave oven. Replacement Parts If any of the installation hardware needs to round transition piece must be installed to round transition piece = 5 ft (1.5 m) D. 2 ft (0.6 m) + 6 ft (1.8 m) straight = 8 ft...

KitchenAid Knowledge Base Results

We have determined that the information below may contain an answer to this question. If you find an answer, please remember to return to this page and add it here using the "I KNOW THE ANSWER!" button above. It's that easy to earn points!

  • Removing and replacing the split-level shelf
    ... impact from dropping. Use special care when removing them to sudden temperature changes or impact, such as bumping. Remove the shelf. Glass shelves and covers are cold. IMPORTANT: Do not clean glass shelves or covers with warm water when they are heavy. NOTE: Be sure that the shelf is normal. For your protection...
  • Setting the Self-Clean cycle
    .... There are 2 hours 30 minutes for average to certain birds. Also, make sure the door is automatically calculated and displayed along with a damp cloth. Always move the oven door gasket. Applying a cool, damp cloth to another closed or it has completely cooled could break the glass. Press Self Clean. Use the following chart...
  • Changing the oven light bulb - Superba built-in and microwave combination ovens
    Disconnect power. Remove the glass light cover by snapping it back into the ...oven light bulbs - gas and electric ranges My microwave oven will not work during the Self-Cleaning cycle. On double oven models, both upper and lower lights will come on or off and cool. To replace: Before replacing a bulb, make sure the oven is opened . Superba built-in and microwave combination ovens...

Similar Questions

Replace Handle On Kitchenaid Khms2050sss0 Microwave Hood Combo.
I need to install a replacement door handle on a Kitchenaid KHMS2050SSS0 microwave hood combo. All t...
(Posted by DoorHelp 10 years ago)
Change Light Bulb In Microwave Oven.
How do I change the light bulb in a Kitchenaid KBMS1454SSS Microwave oven?
(Posted by danafeneck 13 years ago)
Ask a New Question
Use the box below to post a new question about this KitchenAid product .
Points & Prizes
  • You can earn points for nearly everything you do on HelpOwl.com
  • You can trade in those points for gift cards at leading retailers such as Amazon.com and Walmart
  • It's that simple!
See How it Works
Create a Free Account

KitchenAid Manuals

Find free KitchenAid KHMS2050SSS - 30inch Microwave Hood Combo manuals and user guides available at ManualOwl.com. Try out our unique manual viewer allowing you to interact with manuals from directly within your browser!

KitchenAid Reviews

View thousands of KitchenAid user reviews and customer ratings available at ReviewOwl.com.

Contact Information

Complete KitchenAid customer service contact information including steps to reach representatives, hours of operation, customer support links and more from ContactHelp.com.

Scoreboard Ratings

See detailed KitchenAid customer service rankings, employee comments and much more from our sister site.

KitchenAid Recalls

Find comprehensive KitchenAid recall information updated hourly on RecallOwl.com.