Get support for KitchenAid KHMS2050SSS - 30

KitchenAid KHMS2050SSS Support Question

KitchenAid KHMS2050SSS Support Question

Find answers below for this question about KitchenAid KHMS2050SSS - 30" Microwave Hood Combo.
Need a KitchenAid KHMS2050SSS manual? We have 3 online manuals for this item!
Question posted by Kurianjac on February 17th, 2021

Why Fan High Low Swich Turn Light On,how To Fix Or Disconnect..?

The person who posted this question about this KitchenAid product did not include a detailed explanation. Please use the "Request More Information" button to the right if more details would help you to answer this question.

Current Answers

Answer #1: Posted by techyagent on February 18th, 2021 4:11 AM
This answer was accepted by the poster of the original question.
techyagent

Member since:
June 17th, 2014

Points: 4,799,790
1,100
points
This is an issue with exhaust fan and please check this link below to fix exhaust


https://homesteady.com/how-6584585-troubleshoot-range-hood-fan.html


Thanks


Techygirl

Related KitchenAid KHMS2050SSS Manual Pages

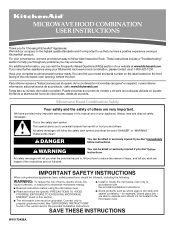
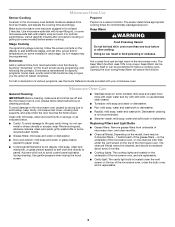
Use & Care Guide - Page 1

... the chance of our website at 1-800-422-1230. Always read and obey all instructions before using the microwave oven. ■ Read and follow instructions. Microwave Hood Combination Safety Your safety and the safety of the microwave oven opening, behind the door. These words mean: DANGER You can happen if the instructions are able to help...
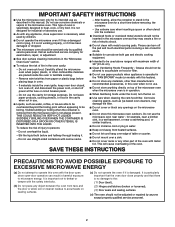
Use & Care Guide - Page 2

... can result in harmful exposure to stand in the microwave oven for industrial or laboratory use the microwave oven near a swimming pool, or similar locations. ■ Do not immerse cord or plug in operation. ■ When flambeing foods under the hood, turn oven off, and disconnect the power cord, or shut off power at the fuse or circuit...
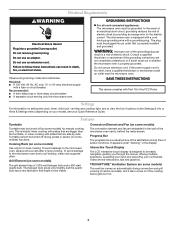
Use & Care Guide - Page 3

...connected appliances: The microwave oven must be turned off (on some models) The vent fan comes on automatically during preset or sensor (on your model), see your commands. The microwave oven is equipped with ... information on setting the clock, timer, child lock, vent fan and cooktop light, and to whether the microwave oven is properly grounded. Progress Bar The progress bar is a visual...
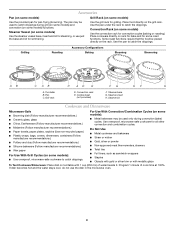
Use & Care Guide - Page 4

...steamer vessel base, insert and lid for steaming, or use the dish in the microwave oven. 4 Program 1 minute of water beside it. Steamer Vessel (on the grill ... Rack (on some models) Use the convection rack for simmering. Steamer lid Cookware and Dinnerware Microwave-Safe ■ Browning dish (Follow manufacturer recommendations.) ■ Ceramic glass, glass ■ China...
Use & Care Guide - Page 5

... sickness. Doneness is cool. The sensor determines appropriate cooking times for at least 30 minutes after convection cooking or grilling (on the top of various programs, see ...To avoid damage to the microwave oven caused by itself or can be replaced about every 6 months. ■ Cooktop lights: The cooktop lights are located on the underside of microwave oven, and clean monthly. ■...
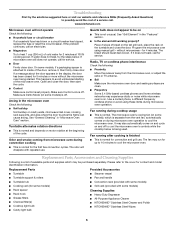
Use & Care Guide - Page 6

..., then start the cycle. ■ Control Make sure control is set properly. Fan running during microwave oven operation to the cover for some models) ■ Rack spacer ■ Rack hook ■ Grease filters ■ Charcoal filter(s) ■ Cooktop light bulb ■ Cavity light bulb ■ Steamer vessel ■ Pan and handle ■ Convection rack (provided...
Use & Care Guide - Page 8

... control system parts SECOND THROUGH TENTH YEAR LIMITED WARRANTY On microwave ovens only, in materials or workmanship. Repairs when your major ...materials or workmanship and is reported to KitchenAid within 30 days from date of your major appliance for ...limited warranty. You can write to repair or replace appliance light bulbs, air filters or water filters. IMPLIED WARRANTIES, ...
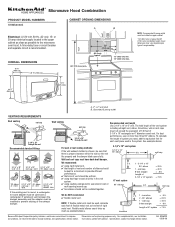
Dimension Guide - Page 1

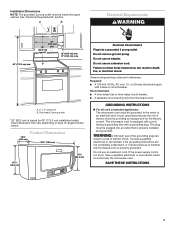
...standard elbows. OVERALL DIMENSIONS 18 ¹⁄₄" (46.4 cm) 29 75.9 cm) 69" (175.3 cm) min. 30" (76.2 cm) 33" min. (83.2 cm) typical* 12" (30.5 cm) min. 13" (33.0 cm) max. NOTE: The grounded 3 prong outlet must be installed together. 2 ft. ... Use 3-1/4" x 10" or 6" vent. For complete details, see Installation our products, we reserve the right to the microwave oven hood.
Installation Guide - Page 1

...differ slightly from the illustration in Rear Wall 7 Attach Mounting Plate to and including 30" (76.2 cm) wide. All safety messages will follow the safety alert symbol and... 8 Prepare Upper Cabinet 8 Install the Microwave Oven 9 Complete Installation 10 VENTING DESIGN SPECIFICATIONS 11 ASSISTANCE 12 Replacement Parts 12 MICROWAVE HOOD COMBINATION SAFETY Your safety and the safety of...
Installation Guide - Page 2

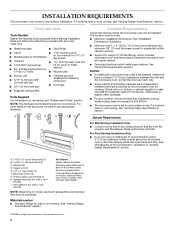
...; screwdriver bit for wood or metal ■ No. 3 Phillips screwdriver for weight of microwave oven) Aluminum grease filters Charcoal filters (Depending on model, charcoal filters may be combined. Location Requirements... to back of 150 lbs (68 kg), which includes microwave oven and items placed inside the microwave oven and upper cabinet. ■ Grounded electrical outlet inside upper...
Installation Guide - Page 3

...30.5 cm) min. 13" (33.0 cm) max. Exact dimension may vary depending on type of electric shock. Recommended: ■ A time-delay fuse or time-delay circuit breaker. ■ A separate circuit serving only this microwave oven... typical for the electric current. Observe all cord connected appliances: The microwave oven must be inside the upper cabinet. Do not remove ground prong....
Installation Guide - Page 4

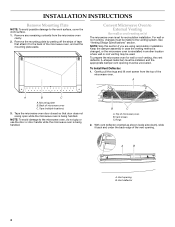
... must be made to the microwave oven, do not grip or use the door or door handle while the microwave oven is being handled. Vent deflector 4 Convert Microwave Oven to the work surface, cover... Mounting Plate NOTE: To avoid possible damage to External Venting (for wall or roof venting only) The microwave oven is set the mounting plate aside. A A B C A. Rings 2. A B A. Vent opening...
Installation Guide - Page 5

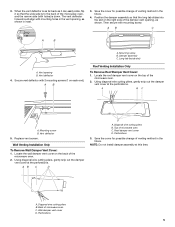
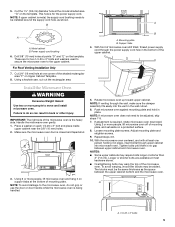
... Installation Only To Remove Roof Damper Vent Cover: 1. Wall Venting Installation Only To Remove Wall Damper Vent Cover: 1. Top of microwave oven C. Then secure with 2 mounting screws (1 on the right side of the microwave oven. 2. A B C A. Diagonal wire cutting pliers B. Perforations 3. Save the cover for possible change of venting method in the future. NOTE: Do...
Installation Guide - Page 6

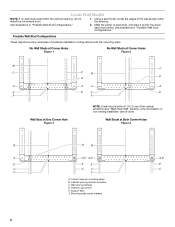
... PLATE MOUNTING PLATE B D B A A,D A,D A,D E E E E C C C C F F A. Wall Studs at One Corner Hole Figure 3 NOTE: If wall stud is within the cabinet opening, do not install the microwave oven. 1. Holes for lag screws E. See illustrations in "Possible Wall Stud Configurations." Corner holes (on mounting plate) B. Cabinet opening . Mounting plate center markers 6 Mark the...
Installation Guide - Page 7

...a 3/16" (5 mm) hole into the wall stud at the other hole marked in Rear Wall In addition to complete the 12" x 4" (30.5 x 10.2 cm) rectangle. Rear wall B. If the holes are ideal hole locations. 5. Drill a 3/4" (19 mm) hole through the marks ... if both bottom corner holes marked in Step 6, and mark. 9. Mark Rear Wall The microwave oven must align with front edge of cabinet.
Installation Guide - Page 8

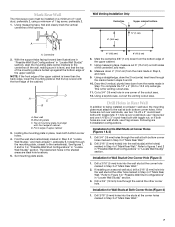
...Stud at Corner Holes (Figures 1 & 2) NOTE: The mounting plate must be secured to open . Disconnect power to points "D" and "E" on a second wall stud, insert a lag screw into the other hole... on the wall, making sure that the holes cut into both bottom corner holes of the microwave oven. Mounting plate C. Position mounting plate on the bolt from the rear wall to outlet. 2....
Installation Guide - Page 9

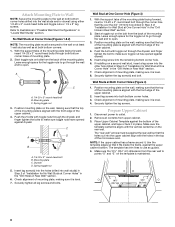
...The right side of the upper cabinet. 5. Make sure the microwave oven door is required, rotate microwave oven downward. With front of microwave oven still tilted, thread power supply cord through the power supply ... bolts through the wall, make sure the damper assembly fits easily into microwave oven. Push microwave oven against mounting plate and hold in the wall cutout. 6. NOTES: ■...
Installation Guide - Page 10

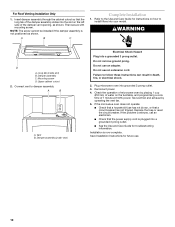
... turntable, and programming a cook time of the damper vent opening, as shown. Insert damper assembly through the cabinet cutout so that the long tab of microwave oven by operating the vent fan. 5. Then secure with mounting screw. Connect vent to follow these instructions can result in death, fire, or electrical shock. 2. A B A. Test vent...
Installation Guide - Page 11

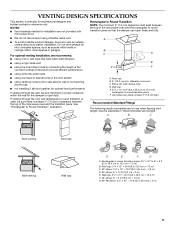
...cm) clearance must exist between the top of the microwave oven and the rectangular to open freely and fully. Rectangular ...high Recommended Standard Fittings The following length equivalents are not provided with microwave hood. ■ We do not recommend using recirculation installation. Vent extension piece, at least 3" (7.6 cm) of clearance between the top of the microwave oven...
Installation Guide - Page 12

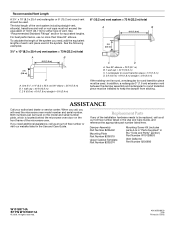
...system = 73 ft (22.2 m) total A B 6 ft (1.8 m) 2 ft (0.6 m) C D A. If you need the microwave oven model number and serial number. Recommended Vent Length A 3¹⁄₄" x 10" (8.3 x 25.4 cm) rectangular or 6" (... straight = 8 ft (2.4 m) If the existing vent is located behind the microwave oven door on the front frame of vent. Replacement Parts If any of each vent ...

KitchenAid Knowledge Base Results

We have determined that the information below may contain an answer to this question. If you find an answer, please remember to return to this page and add it here using the "I KNOW THE ANSWER!" button above. It's that easy to earn points!

  • Changing the oven light bulb - Superba built-in and microwave combination ovens
    ... II - The lights will come on when the oven door is closed, touch Oven Light to turn them on when either door is off . Remove the bulb from the oven. Superba built-in ovens Hidden Options - When the oven door is opened . Built-in and microwave combination ovens How do I change the oven light bulb? Built-in oven Changing the oven light bulb -
  • Using the Options selection pad - Architect Series II
    ... pad and number pad to preserve food. Fahrenheit and Celsius  To turn on Convection Models 6 Oven temperature 7 Sabbath Mode Option 1 - Positioning Racks and Bakeware  section for Low. Download available Owners Manuals/Use & Options 2, 3, 4 - Tone volume High/Low The volume is used to quickly enter the desired hidden function. The...
  • Hidden Options - Built-in oven
    ...turn the audible signals and prompts on my built-in oven? Architect Series II Sabbath Mode << Go Back to 8 hidden functions within the Electronic Oven Control. The Options selection key allows you access to Search Results Options Hidden Function 1 Fahrenheit and Celsius conversion 2 Sound On/Off 3 Sound High/Low... 4 End beep On/Off 5 Dehydrate* 6 Oven temperature ...

Similar Questions

Fan And Light Control Buttons Quit Working, All Else Works Fine
fan speed and light control buttons both quit working, cooking, table and inside light all else work...
(Posted by digitaldoc1 6 years ago)
How To Change The Light Bulb In Kitchenaid Microwave Oven Model Kemc378kss?
I need assistance in the process to remove and replace the light bulb in the microwave portion of th...
(Posted by chipnchatter 11 years ago)
Light Burnt Out
How do I replace the burnt out light bulbs under my microwave?
(Posted by thomas728 12 years ago)
Change Light Bulb In Microwave Oven.
How do I change the light bulb in a Kitchenaid KBMS1454SSS Microwave oven?
(Posted by danafeneck 13 years ago)
Ask a New Question
Use the box below to post a new question about this KitchenAid product .
Points & Prizes
  • You can earn points for nearly everything you do on HelpOwl.com
  • You can trade in those points for gift cards at leading retailers such as Amazon.com and Walmart
  • It's that simple!
See How it Works
Create a Free Account

KitchenAid Manuals

Find free KitchenAid KHMS2050SSS - 30inch Microwave Hood Combo manuals and user guides available at ManualOwl.com. Try out our unique manual viewer allowing you to interact with manuals from directly within your browser!

KitchenAid Reviews

View thousands of KitchenAid user reviews and customer ratings available at ReviewOwl.com.

Contact Information

Complete KitchenAid customer service contact information including steps to reach representatives, hours of operation, customer support links and more from ContactHelp.com.

Scoreboard Ratings

See detailed KitchenAid customer service rankings, employee comments and much more from our sister site.

KitchenAid Recalls

Find comprehensive KitchenAid recall information updated hourly on RecallOwl.com.