Get support for KitchenAid KHMS2040WSS

KitchenAid KHMS2040WSS Support Question

KitchenAid KHMS2040WSS Support Question

Find answers below for this question about KitchenAid KHMS2040WSS.
Need a KitchenAid KHMS2040WSS manual? We have 3 online manuals for this item!
Question posted by dayojpb4 on July 13th, 2014

Kitchenaid Microwave What Is Cardboard Piece On Interior

The person who posted this question about this KitchenAid product did not include a detailed explanation. Please use the "Request More Information" button to the right if more details would help you to answer this question.

Current Answers

There are currently no answers that have been posted for this question.
Be the first to post an answer!

Remember that you can earn up to 1,100 points for every answer you submit. The better the quality of your answer, the better chance it has to be accepted.

Related KitchenAid KHMS2040WSS Manual Pages

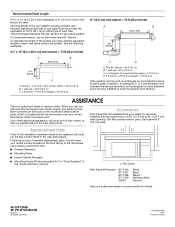
Dimension Guide - Page 1

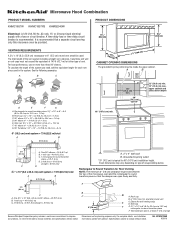
....2 cm) typical* 12" (30.5 cm) min. 14" (35.6 cm) max. Rectangular to Round Transition for either type of the microwave oven and the rectangular to round transition piece so that a separate circuit serving only this microwave oven be provided. 17 " (43.8 cm) 16 " (41.3 cm) VENTING REQUIREMENTS A 3¹⁄₄" x 10" (8.3 x 25.4 cm) rectangular or...
Installation Guide - Page 1

... Oven 9 Complete Installation 10 VENTING DESIGN SPECIFICATIONS 11 ASSISTANCE 12 Replacement Parts 12 Accessories 12 MICROWAVE HOOD COMBINATION SAFETY Your safety and the safety of injury, and tell you and others are not followed. Table of Contents MICROWAVE HOOD COMBINATION SAFETY 1 INSTALLATION REQUIREMENTS 2 Tools and Parts 2 Remove Cardboard Template 2 Location Requirements...
Installation Guide - Page 2

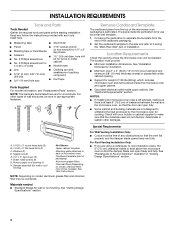
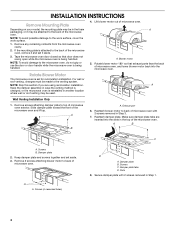
... that the vent fits properly, and the damper blade opens freely and fully. Washers (2) D. Power supply cord bushing (1) H. Remove Cardboard Template The cardboard piece from the rest of clearance between the wall and the microwave oven, so that the materials used will be included. A B C D E FG H A. 1/4-20 x 3" round-head bolts (2) B. 1/4-20 x 3" flat-head bolts (2) C. See User...
Installation Guide - Page 3

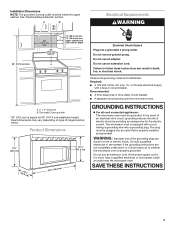
...9632; A time-delay fuse or time-delay circuit breaker. ■ A separate circuit serving only this microwave oven. A. 2" x 4" wall stud B. Exact dimensions may vary depending on type of electric shock by ...(167.6 cm) installation height. SAVE THESE INSTRUCTIONS 3 Failure to whether the microwave oven is properly grounded. WARNING: Improper use an extension cord. Do not remove ground...
Installation Guide - Page 4

... it and set for recirculation installation. Rotate blower motor 180° so that door does not swing open while the microwave oven is set it aside. 3. Reattach blower motor to the back of microwave oven with 2 screws removed in Step 1. 4 Make sure damper plate tabs are using recirculation installation. Screws (in another location where...
Installation Guide - Page 5

... sure damper plate tabs are inserted into microwave oven. D A. Rotate blower motor so that exhaust ports face the top of microwave oven, and flat sides of blower motor face back of the microwave oven (as shown), performance will be reattached to back of microwave oven with flat sides facing the back of microwave oven. NOTE: If blower motor is not...
Installation Guide - Page 6

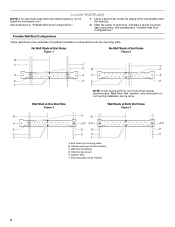
...Studs at Both End Holes Figure 4 B D B A A,D A,D A,D E E E E C C C C F F A. Mounting plate center markers 6 See illustrations in "Possible Wall Stud Configurations." 2. Cabinet opening , do not install the microwave oven. 1. Wall stud centerlines D. Using a stud finder, locate the edges of the wall stud(s) within 6" (15.2 cm) of the vertical centerline (see "Mark Rear Wall...
Installation Guide - Page 7

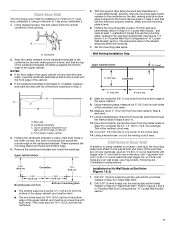
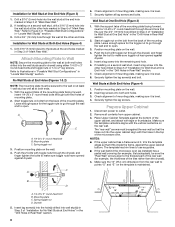
...microwave oven must be installed on a minimum of 1 wall stud, preferably 2, using a minimum of the opening. Using measuring tape, find the wall stud centerline(s) drawn in one 1/4-20 x 3" round-head bolt with front edge of the cardboard...centerline, and mark. 10. Following are properly marked. Remove the cardboard template and check the markings: Upper cabinet bottom 15³⁄₄...
Installation Guide - Page 8

... Mounting Plate to Wall NOTE: Secure the mounting plate to use as guides. ■ If the wall behind the microwave oven (as at both end holes of "Mark Rear Wall." 2. B A C A. 1/4-20 x 3" round-head... against the bottom of the upper cabinet, and attach with the holes in Step 3 of the microwave oven. C A 6. Wall Stud at Both End Holes (Figure 4) 1. Leave enough space for the...
Installation Guide - Page 9

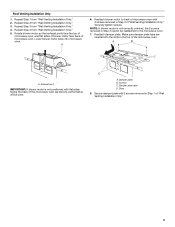
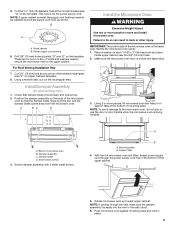
... are for wall venting only) 1. Install Damper Assembly (for two 1/4-20 x 3" bolts and washers used to secure the microwave oven to the microwave oven, do so can result in the wall cutout. 6. Handle the microwave oven gently. 1. Place a washer on Upper Cabinet Template. 8. NOTE: To avoid damage to the upper cabinet. Sheet metal screws 3. Secure damper...
Installation Guide - Page 10

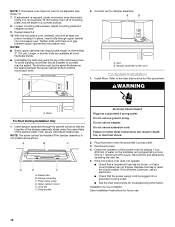
... The blocks must be adjusted, skip steps 7-9. 7. Plug microwave oven into a grounded 3 prong outlet. If the microwave oven does not operate: ■ Check that a household fuse...blown, or that the power supply cord is not positioned as the space between upper cabinet and microwave oven. A B C D E F A. Upper cabinet cutout E. Insert damper assembly through upper cabinet...
Installation Guide - Page 11

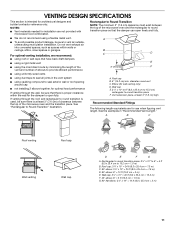
... vent air outside, unless using recirculation installation. Rectangular to Round Transition NOTE: The minimum 3" (7.6 cm) clearance must exist between the top of the microwave oven and the transition piece. See the examples in the vent system ■ using caulking compound to seal exterior wall or roof opening around cap ■ not installing 2 elbows...
Installation Guide - Page 12

...8171336 8171337 8171338 8171339 99403 White Black Biscuit Stainless Steel Almond See your dealer to round transition piece = 5 ft (1.5 m) D. 2 ft (0.6 m) + 6 ft (1.8 m) straight = 8 ft (2.4 m) If the existing vent is 3" (7.6 cm) wide. When you will need the microwave oven model number and serial number. See "Recommended Standard Fittings" section for equivalent lengths. To calculate the...
Use & Care Guide - Page 1

... locate the microwave oven only in the microwave oven. ■ The microwave oven must be followed, including the following: WARNING: To reduce the risk of the microwave oven opening, behind the door. WARNING You can be killed or seriously injured if you can happen if the instructions are able to us at www.kitchenaid.com. for Choosing KitchenAid® Appliances...
Use & Care Guide - Page 2

..." mode (on models with maximum width of injury to heat, cook, or dry food. Pieces can result in use. ■ Do not store anything directly on top of electric shock.... Corrosive cleaning agents, such as lye-based oven cleaners, may create a fire or risk of the microwave oven when the microwave oven is no damage to microwave energy. THIS COULD RESULT IN VERY HOT LIQUIDS...
Use & Care Guide - Page 3

...or time-delay circuit breaker. ■ A separate circuit serving only this microwave oven. ■ For all cord connected appliances: The microwave oven must be turned off , or all governing codes and ordinances. In ...cook function. Light Timer Set the cooktop light to turn tones off . See "Microwave Oven Care" section. Scroll Speed Scroll speed of electric shock by providing an escape ...
Use & Care Guide - Page 4

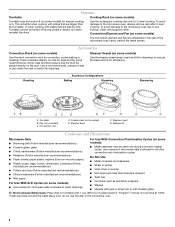
...water stays cool, do not use just the base and lid for simmering. To avoid damage to the microwave oven due to catch drippings. Steamer base F. Convection rack D. Place cookware directly on rack for bake and... and lid for steaming, or use the dish in the wall of the microwave oven cavity, behind the metal screen. This is helpful when cooking with plates that are side by side...
Use & Care Guide - Page 6

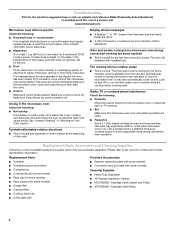
... Steel Wipes 6 Troubleshooting First try the steps in the bullets below is attached to inside of the door, remove it, then firmly close door. www.kitchenaid.com Microwave oven will dissipate with some models) is set properly. Make sure Demo Mode (on motor rotation at 100% cooking power. Open and close the door...
Use & Care Guide - Page 7

... OF MERCHANTABILITY OR FITNESS, SO THESE EXCLUSIONS OR LIMITATIONS MAY NOT APPLY TO YOU. Costs associated with the removal from your major appliance. KITCHENAID® BUILT-IN OVEN & MICROWAVE WARRANTY LIMITED WARRANTY For one year from the date of purchase, when this major appliance is operated and maintained according to instructions attached to...
Use & Care Guide - Page 8

..., you may contact KitchenAid at : KitchenAid Brand Home Appliances Customer eXperience Center 553 Benson Road Benton Harbor, MI 49022-2692 Please include a daytime phone number in China Please keep this User Instructions and model number information for future reference. All rights reserved. ®Registered Trademark/TM Trademark of the microwave oven opening, behind the...

KitchenAid Knowledge Base Results

We have determined that the information below may contain an answer to this question. If you find an answer, please remember to return to this page and add it here using the "I KNOW THE ANSWER!" button above. It's that easy to earn points!

  • My microwave oven will not run
    ...the door? Care Guides, Installation Instructions and Warranty Information. Extended warranty information - See "Microwave Oven control" section in the search tool below. On some models) set correctly? Child ...locked, only the Vent Fan and Light pads will not run Why won't my microwave oven run? Assistance or service Call the KitchenAid Customer eXperience Center toll free: 1-800...
  • Can I use aluminum foil in my microwave and if so, are there tips for using it?
    ... inside cavity walls, ceiling or floor. Built-in the oven. Metals approved for using it? Can I use oven mitts or pot holders when removing dishes from the microwave oven. Do not allow aluminum foil or metal to the microwave oven. Always use aluminum foil in microwave ovens: Metal cookware and bakeware Gold, silver, pewter Nonapproved meat...
  • Microwavable immersion blender beaker
    ... beaker Are the beaker and chopper bowl that come with the Immersion Blender microwave safe? The beaker and the chopper bowl should not be used in the microwave oven. Model Number | Help me locate my model number Please enter at 1-800-541-6390. All times are ...

Similar Questions

Charcoal Filter
What is the part number for the charcoal filter my KitchenAid Microwave Model KHMS2040WSS-0?  needs?
(Posted by retfel 12 years ago)
Change Light Bulb In Microwave Oven.
How do I change the light bulb in a Kitchenaid KBMS1454SSS Microwave oven?
(Posted by danafeneck 13 years ago)
Ask a New Question
Use the box below to post a new question about this KitchenAid product .
Points & Prizes
  • You can earn points for nearly everything you do on HelpOwl.com
  • You can trade in those points for gift cards at leading retailers such as Amazon.com and Walmart
  • It's that simple!
See How it Works
Create a Free Account

KitchenAid Manuals

Find free KitchenAid KHMS2040WSS manuals and user guides available at ManualOwl.com. Try out our unique manual viewer allowing you to interact with manuals from directly within your browser!

KitchenAid Reviews

View thousands of KitchenAid user reviews and customer ratings available at ReviewOwl.com.

Contact Information

Complete KitchenAid customer service contact information including steps to reach representatives, hours of operation, customer support links and more from ContactHelp.com.

Scoreboard Ratings

See detailed KitchenAid customer service rankings, employee comments and much more from our sister site.

KitchenAid Recalls

Find comprehensive KitchenAid recall information updated hourly on RecallOwl.com.