Get support for KitchenAid KHMS2040WSS

KitchenAid KHMS2040WSS Support Question

KitchenAid KHMS2040WSS Support Question

Find answers below for this question about KitchenAid KHMS2040WSS.
Need a KitchenAid KHMS2040WSS manual? We have 3 online manuals for this item!
Question posted by zakiki91 on July 26th, 2014

How To Clean Microwave Filters Khms2040wss

The person who posted this question about this KitchenAid product did not include a detailed explanation. Please use the "Request More Information" button to the right if more details would help you to answer this question.

Current Answers

There are currently no answers that have been posted for this question.
Be the first to post an answer!

Remember that you can earn up to 1,100 points for every answer you submit. The better the quality of your answer, the better chance it has to be accepted.

Related KitchenAid KHMS2040WSS Manual Pages

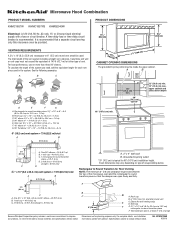
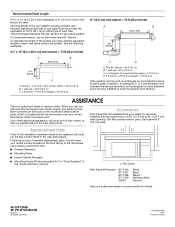
Dimension Guide - Page 1

... cm) min. 14" (35.6 cm) max. Exact dimensions may vary depending on type of the microwave oven and the rectangular to Round Transition for planning purposes only. Roof cap B. 6" (15.2 cm) min.... used in the system. Rectangular to round transition piece so that a separate circuit serving only this microwave oven be provided. 17 " (43.8 cm) 16 " (41.3 cm) VENTING REQUIREMENTS A 3¹...
Installation Guide - Page 1

... for use above electric or gas cooking products up to Wall 8 Prepare Upper Cabinet 8 Install Damper Assembly 9 Install the Microwave Oven 9 Complete Installation 10 VENTING DESIGN SPECIFICATIONS 11 ASSISTANCE 12 Replacement Parts 12 Accessories 12 MICROWAVE HOOD COMBINATION SAFETY Your safety and the safety of your appliance. These installation instructions cover different models.
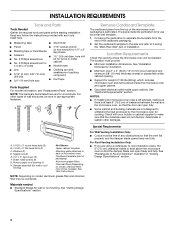
Installation Guide - Page 2

... required tools and parts before starting installation. Toggle nuts (2) E. 1/4" x 2" lag screws (2) F. See User Instructions.) NOTE: Depending on model, charcoal filters may be sure to withstand the heat produced by the microwave oven for use appropriate fasteners. Remove Cardboard Template The cardboard piece from the rest of wall structures, be combined. Washers (2) D. See...
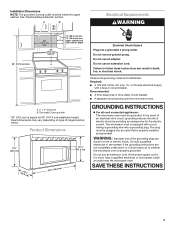
Installation Guide - Page 3

...the event of an electrical short circuit, grounding reduces the risk of electric shock. The microwave oven is typical for the electric current. The plug must be plugged into a grounded 3 prong...cord. If the power supply cord is properly installed and grounded. Failure to whether the microwave oven is properly grounded. Product Dimensions 17¹⁄₄" (43.8 cm) 16¹...
Installation Guide - Page 4

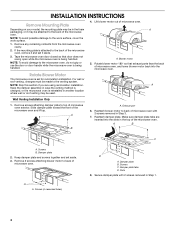
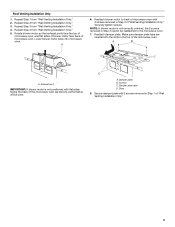
... in Step 3. 7. Make sure damper plate tabs are using recirculation installation. Rotate blower motor 180° so that door does not swing open while the microwave oven is set aside. 3. Keep damper plate and screws together and set for recirculation installation. Slots 8. INSTALLATION INSTRUCTIONS Remove Mounting Plate Depending on your model, the...
Installation Guide - Page 5

... Installation Only." D A. Screws C. A 6. Secure damper plate with 2 screws removed in Step 3 cannot be poor. Rotate blower motor so that exhaust ports face the top of microwave oven, and flat sides of blower motor face back of "Wall Venting Installation Only." 5 Damper plate tabs D. Repeat Step 4 from "Wall Venting Installation Only." 2. Reattach blower...
Installation Guide - Page 6

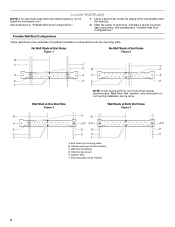
... D B D A A A A E E E E F F NOTE: If wall stud is within 6" (15.2 cm) of the wall stud(s) within the cabinet opening vertical centerline C. Cabinet opening , do not install the microwave oven. 1. See illustrations in "Possible Wall Stud Configurations." 2. Using a stud finder, locate the edges of the vertical centerline (see "Mark Rear Wall" section), only recirculation or ...
Installation Guide - Page 7

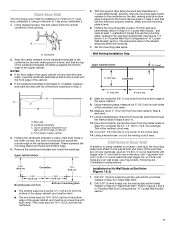
... 4. Wall Venting Installation Only Upper cabinet bottom ³⁄₈" (1 cm) 4" (10.2 cm) Centerline 6" (15.2 cm) 6" (15.2 cm) 8. This is level. 6. Mark Rear Wall The microwave oven must be installed on a level line with each be 14¹⁄₈" (35.9 cm) from the centerline. 5. Cardboard template C. D. Remove the cardboard template and...
Installation Guide - Page 8

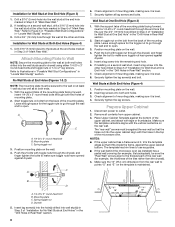
...wall" arrows must be secured to make sure toggle nuts have opened against the bottom of the microwave oven. B D A. 1/4-20 x 3" round-head bolt B. Installation for Wall Stud at the ... alignment of "Installation for the toggle nut to use as guides. ■ If the wall behind the microwave oven (as at both ends. 1. Check alignment of the mounting plate facing forward, insert a 1/4-20 x ...
Installation Guide - Page 9

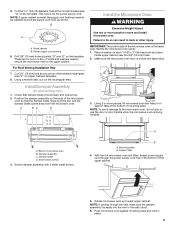
... the damper assembly on the back of the shaded rectangular area "F" on Upper Cabinet Template. 8. Damper assembly C. Secure damper assembly with 2 sheet metal screws. Rotate microwave oven up toward upper cabinet. This hole is for wall venting only) 1. For Roof Venting Installation Only 7. Check that the damper blade hinge is at the...
Installation Guide - Page 10

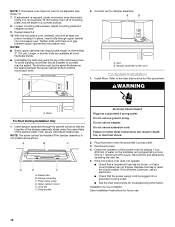
... a grounded 3 prong outlet. ■ See the User Instructions for filter placement. Sheet metal screw D. Plug microwave oven into a grounded 3 prong outlet. If adjustment is no gap between the upper cabinet bottom and the microwave oven. Tighten bolts until there is required, rotate microwave oven downward. A B C D E F A. Damper plate Electrical Shock Hazard Plug into...
Installation Guide - Page 11

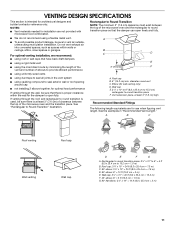
...Round Transition NOTE: The minimum 3" (7.6 cm) clearance must exist between the top of the microwave oven and the rectangular to round transition piece so that there is used, be sure to 15.2...damage, be sure there is at least 3" (7.6 cm) of clearance between the top of the microwave oven and the transition piece. Elbow (for use when figuring vent length. Roof cap: 3¹⁄&#...
Installation Guide - Page 12

...any of available replacement parts. If you will need , add the equivalent lengths of the microwave oven. You will need additional assistance, call us at our toll free number or visit our ...(s), transitions and wall or roof caps must be replaced, call , you need the microwave oven model number and serial number. Accessories Filler Panel Kits are available from sticking. The ...
Use & Care Guide - Page 1

... instructions include a "Troubleshooting" section to reduce the chance of injury, and tell you may encounter. We have provided many important safety messages in the microwave oven. ■ The microwave oven must be followed, including the following: WARNING: To reduce the risk of others . This is , tell you how to help you through any problems...
Use & Care Guide - Page 2

... for a short time before and halfway through heating it is damaged. Pieces can result in the microwave oven as lye-based oven cleaners, may create a fire or risk of the oven. Corrosive cleaning agents, such as they may damage the filter. ■ Do not cover or block any other utensil into the container. ■ Oversized foods...
Use & Care Guide - Page 3

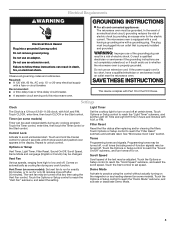
...(on automatically as to turn tones off after replacing and/or cleaning the filters. Filter Reset Reset the filter status after 30 minutes). Tones Programming tones and signals. Programming...Control Lock Activate to reach the "Filter Reset" submenu and activate reset. Touch Options or Setup control to avoid unintended start. See "Microwave Oven Care" section. Touch the Options or...
Use & Care Guide - Page 4

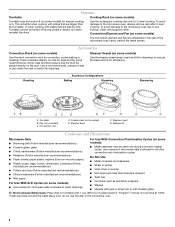
... Use the rectangular cooking rack only for some roast functions. To avoid damage to the microwave oven due to catch drippings. Place cookware directly on rack for bake and for 2-level cooking...paper For Use With Grill Cycles (on some models): ■ Use ovenproof, microwave-safe cookware to soil buildup, clean rack supports often. Turntable cannot be used only during preset or sensor (on ...
Use & Care Guide - Page 5

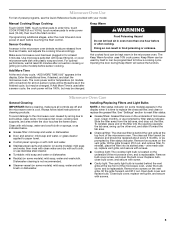
... dishwasher. ■ Rack(s) (on the vent grille, tilt the grille forward, lift it out. Enter the additional time, if desired, and start the microwave oven. Clean monthly, or as indicated below. ■ Grease filter: mild soap and water or dishwasher. ■ Door and exterior: mild soap and water, or glass cleaner applied to reset...
Use & Care Guide - Page 6

... fan (on during cooktop usage ■ This is on. This occurs to cool the microwave oven. It may be purchased separately. Replacement Parts, Accessories and Cleaning Supplies Following is being started. See "General Cleaning" in the microwave oven Check the following : ■ Household fuse or circuit breaker If a household fuse has blown or a circuit breaker has...
Use & Care Guide - Page 7

...TENTH YEAR LIMITED WARRANTY On microwave ovens only, in the second through due to repair or replace appliance light bulbs, air filters or water filters. Repairs when your major appliance... excluded from accident, alteration, misuse, abuse, fire, flood, acts of consumables or cleaning products not approved by a KitchenAid designated service company. Damage resulting from warranty coverage....

KitchenAid Knowledge Base Results

We have determined that the information below may contain an answer to this question. If you find an answer, please remember to return to this page and add it here using the "I KNOW THE ANSWER!" button above. It's that easy to earn points!

  • Changing the oven light bulb - Superba built-in and microwave combination ovens
    ... light cover by snapping it back into the wall. Replacing oven light bulbs - Architect Series II - gas and electric ranges My microwave oven will not work during the Self-Cleaning cycle. Superba built-in and microwave combination ovens How do I change the oven light bulb? When the oven door is off . Using tissue or wearing cotton gloves...
  • Cleaning the Downdraft Vent System - Architect 2 electric cooktop with downdraft
    ... the sink with mild detergent. Go Back to Off before reassembling. Cleaning the downdraft filter, image B: Make sure the ventilation control is cool before cleaning. Do not clean the filter in the dishwasher, a self-cleaning oven, or use abrasive cleaners or scrubbing pads. Less than one year 1 to Off before...
  • Microwavable immersion blender beaker
    ... the KitchenAid Customer eXperience Center is available 8am-8pm Monday-Friday and Saturday 10am-5pm Eastern Time at least 6 characters of your model number. Microwavable immersion blender beaker Are the beaker and chopper bowl that come with the Immersion Blender...

Similar Questions

Filter Reset
How do I reset the filter after changing out the old one?
(Posted by glord 6 years ago)
How To Change The Light Bulb In Kitchenaid Microwave Oven Model Kemc378kss?
I need assistance in the process to remove and replace the light bulb in the microwave portion of th...
(Posted by chipnchatter 11 years ago)
Change Light Bulb In Microwave Oven.
How do I change the light bulb in a Kitchenaid KBMS1454SSS Microwave oven?
(Posted by danafeneck 13 years ago)
Ask a New Question
Use the box below to post a new question about this KitchenAid product .
Points & Prizes
  • You can earn points for nearly everything you do on HelpOwl.com
  • You can trade in those points for gift cards at leading retailers such as Amazon.com and Walmart
  • It's that simple!
See How it Works
Create a Free Account

KitchenAid Manuals

Find free KitchenAid KHMS2040WSS manuals and user guides available at ManualOwl.com. Try out our unique manual viewer allowing you to interact with manuals from directly within your browser!

KitchenAid Reviews

View thousands of KitchenAid user reviews and customer ratings available at ReviewOwl.com.

Contact Information

Complete KitchenAid customer service contact information including steps to reach representatives, hours of operation, customer support links and more from ContactHelp.com.

Scoreboard Ratings

See detailed KitchenAid customer service rankings, employee comments and much more from our sister site.

KitchenAid Recalls

Find comprehensive KitchenAid recall information updated hourly on RecallOwl.com.