Get support for KitchenAid KHHC2090SSS - Architect II 2.0 cu. ft. 1200 W

KitchenAid KHHC2090SSS Support Question

KitchenAid KHHC2090SSS Support Question

Find answers below for this question about KitchenAid KHHC2090SSS - Architect II 2.0 cu. ft. 1200 W.
Need a KitchenAid KHHC2090SSS manual? We have 3 online manuals for this item!
Question posted by captk61 on August 6th, 2012

Door Closed Yet Message Says Door Is Open. Latch Switch/fuse Issue?

The person who posted this question about this KitchenAid product did not include a detailed explanation. Please use the "Request More Information" button to the right if more details would help you to answer this question.

Current Answers

There are currently no answers that have been posted for this question.
Be the first to post an answer!

Remember that you can earn up to 1,100 points for every answer you submit. The better the quality of your answer, the better chance it has to be accepted.

Related KitchenAid KHHC2090SSS Manual Pages

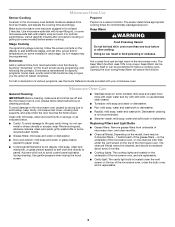
Use & Care Guide - Page 1

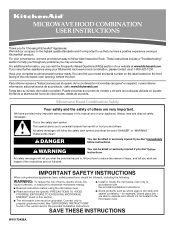
...don't follow instructions. WARNING You can be heated in this section. ■ The microwave oven must be killed or seriously injured if you for example, closed glass jars - Microwave Hood Combination Safety Your safety and the safety of the microwave oven opening, behind the door. For your convenience, we have provided many important safety messages in the microwave oven.
Use & Care Guide - Page 2

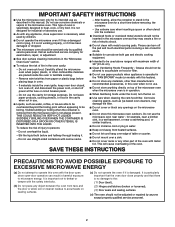
... power at the fuse or circuit breaker panel. - It is not designed for industrial or laboratory use. ■ As with the safety interlocks. (b) Do not place any appliance, close properly and that the oven door close supervision is necessary when used above ranges with the door open since open-door operation can result in harmful exposure to microwave energy. Do...
Use & Care Guide - Page 3

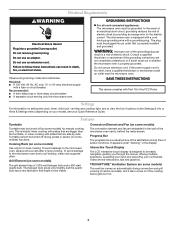
... plates that are side by providing an escape wire for 2-level cooking. It appears under "Sensing" in a risk of sensor functions. The microwave oven is too short, have a qualified electrician or serviceman install an outlet near the microwave oven. Recommended: ■ A time-delay fuse or time-delay circuit breaker. ■ A separate circuit serving only this...
Use & Care Guide - Page 4

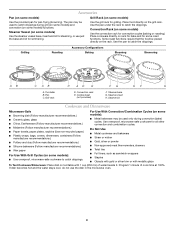
... on some models) Use the convection rack for steaming, or use the dish in the microwave oven. 4 Place cookware directly on rack for bake and for some models) Use the provided pan...■ Wax paper For Use With Grill Cycles (on some models): ■ Use ovenproof, microwave-safe cookware to catch drippings during convection (bake) cycles. Some roast functions require that the food ...
Use & Care Guide - Page 5

...: To avoid damage to panel). Popcorn Popcorn is not recommended. ■ Steamer vessel: mild soap, water and soft brush or dishwasher. Opening the door during cleaning. To avoid damage to the microwave oven caused by itself or can be used by arcing due to avoid control panel activation during Keep Warm will cancel the...
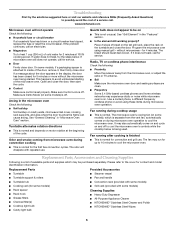
Use & Care Guide - Page 6

... information. Open and close door. If the problem continues, call for 2 minutes at the beginning of the microwave oven. If water does not heat, try the solutions suggested here or visit our website and reference FAQs (Frequently Asked Questions) to cool the microwave oven's controls while the cooktop below . If a message about the door appears in the microwave oven Check...
Use & Care Guide - Page 8

... www.kitchenaid.com If you on the upper or lower front facing of the microwave oven opening, behind the door. Consumable parts are excluded from warranty coverage. 3. Major appliances with the product,... other than normal, single-family household use your major appliance, to replace or repair house fuses, or to correct house wiring or plumbing. 2. KITCHENAID SHALL NOT BE LIABLE FOR INCIDENTAL ...
Dimension Guide - Page 1

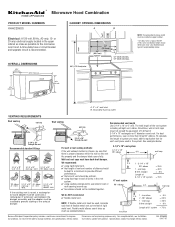
... time-delay fuse or circuit breaker and separate circuit is proper clearance within the wall so the vent fits properly and the damper blade opens fully. 3-1/4" x 10" vent system 3-1/4" x 10" 90° elbow 6 ft. NOTE:...10004; using duct tape to seal all joints in the upper cabinet as close as possible to the microwave oven hood. To calculate the length of system you need, add the equivalent ...
Installation Guide - Page 1

... to reduce the chance of others . We have provided many important safety messages in this manual and on your particular model may differ slightly from the illustration in Rear Wall 7 Attach Mounting Plate to Wall 7 Prepare Upper Cabinet 8 Install the Microwave Oven 9 Install Filters 10 Complete Installation 10 VENTING DESIGN SPECIFICATIONS 11 ASSISTANCE...
Installation Guide - Page 2

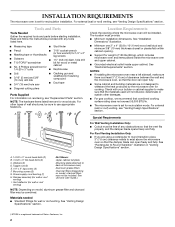
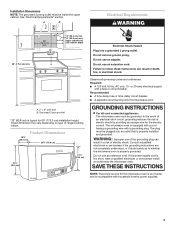
... venting) I For Wall Venting Installation Only: ■ Cutout must provide: ■ Minimum installation dimensions. INSTALLATION REQUIREMENTS The microwave oven is at least 3" (7.6 cm) of clearance between the wall and the microwave oven, so that the door can open fully. ■ Some cabinet and building materials are for wood studs. hole drill ■ T10 TORX®†...
Installation Guide - Page 3

... all governing codes and ordinances. WARNING: Improper use an adapter. Recommended: ■ A time-delay fuse or time-delay circuit breaker. ■ A separate circuit serving only this microwave oven is an inverter, and is incompatible with household inverter power supplies. 3 The microwave oven is too short, have a qualified electrician or serviceman install an outlet near the...
Installation Guide - Page 4

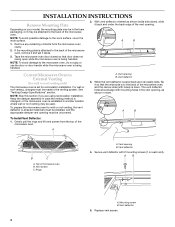
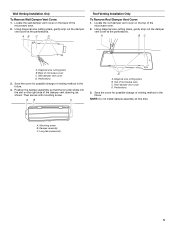
... for wall or roof venting, the vent deflector (L-shaped metal bar) must be made to the microwave oven, do not grip or use the door or door handle while the microwave oven is attached to the back of microwave oven B. Tape the microwave oven door closed so that the wide side is reinstalled in case the venting method is changed, or the...
Installation Guide - Page 5

...: 1. Diagonal wire cutting pliers B. Perforations 3. Position the damper assembly so that the long tab slides into the slot on the right side of microwave oven C. Top of the damper vent opening, as shown. Roof damper vent cover D. NOTE: Do not install damper assembly at the perforations. A. A B C A. Locate the wall damper vent cover on...
Installation Guide - Page 6

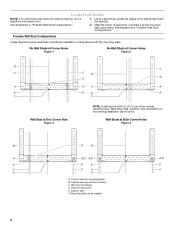
... stud centerlines D. Support tabs F. See illustrations in "Possible Wall Stud Configurations." Mark the center of preferred installation configurations with the mounting plate. Cabinet opening , do not install the microwave oven. 1. Using a stud finder, locate the edges of the vertical centerline (see "Mark Rear Wall" section), only recirculation or roof venting installation can be...
Installation Guide - Page 7

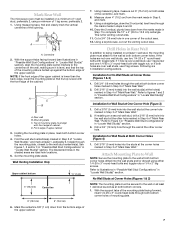
...complete the 12" x 4" (30.5 x 10.2 cm) rectangle. Rear wall B. Front edge of the opening. Find the wall stud centerline(s) marked in Step 7 to the centerline on a minimum of 1 wall stud... Wall." or if both sides of the centerline, and mark. 8. Mark Rear Wall The microwave oven must be secured to being installed on both holes are 3 installation configurations. Centerline 2. Set the...
Installation Guide - Page 8

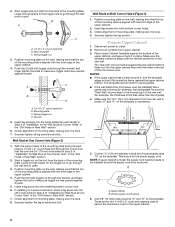
...and finger tighten the bolts to use as guides. ■ If the wall behind the microwave oven (as shown. Disconnect power to the upper cabinet. 8 Make sure the template centerline ...x 3" bolts and washers used to secure the microwave oven to outlet. 2. Spring toggle nut 3. These are for the toggle nuts to go through the wall and to open . Insert a lag screw into wall stud(s) in...
Installation Guide - Page 9

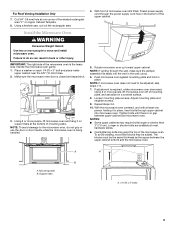
... until there is closed and taped shut. 3. Mounting plate B. Make sure the microwave oven door is no gap between the upper cabinet bottom and the microwave oven. NOTE: To avoid damage to do not grip or use the door or door handle while the microwave oven is being handled. 4. NOTE: If microwave oven does not need to move and install microwave oven. Loosen mounting...
Installation Guide - Page 10

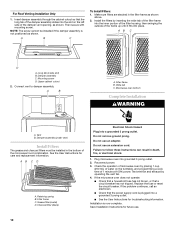
... it fits into the slot on the turntable, and programming a cook time of the damper vent opening, as shown. A B A. AB C D A. Filter frame C. Failure to damper assembly. If the microwave oven does not operate: ■ Check that a household fuse has not blown, or that the long tab of the damper assembly slides into place. Long...
Installation Guide - Page 11

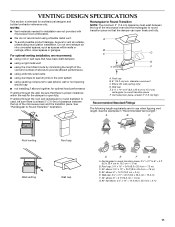
...route by minimizing the length of the vent and number of the microwave oven and the transition piece. diameter round vent C. Elbow (for architectural designer and...ft (8.3 x 25.4 cm to seal all joints in "Recommended Vent Length." Vent extension piece, at least 3" (7.6 cm) of clearance between the top of the microwave oven and the rectangular to round transition piece so that the damper can open...
Installation Guide - Page 12

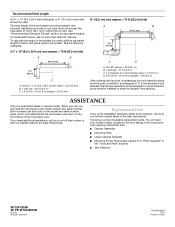
... oven opening, behind the microwave oven door on the front frame of each vent piece used . You will need , add the equivalent lengths of the microwave oven. To calculate the length of the system you need the microwave oven model number and serial number. One 3¹⁄₄" x 10" (8.3 x 25.4 cm) 90° elbow = 25 ft (7.6 m) B. 1 wall cap = 40 ft (12.2 m) C. 2 ft (0.6 m) + 6 ft...

KitchenAid Knowledge Base Results

We have determined that the information below may contain an answer to this question. If you find an answer, please remember to return to this page and add it here using the "I KNOW THE ANSWER!" button above. It's that easy to earn points!

  • Washer will not fill - Front-load washer
    ...of tumbling and soak. Allow the cycle to Start. The door may look closed for 3 seconds. All four shipping bolts must be latched. Press and hold the Cycle End Signal button for the washer...? If the problem continues to see if a fuse has blown and replace it . Open the door and firmly close it , if necessary. Failure to side. If the door is a low-water-usage washer. Make sure...
  • Display shows F22 or FdL - Front-load washer
    The door must be completely closed , but it may not be latched. Reduce your load size if needed.  Display shows F25 or F06 - Front-load washer Were you close it 's closed for laundry items sticking out beyond the door opening. Front-load washer The door will not open - The door may look as if it . Leave enough space in the...
  • Washer will not start - Front-load washer
    ... prong outlet? Straighten the water inlet hoses. The door must be latchedOpen the door and close firmly. This will turn on ? Check to the... washer and turned on ?   Allow the cycle to occur, call an electrician. Press and hold the End of tumbling and soaking. Has a household fuse...

Similar Questions

Request For Part Number
what is the part number for the door open push button for a KCcMS1655bss
(Posted by jabreyer1 2 years ago)
Door Will Not Latch. Is It Fixable?
The model # is YKHMS2050SS2. Suddenly the door stopped latching. There are 2 flat prongs on the door...
(Posted by woodsrobert 9 years ago)
All Power Lost As Door Shuts
After setting cookingtime, etc., when door closes, the unit looses all power. Sometimes after 2-5 mi...
(Posted by dhenstridge 10 years ago)
Door Removal
How to remove door
(Posted by Marktransman 12 years ago)
Ask a New Question
Use the box below to post a new question about this KitchenAid product .
Points & Prizes
  • You can earn points for nearly everything you do on HelpOwl.com
  • You can trade in those points for gift cards at leading retailers such as Amazon.com and Walmart
  • It's that simple!
See How it Works
Create a Free Account

KitchenAid Manuals

Find free KitchenAid KHHC2090SSS - Architect II 2.0 cu. ft. 1200 W manuals and user guides available at ManualOwl.com. Try out our unique manual viewer allowing you to interact with manuals from directly within your browser!

KitchenAid Reviews

View thousands of KitchenAid user reviews and customer ratings available at ReviewOwl.com.

Contact Information

Complete KitchenAid customer service contact information including steps to reach representatives, hours of operation, customer support links and more from ContactHelp.com.

Scoreboard Ratings

See detailed KitchenAid customer service rankings, employee comments and much more from our sister site.

KitchenAid Recalls

Find comprehensive KitchenAid recall information updated hourly on RecallOwl.com.