
KitchenAid KESS907SSS Support Question
KitchenAid KESS907SSS Support Question
Find answers below for this question about KitchenAid KESS907SSS - 30" Electric Range.Need a KitchenAid KESS907SSS manual? We have 3 online manuals for this item!
Question posted by 298tattoo on January 4th, 2015
Loose Knob
My Kess907sss00 has a loose left front knob. I there a common issue?
Current Answers
Answer #1: Posted by LuxuriKnows on January 9th, 2015 11:30 PM
LuxuriKnows

Member since:
March 25th, 2013 Points: 495,300

Member since:
March 25th, 2013 Points: 495,300
Hi,
according to the reviews left by four other kitchenaid owners the knobs are easily turned with a light bump. source : amazon
★ Hit "Accepted" or "Helpful" ✔ : If I Helped to Resolve Question.
✘ Didn't help? Resubmit Your Question : Include More Details if Possible |✘
Related KitchenAid KESS907SSS Manual Pages
Dimension Guide - Page 1

...will not be installed next
to combustible walls with zero clearance. 30" (76.2 cm) Freestanding and Slide-In Electric Range
PRODUCT MODEL NUMBERS
OVERALL DIMENSIONS
KERS807S KERS807X
KESK901S KESS907S
KESS908S KESS907X
Freestanding Range
Slide-in Range
ELECTRICAL REQUIREMENTS
B
q This range is less than the total connected load
F**
E
listed on the model/serial rating plate.
**If...
Installation Guide - Page 2

... - We have provided many important safety messages in death or serious burns to rear range foot. Only 5 Electrical Requirements - Only 9 Verify Anti-Tip Bracket Location 14 Level Range 14 Complete Installation 14 Moving the Range 14
ANTI-TIP BRACKET TEMPLATE 24
TABLE DES MATIÈRES
SÉCURITÉ DE LA CUISINIÈRE...
Installation Guide - Page 3

... or cabinet supplier to subfloor. Thickness of flooring may be used to be provided, the risk can be reduced by installing a range hood or microwave range hood combination that all electrical connections be made by reaching over heated surface units, cabinet storage space located above the surface units should be avoided. Longer screws...
Installation Guide - Page 4

... height with leveling legs screwed all the way in *
E. 30" (76.2 cm)
F. 27¹⁄₄" (69.2 cm) max.
See "Electrical Connection" section.
Product Dimensions
Freestanding Range
Mobile home installations require: ■ When this range is installed in a mobile home installation. front of this range must conform with leveling legs screwed all the way in...
Installation Guide - Page 5

... for dimensional clearances above the cooktop surface. Refer to the top of electrical connection you are in Range
A
C
B
D
A
C
B
D
F E
E F
G H
A. 13" (33.0 cm) upper cabinet depth
B. 30" (76.2 cm) min. Freestanding Range
A freestanding range may be using and follow the range hood or microwave hood combination installation instructions for use with local codes. opening...
Installation Guide - Page 6

...-50R is adequate and wire gauge are in a NEMA Type 14-50P plug on the supply end. Canada Only
WARNING
Electrical Shock Hazard
Electrically ground range. latest edition, and all local codes and ordinances. Range Rating*
Specified Rating of Power Supply Cord Kit and Circuit Protection
120/240 Volts 120/208 Volts Amps
8.8 - 16...
Installation Guide - Page 7

... adjust the ³⁄₈" (1.0 cm) dimension. Be sure the wall receptacle is not level, range will be level. Measure at locations marked A, B, C, D.
2. Countertop Preparation
(for Slide-in Ranges Only)
The cooktop sides of range's final location. C D
A B
30" (76.2 cm)
30 ¾" (78.1 cm)
³⁄₈" (1.0 cm)
If countertop opening . Countertop must have a square...
Installation Guide - Page 9

... Hazard Disconnect power before servicing. Failure to the subfloor.
Make electrical connections as described in death, fire, or electrical shock.
Remove cardboard or hardboard from under range.
8. Continue installing your flooring, longer screws may be made. Disconnect power.
2. 6. Electrically ground range. Add strain relief. Depending on the back of your...
Installation Guide - Page 10
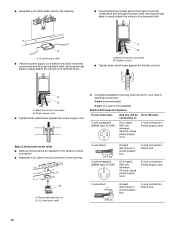
... circuit breaker box
A UL listed, 250-volt minimum, 40-amp, range power supply cord
4-wire connection: Direct wire
3-wire connection: Power supply cord
B
A.
A
A. Complete installation following instructions for your type of electrical connection: 4-wire (recommended)
3-wire (if 4-wire is not available)
Electrical Connection Options
If your home has:
And you will be Go...
Installation Guide - Page 12

Ground-link screw
D. Neutral (white) wire E. Securely tighten hex nuts. Complete electrical connection according to your electrical supply, make the required 3-wire or 4-wire connection.
1. Pull the wires through the strain relief on the front of the range. Terminal block B. Ground-link screw C. Bare (green) ground wire
E. Line 1 (black) wire
4. Replace terminal block ...
Installation Guide - Page 14

.... See the Use and Care Guide for heat. then front to back.
See the "Level Range" section. 5. or circuit breaker has not tripped.
■ Range is plugged into an outlet.
■ Electrical supply is engaged in range or reconnect power. 8. Place level on rack and check levelness of /recycle all parts are now installed...
Installation Guide - Page 15

....
1. Check that anti-tip bracket is installed:
■ Look for cleaning or maintenance: For power supply cord-connected ranges: 1. If removing the range is level and reconnect power.
15 For direct-wired ranges:
WARNING
Electrical Shock Hazard Disconnect power before operating. Replace all parts and panels before servicing. Disconnect wiring (if necessary). 4. Check that...
Use & Care Guide - Page 1

ELECTRIC RANGE
ARCHITECT® SERIES II
Use & Care Guide
For questions about features, operation/performance, parts, accessories or service, call: 1-800-422-1230 or visit our website ...
Use & Care Guide - Page 2
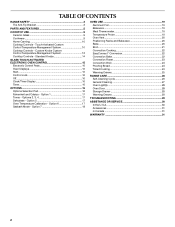
... 10 Cooktop Controls - Custom Knobs Custom Control Temperature Management System 12 Cooktop Controls - Option 1 17 Tones - Standard Knobs 14
GLASS TOUCH-ACTIVATED ELECTRONIC ...Drawer 29 Warming Drawer 29
TROUBLESHOOTING 29
ASSISTANCE OR SERVICE 30 In the U.S.A 30 Accessories 31 In Canada 31
WARRANTY 31
2 TABLE OF CONTENTS
RANGE SAFETY 3 The Anti-Tip Bracket 3
PARTS AND FEATURES...
Use & Care Guide - Page 4

... rub, damage, or move the gasket.
■ Do Not Use Oven Cleaners - Loose-fitting or hanging garments should be positioned so that may result in water.
■ Do...electric shock. The door gasket is turned inward, and does not extend over adjacent surface units.
■ Do Not Soak Removable Heating Elements - All other servicing should be left alone or unattended in area where the range...
Use & Care Guide - Page 8

... door window
Parts and Features not shown (on some models)
Broiler pan and grid Roasting rack Temperature probe Simmer feature switch Temperature probe jack (electronic knob control only)
A
B
CA
D
E
A. Range D E F
A
G H
I . Hot surfaces indicator lights
G. Model and serial number K.
Use & Care Guide - Page 24
...They will show 100°F (38°C). 2. The convection broil range can be set length of foods is turned off automatically.
Convection ...
Press the number pads to turn off in size, checking after 30 seconds. The set to enter a temperature other than the one ...Do not let food sit in baking pan(s) and cover loosely with plastic wrap, coated with cooking spray.
Press the...
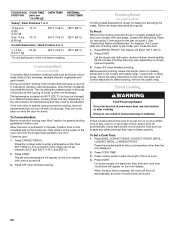
Use & Care Guide - Page 26
... can be changed. When the cycle is essential for a 2 hour 30 minute clean cycle, however the time can result. Press any loose soil to clear the oven display.
26 Keep children away from the ...all items from oven during self-cleaning to help get hot enough during Self-Cleaning cycle. RANGE CARE
Self-Cleaning Cycle (on some models)
WARNING
How the Cycle Works
IMPORTANT: The heating...
Use & Care Guide - Page 30

... cooking results not what expected
■ Is the range level? Custom Knobs Custom Control Temperature Management System" or "Cooktop Controls Standard Knobs" section, depending on our full line of a... sales.
■ Specialized customer assistance (Spanish speaking, hearing impaired, limited vision, etc.).
30 See "Oven Displays" section. Oven temperature too high or too low
■ Does the...
Use & Care Guide - Page 31
...Factory Specified Parts for the following components if defective in materials or workmanship:
■ Electric element
■ Solid state touch control system parts
■ Any cracking of the rubber... brand of the ceramic glass cooktop
■ Surface unit elements
31 KITCHENAID® ELECTRIC RANGE WARRANTY
LIMITED WARRANTY
For one year from the date of purchase, when this limited warranty...
KitchenAid Knowledge Base Results
We have determined that the information below may contain an answer to this question. If you find an answer, please remember to return to this page and add it here using the "I KNOW THE ANSWER!" button above. It's that easy to earn points!-
General cleaning tips for my electric or gas range
...knobs. To replace the storage drawer: Fit the ends of ½ then pull out the drawer another inch. For hard water spots, use abrasive cleaners, steel-wool pads, gritty washcloths or certain paper towels. Electric Ranges...is properly seated on some models, do I clean and care for my electric or gas range? On some models) To remove the warming drawer: Open drawer to ... -
Temperature probe - Architect Series II - gas and electric ranges
... oven display throughout cooking. FAQs Knowledgebase search tips Using your meat thermometer Using the Options selection pad - then repeat the above steps. gas and electric ranges How do I use : Before using, insert the probe into the center of the thickest portion of meat or into the inner thigh or breast of... -
Beeps and tones - Ultima built-in oven with steam
... change the sound from either display. To change the sound level, touch the "plus" (+) or "minus" (-) signs to increase or decrease to the left. On combination ovens, you can be changed. To change the sound: Touch Sound. gas and electric ranges Sabbath Mode Includes using the Timer for both ovens. Architect Series II -
Similar Questions

How Do I Replace A Front Right Burner Element When The Knobs Are In Front?
Right front burner element "burned out". How do I open flat-glass cooktop to expose the burner eleme...
Right front burner element "burned out". How do I open flat-glass cooktop to expose the burner eleme...
(Posted by Yazmin50 7 years ago)

My Kitchenaid Kers205tss Electric Range Is Randomly Not Holding Tempurature.
My oven is not holding temps, but not all the time. It has happened twice in the last day. Would it ...
My oven is not holding temps, but not all the time. It has happened twice in the last day. Would it ...
(Posted by ritastrang 8 years ago)

Dual Burner Switch Replacement For The Model #kess907 Electric Range
How do i replace the left side dual burner switch and what is the part number ?
How do i replace the left side dual burner switch and what is the part number ?
(Posted by woodsv 9 years ago)

Slid In Electrical Range
i have to install an electrical slidin range but it come with a metal below cooktop glass that separ...
i have to install an electrical slidin range but it come with a metal below cooktop glass that separ...
(Posted by arqfalves 12 years ago)

First: What Price Do You Charge For Your Answers? Second:
KitchenAid electric range, Mod. YKESH307HS0 presents F5:E3 in place of time in the clock display. W...
KitchenAid electric range, Mod. YKESH307HS0 presents F5:E3 in place of time in the clock display. W...
(Posted by ve3auw 14 years ago)