
KitchenAid KESS907SSS Support Question
KitchenAid KESS907SSS Support Question
Find answers below for this question about KitchenAid KESS907SSS - 30" Electric Range.Need a KitchenAid KESS907SSS manual? We have 3 online manuals for this item!
Question posted by Yazmin50 on April 20th, 2017
How Do I Replace A Front Right Burner Element When The Knobs Are In Front?
Right front burner element "burned out". How do I open flat-glass cooktop to expose the burner elements?
Current Answers
Answer #1: Posted by Odin on April 21st, 2017 5:46 AM
Odin

Member since:
April 10th, 2010 Points: 41,236,680

Member since:
April 10th, 2010 Points: 41,236,680
Hope this is useful. Please don't forget to click the Accept This Answer button if you do accept it. My aim is to provide reliable helpful answers, not just a lot of them. See https://www.helpowl.com/profile/Odin.
Related KitchenAid KESS907SSS Manual Pages
Dimension Guide - Page 1

... or microwave hood combination above the cooktop surface.
Range must be level. For complete details, see Range Rating chart below). For 50-amp rated cord kits, use kits that specify use with kit.
Formed front-edged countertops: Must have a square finish (flat) countertop and the opening width is 30" (76.2 cm), no countertop preparation is covered...
Installation Guide - Page 3

... the right-hand side oven door trim.
■ The range should be securely mounted to order. The cord should be installed. Check local codes. W10113904A
Location Requirements
IMPORTANT: Observe all electrical connections be made by installing a range hood or microwave range hood combination that projects horizontally a minimum of 5" (12.7 cm) beyond the bottom of burns or...
Installation Guide - Page 4

... (located on the right-hand side oven door trim)
*Range can be revised. A. 30 77.6 cm)
B. 35⁵⁄₈" (90.5 cm) height to the floor during transit. Product Dimensions
Freestanding Range
Mobile home installations require: ■ When this range is adequate as long as it must be
secured to underside of range**
G. See "Electrical Connection" section...
Installation Guide - Page 5

... the cooktop, see following Range Rating chart). Cabinet door or hinge should not extend into cutout.
Electrical Requirements - The model/serial rating plate is manufactured with the neutral terminal connected to 22" (55.9 cm) from either cabinet, 7" (17.8 cm) max. Refer to 22" (55.9 cm) from either cabinet, 7" (17.8 cm) max. opening width
C.
opening depth
E. 30...
Installation Guide - Page 12

... terminal block posts with one of range. Replace terminal block access cover.
Neutral (...expose wires. Terminal lug B. Tighten strain relief screws.
6. Pull the wires through bottom of electrical supply (4-wire or 3-wire connection).
4-wire Connection: Direct Wire
Use this method for use with nominal 1³⁄₈" (3.5 cm) diameter connection opening, with ranges...
Installation Guide - Page 14

... the cavity.
■ Slide the drawer closed.
Check that the range is engaged in anti-tip bracket. Replace the storage drawer:
■ Fit the ends of your tools. ... on surface burners and oven. Moving the Range
WARNING
3. Failure to follow these instructions can tip the range and be
removed to side;
Push range back into an outlet.
■ Electrical supply is removed...
Installation Guide - Page 15

...cleaning or maintenance. 4.
Failure to floor. ■ Slide range back so rear range foot is under anti-tip
bracket.
6. Only" section. 6. Check that range is level. Disconnect power. 2. Perform cleaning or maintenance. 5. U.S.A. Check that range is level and reconnect power.
15 Plug in death or electrical shock.
1. Replace all parts and panels before servicing. If removing...
Use & Care Guide - Page 1

ELECTRIC RANGE
ARCHITECT® SERIES II
Use & Care Guide
For questions about features, operation/performance, parts, accessories or service, call: 1-800-422-1230 or visit our website ...
Use & Care Guide - Page 2
...(s 28 Oven Door 28 Storage Drawer 29 Warming Drawer 29
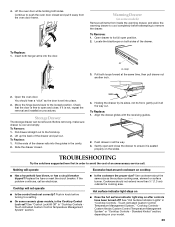
TROUBLESHOOTING 29
ASSISTANCE OR SERVICE 30 In the U.S.A 30 Accessories 31 In Canada 31
WARRANTY 31
2 Touch-Activated Custom Control Temperature Management System 10 Cooktop Controls - TABLE OF CONTENTS
RANGE SAFETY 3 The Anti-Tip Bracket 3
PARTS AND FEATURES 5
COOKTOP USE 9 Ceramic Glass 9 Cookware 9 Home Canning 10...
Use & Care Guide - Page 4

... to cool. Absence of glass, glass/ceramic, ceramic, earthenware, or other flammable materials contact heating elements or interior surfaces of the range.
■ Wear Proper Apparel - If rack must be seriously injured.
■ Proper Installation - Do not repair or replace any part of oven until they have had sufficient time to cause burns -
SAVE THESE INSTRUCTIONS...
Use & Care Guide - Page 5
... DELAY
MIN HR SEC MIN
START TIME
STOP TIME
B
A. Right front touch control (single element)
C. Left rear touch control (dual-size element)
G F ED C
B
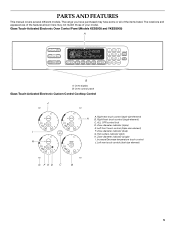
5 The range you have purchased may not match those of the items listed. Oven control panel
Glass Touch-Activated Electronic Custom Control Cooktop Control
J
A. Zone diameter indicator (triple)
E. Hot surface indicator lights...
Use & Care Guide - Page 7
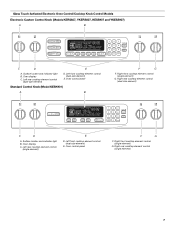
...START TIME
STOP TIME
C
D
A. Right rear cooktop element control (single element)
7 Left rear cooktop element control (single element)
E
D. Surface locator and indicator light
B. Left front cooktop element control (dual-size element)
E. Left rear cooktop element control (dual-size element)
D. Glass Touch-Activated Electronic Oven Control/Cooktop Knob Control Models
Electronic...
Use & Care Guide - Page 8

... shown (on electronic control models)
B. Oven lights B. Door gasket J. Dual-size element (rear element also dual on some models)
Broiler pan and grid Roasting rack Temperature probe Simmer feature switch Temperature probe jack (electronic knob control only)
A
B
CA
D
E
A. Range D E F
A
G H
I . Anti-tip bracket C. Selectable simmer feature (available on standard control models...
Use & Care Guide - Page 10

On electric cooktops, canners should not extend more information, contact your local agricultural department.
HI [8-10]
■ Hold a rapid boil. ■ Quickly brown or sear food. LO-3 [SIMMER]
■ Simmer (range of food. ■ Home canning.
For maximum element operation, all cooktop touch-activated controls can be set to HI when bringing liquids to increase or...
Use & Care Guide - Page 12
...element operation, all controls when done cooking. NOTE: This cooktop automatically adjusts for minimal element operation. Push in and turn to touch, even after the surface cooking area(s) is turned off all knob... will glow as long as a guide when setting heat levels.
i
REMEMBER: When range is too hot to desired setting.
12
A. Dual size
MED-LO
■ Stew or steam...
Use & Care Guide - Page 14

... butter. POWER ON Lights
Each control knob has a POWER ON light. HI
■ Hold a rapid boil. ■ Quickly brown or sear food.
REMEMBER: When range is on the size of food and home canning. Dual size
The Dual-Size Elements offer flexibility depending on . To Use SINGLE: 1. Cooktop Controls - Failure to do so can...
Use & Care Guide - Page 29
...cookware the proper size?
Replace the fuse or reset the circuit breaker. See "Control Lock/All Off" in all the way. 3. Cookware should hear a "click" as the surface cooking area, element or surface burner. Touch-Activated Custom Control Temperature Management System," "Cooktop Controls Custom Knobs Custom Control Temperature Management System" or "Cooktop Controls -
Insert both sides...
Use & Care Guide - Page 30

...Cooktop Controls Standard Knobs" section, depending on the bottom? Level the range. There has been a power failure. Press OFF to the proper heat level? See "Oven Displays" section. Level the range. Option 6" section.
■ Was the oven preheated? Adjust cooking time.
■ Has the oven door been opened...properly? See "Glass Touch-Activated Electronic...right and work right...
Use & Care Guide - Page 31
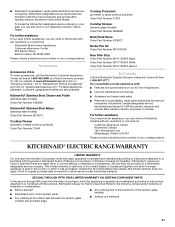
...ELECTRIC RANGE WARRANTY
LIMITED WARRANTY
For one year from the date of purchase, when this major appliance is required to obtain service under this limited warranty does not apply. Proof of the ceramic glass cooktop
■ Surface unit elements... bakeware, cookware, gadgets and textiles are trained to "Replacement Parts & Accessories" and click on "Shopping Options." KitchenAid ...
Use & Care Guide - Page 32
...future reference. The cost of repair or replacement under these excluded circumstances shall be repaired...GIVES YOU SPECIFIC LEGAL RIGHTS, AND YOU MAY ALSO HAVE OTHER RIGHTS WHICH VARY FROM STATE...improper installation, installation not in accordance with electrical or plumbing codes, or use or when it . ...unauthorized modifications made to KitchenAid within 30 days from your major appliance, ...
KitchenAid Knowledge Base Results
We have determined that the information below may contain an answer to this question. If you find an answer, please remember to return to this page and add it here using the "I KNOW THE ANSWER!" button above. It's that easy to earn points!-
Tips for using cookware - Gas and Electric Ranges and Cooktops
... on a hot surface cooking area, element or surface burner. Good for most cooking tasks. Using ceramic glass cooktop Using the ceramic glass cooktop FAQs Knowledgebase search tips Medium or heavy thickness is a factor in cookware. Stainless steel Heats quickly, but unevenly. Tips for using cookware on my range or cooktop? Gas and Electric Ranges and Cooktops Are there any tips for... -
General cleaning tips for my electric or gas range
... instructions on some models) Cleaning ceramic glass cooktop. When replacing knob, make sure knob is cool. Food spills should be cleaned after the oven cools. Cleaning ceramic glass cooktop - These spills may occur. To clean ceramic glass (on cleaning products. On some models, do I clean and care for my electric or gas range? cup (125 mL) ammonia to... -
Replacing oven light bulbs - Built-in ovens
... the bulb with bare fingers. Replace the bulb cover by grasping the front edge and pulling away from the socket. Architect Series II - gas and electric ranges FAQs Knowledgebase search tips Setting the...combination ovens Changing the oven light bulb - Remove the glass light cover by snapping it does not come on ? When the oven door is opened . Remove the bulb from the oven. Built-in...
Similar Questions

How To Replace Lower Heating Element?
Lower heating element has failed - I need instructions on how to replace it. Thanks.
Lower heating element has failed - I need instructions on how to replace it. Thanks.
(Posted by Anonymous-172477 1 year ago)


Dual Burner Switch Replacement For The Model #kess907 Electric Range
How do i replace the left side dual burner switch and what is the part number ?
How do i replace the left side dual burner switch and what is the part number ?
(Posted by woodsv 9 years ago)

Slid In Electrical Range
i have to install an electrical slidin range but it come with a metal below cooktop glass that separ...
i have to install an electrical slidin range but it come with a metal below cooktop glass that separ...
(Posted by arqfalves 12 years ago)

First: What Price Do You Charge For Your Answers? Second:
KitchenAid electric range, Mod. YKESH307HS0 presents F5:E3 in place of time in the clock display. W...
KitchenAid electric range, Mod. YKESH307HS0 presents F5:E3 in place of time in the clock display. W...
(Posted by ve3auw 14 years ago)