

Dimension Guide
Page 1
...: W10246119C 2/28/11 Use a 3-wire UL listed, 40- Place level on models KESS907XSP and KERS807XSP) beyond 24" (61 cm) base cabinet. 30" (76.2 cm) Freestanding and Slide-In Electric Range PRODUCT MODEL NUMBERS OVERALL DIMENSIONS KERS807S KERS807X KESK901S KESS907S KESS908S KESS907X Freestanding Range Slide-in Range ELECTRICAL REQUIREMENTS B q This range is less than the total connected load F** E listed on the model/serial rating plate. **If connecting to a 50-amp circuit, use a 50-amp rated cord with kit. Because Whirlpool Corporation...
...: W10246119C 2/28/11 Use a 3-wire UL listed, 40- Place level on models KESS907XSP and KERS807XSP) beyond 24" (61 cm) base cabinet. 30" (76.2 cm) Freestanding and Slide-In Electric Range PRODUCT MODEL NUMBERS OVERALL DIMENSIONS KERS807S KERS807X KESK901S KESS907S KESS908S KESS907X Freestanding Range Slide-in Range ELECTRICAL REQUIREMENTS B q This range is less than the total connected load F** E listed on the model/serial rating plate. **If connecting to a 50-amp circuit, use a 50-amp rated cord with kit. Because Whirlpool Corporation...

Installation Guide
Page 3
... included. See "Electrical Requirements" section. Tools needed If using a power supply cord: ■ A UL listed power supply cord kit marked for use with nominal 1³⁄₈" (3.5 cm) diameter connection opening dimensions that the materials used to fill a gap between the rear of the slide-in cooktop and the wall in accordance with the requirements of UL and CSA International and complies with the range, see "Install Anti-Tip Bracket" section. ■ Grounded electrical supply is marked...
... included. See "Electrical Requirements" section. Tools needed If using a power supply cord: ■ A UL listed power supply cord kit marked for use with nominal 1³⁄₈" (3.5 cm) diameter connection opening dimensions that the materials used to fill a gap between the rear of the slide-in cooktop and the wall in accordance with the requirements of UL and CSA International and complies with the range, see "Install Anti-Tip Bracket" section. ■ Grounded electrical supply is marked...

Installation Guide
Page 4
Product Dimensions Freestanding Range Mobile home installations require: ■ When this range is installed in a mobile home installation. See "Electrical Connection" section. Model/serial number plate (located on the right-hand side oven door trim) *Range can be used in a mobile home, it conforms to the floor during transit. front of range** G. Slide-in Range A B A F B* D* C* G E** C D F** E A. 5³⁄₄" (14.6 cm) B. 30" (76.2 cm) C. 41³⁄₄" (106.0 cm) overall height with leveling legs screwed...
Product Dimensions Freestanding Range Mobile home installations require: ■ When this range is installed in a mobile home installation. See "Electrical Connection" section. Model/serial number plate (located on the right-hand side oven door trim) *Range can be used in a mobile home, it conforms to the floor during transit. front of range** G. Slide-in Range A B A F B* D* C* G E** C D F** E A. 5³⁄₄" (14.6 cm) B. 30" (76.2 cm) C. 41³⁄₄" (106.0 cm) overall height with leveling legs screwed...

Installation Guide
Page 5
... MSG sheet steel, 0.015" (0.4 mm) stainless steel, 0.024" (0.6 mm) aluminum or 0.020" (0.5 mm) copper. 30" (76.2 cm) minimum clearance between the top of the cooking platform and the bottom of wood or metal cabinet is located inside the oven door on the model/serial number rating plate. Use a 3-wire UL listed, 40- If local codes do not permit ground through the neutral, use a 4-wire power supply cord rated at 250...
... MSG sheet steel, 0.015" (0.4 mm) stainless steel, 0.024" (0.6 mm) aluminum or 0.020" (0.5 mm) copper. 30" (76.2 cm) minimum clearance between the top of the cooking platform and the bottom of wood or metal cabinet is located inside the oven door on the model/serial number rating plate. Use a 3-wire UL listed, 40- If local codes do not permit ground through the neutral, use a 4-wire power supply cord rated at 250...
Installation Guide
Page 8
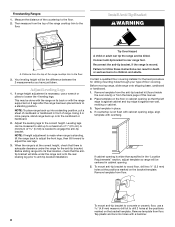
... template in cabinet opening . 5. To mount anti-tip bracket to rear range foot. Remove template from floor. Install Anti-Tip Bracket WARNING A A. Reconnect the anti-tip bracket, if the range is necessary, use a 4.8 mm) masonry drill bit to a maximum of range. If cabinet opening is wider than specified in the "Location Requirements" section, adjust template so range will be centered in death or serious burns to adjust the rear legs. 3. Connect anti-tip bracket to wood floor, drill...
... template in cabinet opening . 5. To mount anti-tip bracket to rear range foot. Remove template from floor. Install Anti-Tip Bracket WARNING A A. Reconnect the anti-tip bracket, if the range is necessary, use a 4.8 mm) masonry drill bit to a maximum of range. If cabinet opening is wider than specified in the "Location Requirements" section, adjust template so range will be centered in death or serious burns to adjust the rear legs. 3. Connect anti-tip bracket to wood floor, drill...

Installation Guide
Page 9
... of the range. Plug into anti-tip bracket. Terminal block cover 4. 6. Continue installing your local hardware store. 10. Failure to remove cover. 3. Electrically ground range. Pull cover down screws B. Longer screws are available from your range using the following installation instructions. Use a new 40 amp power supply cord. Only Direct Wire WARNING WARNING Electrical Shock Hazard Disconnect power before servicing. Electrical Shock Hazard Disconnect power before servicing. Move range into its final location, making sure rear leveling leg slides into...
... of the range. Plug into anti-tip bracket. Terminal block cover 4. 6. Continue installing your local hardware store. 10. Failure to remove cover. 3. Electrically ground range. Pull cover down screws B. Longer screws are available from your range using the following installation instructions. Use a new 40 amp power supply cord. Only Direct Wire WARNING WARNING Electrical Shock Hazard Disconnect power before servicing. Electrical Shock Hazard Disconnect power before servicing. Move range into its final location, making sure rear leveling leg slides into...

Installation Guide
Page 14
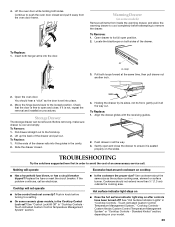
... range is under anti-tip bracket. Use pliers or wrench to floor. ■ Slide range back so rear range foot is cold, turn off the range and contact a qualified technician. To remove storage drawer: ■ Pull drawer straight out to children and adults. Check that you have all packaging materials. 4. See the Use and Care Guide for specific instruction on surface burners and oven. Level Range 1. Push range back into an outlet. ■ Electrical supply is level. Tip Over...
... range is under anti-tip bracket. Use pliers or wrench to floor. ■ Slide range back so rear range foot is cold, turn off the range and contact a qualified technician. To remove storage drawer: ■ Pull drawer straight out to children and adults. Check that you have all packaging materials. 4. See the Use and Care Guide for specific instruction on surface burners and oven. Level Range 1. Push range back into an outlet. ■ Electrical supply is level. Tip Over...
Use & Care Guide
Page 2
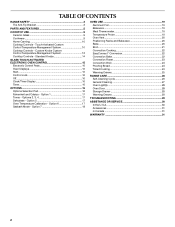
... 19 Temperature Probe 19 Oven Vent 20 Positioning Racks and Bakeware 20 Bake 20 Broil 21 Convection Cooking 22 EasyConvect™ Conversion 22 Convection Bake 22 Convection Roast 23 Convection Broil 24 Proofing Bread 24 Timed Cooking 24 Warming Drawer 25 RANGE CARE 26 Self-Cleaning Cycle 26 General Cleaning 27 Oven Light(s 28 Oven Door 28 Storage Drawer 29 Warming Drawer 29 TROUBLESHOOTING 29 ASSISTANCE OR SERVICE 30 In the U.S.A 30 Accessories 31 In Canada 31 WARRANTY 31 2 TABLE OF CONTENTS RANGE SAFETY 3 The Anti-Tip Bracket 3 PARTS AND FEATURES 5 COOKTOP USE...
... 19 Temperature Probe 19 Oven Vent 20 Positioning Racks and Bakeware 20 Bake 20 Broil 21 Convection Cooking 22 EasyConvect™ Conversion 22 Convection Bake 22 Convection Roast 23 Convection Broil 24 Proofing Bread 24 Timed Cooking 24 Warming Drawer 25 RANGE CARE 26 Self-Cleaning Cycle 26 General Cleaning 27 Oven Light(s 28 Oven Door 28 Storage Drawer 29 Warming Drawer 29 TROUBLESHOOTING 29 ASSISTANCE OR SERVICE 30 In the U.S.A 30 Accessories 31 In Canada 31 WARRANTY 31 2 TABLE OF CONTENTS RANGE SAFETY 3 The Anti-Tip Bracket 3 PARTS AND FEATURES 5 COOKTOP USE...

Use & Care Guide
Page 4
... damage when using the range. ■ User Servicing - Do not repair or replace any part of oven until they are dark in temperature. ■ Utensil Handles Should Be Turned Inward and Not Extend Over Adjacent Surface Units - Contact a qualified technician immediately. ■ Clean Cooktop With Caution - Build-up of pressure may ignite. ■ Make Sure Reflector Pans or Drip Bowls Are in or on Broken Cooktop - Always place oven racks in...
... damage when using the range. ■ User Servicing - Do not repair or replace any part of oven until they are dark in temperature. ■ Utensil Handles Should Be Turned Inward and Not Extend Over Adjacent Surface Units - Contact a qualified technician immediately. ■ Clean Cooktop With Caution - Build-up of pressure may ignite. ■ Make Sure Reflector Pans or Drip Bowls Are in or on Broken Cooktop - Always place oven racks in...
Use & Care Guide
Page 6
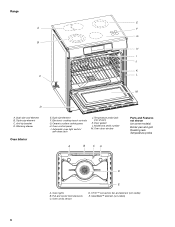
Anti-tip bracket D. Electronic cooktop touch controls G. Full and center broil elements C. Dual-size oval element B. Dual-size element F. Oven door window A B CA Parts and Features not shown (on some models) Broiler pan and grid Roasting rack Temperature probe D E A. Automatic oven light switch/ self-clean latch J. CleanBake™ element (not visible) 6 Warming drawer Oven Interior E. Oven control panel I J K C L M D A. T.H.E.™ convection fan and element (not visible) E. Model and serial number M. Oven lights B. Ceramic surface cooking area H. Oven ...
Anti-tip bracket D. Electronic cooktop touch controls G. Full and center broil elements C. Dual-size oval element B. Dual-size element F. Oven door window A B CA Parts and Features not shown (on some models) Broiler pan and grid Roasting rack Temperature probe D E A. Automatic oven light switch/ self-clean latch J. CleanBake™ element (not visible) 6 Warming drawer Oven Interior E. Oven control panel I J K C L M D A. T.H.E.™ convection fan and element (not visible) E. Model and serial number M. Oven lights B. Ceramic surface cooking area H. Oven ...

Use & Care Guide
Page 8
...8482; convection fan and element (on some models) Broiler pan and grid Roasting rack Temperature probe Simmer feature switch Temperature probe jack (electronic knob control only) A B CA D E A. Automatic oven light switch/ self-clean latch I B J K C A. Oven cavity sensor D. Anti-tip bracket C. Warming drawer (storage drawer on standard control models) F. Ceramic surface cooking area E. Door gasket J. Full and center broil elements C. Selectable simmer feature (available on standard control models) Oven Interior D. Model and serial number K. Dual-size element (rear...
...8482; convection fan and element (on some models) Broiler pan and grid Roasting rack Temperature probe Simmer feature switch Temperature probe jack (electronic knob control only) A B CA D E A. Automatic oven light switch/ self-clean latch I B J K C A. Oven cavity sensor D. Anti-tip bracket C. Warming drawer (storage drawer on standard control models) F. Ceramic surface cooking area E. Door gasket J. Full and center broil elements C. Selectable simmer feature (available on standard control models) Oven Interior D. Model and serial number K. Dual-size element (rear...
Use & Care Guide
Page 16
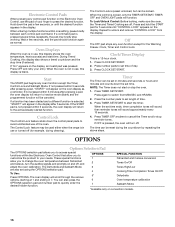
... the Electronic Oven Control that allow you to your needs. When the control is a 12-hour clock. 1. Press CLOCK SET/START. 2. Timer The Timer can be reset during cleaning). Press again to cancel the Timer and/or stop working. To Use: Press OPTIONS. Oven Displays When the oven is in use , this display is selected, "START?" If "Err" appears on convection models. 16 To Lock/Unlock Control: Before locking, make sure the oven, the Timer and Timed Cooking are also set using the...
... the Electronic Oven Control that allow you to your needs. When the control is a 12-hour clock. 1. Press CLOCK SET/START. 2. Timer The Timer can be reset during cleaning). Press again to cancel the Timer and/or stop working. To Use: Press OPTIONS. Oven Displays When the oven is in use , this display is selected, "START?" If "Err" appears on convection models. 16 To Lock/Unlock Control: Before locking, make sure the oven, the Timer and Timed Cooking are also set using the...
Use & Care Guide
Page 20
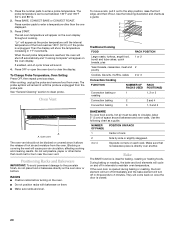
... 2 or 3 Convection Cooking FUNCTION NUMBER OF RACK RACKS USED POSITION(S) Convection baking or 1 roasting 1, 2 or 3 Convection baking 2 2 and 4 Convection baking 3 1, 3 and 5 BAKEWARE To cook food evenly, hot air must be blocked or covered since it out to maintain oven temperature. 1. Then the display will come back on and off in 30 seconds to circulate. Make sure that could melt or burn near the oven vent. Press the number pads to clean probe. Press OFF or open the oven door to...
... 2 or 3 Convection Cooking FUNCTION NUMBER OF RACK RACKS USED POSITION(S) Convection baking or 1 roasting 1, 2 or 3 Convection baking 2 2 and 4 Convection baking 3 1, 3 and 5 BAKEWARE To cook food evenly, hot air must be blocked or covered since it out to maintain oven temperature. 1. Then the display will come back on and off in 30 seconds to circulate. Make sure that could melt or burn near the oven vent. Press the number pads to clean probe. Press OFF or open the oven door to...
Use & Care Guide
Page 21
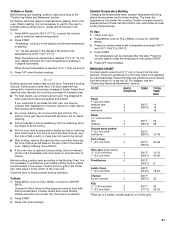
... preheat before putting food in unless recommended in the heated oven, making cleaning more from the bottom (1) to the "Positioning Racks and Bakeware" section. Variable Temperature Broiling Changing the temperature when Variable Temperature Broiling allows more precise control when cooking. Thicker cuts and unevenly shaped pieces of foods. Close oven door. 2. Times are 2 broiling choices, Full Broil and Center Broil. Press OFF when finished. See "Assistance or Service" section to the Broiling...
... preheat before putting food in unless recommended in the heated oven, making cleaning more from the bottom (1) to the "Positioning Racks and Bakeware" section. Variable Temperature Broiling Changing the temperature when Variable Temperature Broiling allows more precise control when cooking. Thicker cuts and unevenly shaped pieces of foods. Close oven door. 2. Times are 2 broiling choices, Full Broil and Center Broil. Press OFF when finished. See "Assistance or Service" section to the Broiling...
Use & Care Guide
Page 26
... on door frame. On some Canadian models, the surface elements will not work during self-cleaning to follow these instructions can be set a clean time other than 3 hours 30 minutes, press SELF CLEAN until the oven cools. See "General Cleaning" section for a good seal. 2 3 (Regular) 4 5 (Maxi) 3 hours 3 hours 30 minutes 4 hours 4 hours 30 minutes Once the oven has completely cooled, remove ash with porcelain. enter slots on your model, see "Oven Vent" or "Oven Vents" section. Use...
... on door frame. On some Canadian models, the surface elements will not work during self-cleaning to follow these instructions can be set a clean time other than 3 hours 30 minutes, press SELF CLEAN until the oven cools. See "General Cleaning" section for a good seal. 2 3 (Regular) 4 5 (Maxi) 3 hours 3 hours 30 minutes 4 hours 4 hours 30 minutes Once the oven has completely cooled, remove ash with porcelain. enter slots on your model, see "Oven Vent" or "Oven Vents" section. Use...
Use & Care Guide
Page 27
... not use steel wool, abrasive powder cleansers, chlorine bleach, rust remover or ammonia. See "Clock/Timer Display" section. Also, make sure the clock is reached, "LOCKING DOOR" will appear in direction of grain to the correct time of children. "DELAY" will not unlock until the desired time is automatically calculated and displayed along with a damp paper towel or soft cloth. When the start time is reached. General Cleaning...
... not use steel wool, abrasive powder cleansers, chlorine bleach, rust remover or ammonia. See "Clock/Timer Display" section. Also, make sure the clock is reached, "LOCKING DOOR" will appear in direction of grain to the correct time of children. "DELAY" will not unlock until the desired time is automatically calculated and displayed along with a damp paper towel or soft cloth. When the start time is reached. General Cleaning...
Use & Care Guide
Page 28
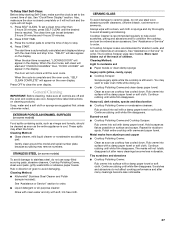
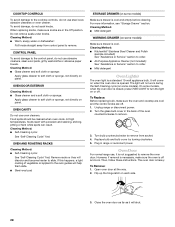
... latch on panel. Cleaning Method: ■ Self-Cleaning cycle: See "Self-Cleaning Cycle" first. Remove racks or they will shut. 28 The light will come on panel. Then, follow these instructions. Do not remove seals under knobs. If this happens, a light coating of the oven counterclockwise to remove. 3. Replace bulb and bulb cover by turning clockwise. 5. It will not work during the Self-Cleaning cycle (on some models). To Remove: 1. COOKTOP CONTROLS To avoid damage to the cooktop controls, do not use abrasive...
... latch on panel. Cleaning Method: ■ Self-Cleaning cycle: See "Self-Cleaning Cycle" first. Remove racks or they will shut. 28 The light will come on panel. Then, follow these instructions. Do not remove seals under knobs. If this happens, a light coating of the oven counterclockwise to remove. 3. Replace bulb and bulb cover by turning clockwise. 5. It will not work during the Self-Cleaning cycle (on some models). To Remove: 1. COOKTOP CONTROLS To avoid damage to the cooktop controls, do not use abrasive...
Use & Care Guide
Page 29
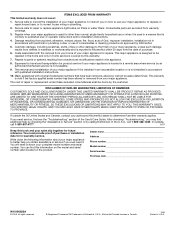
...," "Cooktop Controls Custom Knobs Custom Control Temperature Management System" or "Cooktop Controls - Lift the oven door while holding both hanger arms into the door. Push in order to remove the drawer. Standard Knobs" section, depending on after controls have been turned off? Cooktop will operate Excessive heat around cookware on some ceramic glass models, is set into the guides in "Cooktop Controls - See "Control Lock/All Off" in all items from the oven door frame. Hot surface indicator light stays on ■ Does the hot surface indicator light...
...," "Cooktop Controls Custom Knobs Custom Control Temperature Management System" or "Cooktop Controls - Lift the oven door while holding both hanger arms into the door. Push in order to remove the drawer. Standard Knobs" section, depending on after controls have been turned off? Cooktop will operate Excessive heat around cookware on some ceramic glass models, is set into the guides in "Cooktop Controls - See "Control Lock/All Off" in all items from the oven door frame. Hot surface indicator light stays on ■ Does the hot surface indicator light...

Use & Care Guide
Page 30
... information will not operate ■ Is the electronic oven control set ? To locate factory specified parts in a reliable cookbook. ■ Is the proper oven temperature calibration set ? See the Installation Instructions. See "Control Lock" section. ■ On some models, has a delay start been set ? See "Oven Displays" section. See "Self-Cleaning Cycle" section. ■ Has a delay start Self-Clean cycle been set correctly? Double-check the recipe in your request. Adjust cooking time. ■ Has the oven door been opened while cooking? Use aluminum foil to...
... information will not operate ■ Is the electronic oven control set ? To locate factory specified parts in a reliable cookbook. ■ Is the proper oven temperature calibration set ? See the Installation Instructions. See "Control Lock" section. ■ On some models, has a delay start been set ? See "Oven Displays" section. See "Self-Cleaning Cycle" section. ■ Has a delay start Self-Clean cycle been set correctly? Double-check the recipe in your request. Adjust cooking time. ■ Has the oven door been opened while cooking? Use aluminum foil to...
Use & Care Guide
Page 32
... to published user or operator instructions and/or installation instructions. 4. Damage resulting from accident, alteration, misuse, abuse, fire, flood, acts of your complete model number and serial number. Costs associated with the removal from your major appliance, to replace or repair house fuses, or to correct the installation of the Use & Care Guide. Major appliances with original model/serial numbers that is not installed in accordance with electrical or plumbing codes, or use your...
... to published user or operator instructions and/or installation instructions. 4. Damage resulting from accident, alteration, misuse, abuse, fire, flood, acts of your complete model number and serial number. Costs associated with the removal from your major appliance, to replace or repair house fuses, or to correct the installation of the Use & Care Guide. Major appliances with original model/serial numbers that is not installed in accordance with electrical or plumbing codes, or use your...


