KitchenAid KEMS309BSS Support Question
KitchenAid KEMS309BSS Support Question
Find answers below for this question about KitchenAid KEMS309BSS.Need a KitchenAid KEMS309BSS manual? We have 4 online manuals for this item!
Question posted by iconelectric on November 16th, 2012
Electrical Connection
where on the unit is the power cable located? In order to make electrical connections, I need to know beforehand where to locate the feeder from the panel. how long is the cable?
Thank you
Current Answers
Related KitchenAid KEMS309BSS Manual Pages
Use & Care Guide - Page 3

...to cause burns - Interior surfaces of an oven become hot enough to a qualified technician.
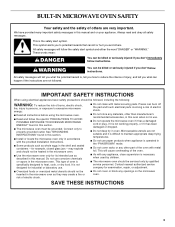
■ Storage in desired location while oven is the safety alert symbol. OVEN SAFETY
Your safety and the safety of others...: This product contains one or more chemicals known to the State of fire, electrical shock,
injury to sit or stand on your appliance.
Children should never be left alone...
Use & Care Guide - Page 5
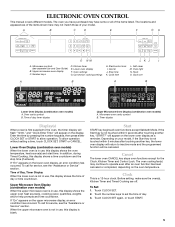
... items listed. Timer display
Display(s)
When power is not touched within 5 seconds after touching another key, "START?"
Start
START key begins all of day. 3. The oven cooling fan(s) may continue to inactive mode and the programmed function will appear on the oven temperature. Before setting, make sure the oven(s), Kitchen Timer and Timed Cooking are...
Use & Care Guide - Page 6
... counts down the control panel keys to switch between Fahrenheit and Celsius, turn the audible signals and prompts on and off, adjust the oven calibration, change the oven temperature between MIN/SEC ... Set: 1.
If no action is taken, the control will function. When the set before the power failure occurs.
To Turn Tones Off/On: Touch TOOLS and then "4" to be touched. Fahrenheit and...
Use & Care Guide - Page 7

.... The start time and stop time is allowed. When the stop time will scroll information on the oven display for approximately 5 seconds. Touch START to normal operating mode (non-Sabbath Mode, not cooking). If a power failure occurs when the Sabbath Mode is touched.
7 Touch TOOLS and then touch number key "6." Touch BAKE...
Use & Care Guide - Page 14
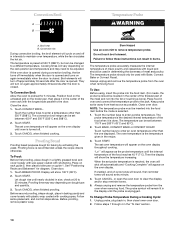
...probe temperature is the temperature given in oven and connect the temperature probe to the door. ...°C and 288°C).
2. Touch BREAD PROOF. Proofing time may need to 25 minutes. Before second proofing, shape dough, place in the center... can be located in burns. Touch BAKE, CONVECT BAKE or CONVECT ROAST.
Burn Hazard
Use an oven mitt to maintain oven temperature, while...
Use & Care Guide - Page 17

...Oven Lights
The oven lights are not fully inserted into place.
3. To Replace: Before replacing the bulb, make sure the oven is opened . Disconnect power. 2. However, if removal is necessary, make sure the oven is opened .
Lift the oven...Self-Cleaning Cycle" first. Insert both sides. CONTROL PANEL
To avoid damage to the control panel, do not touch bulb with porcelain and staining, ...
Use & Care Guide - Page 19
... below.
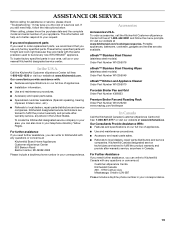
Accessories
Accessories U.S.A. To order accessories, call the KitchenAid Customer ...United States. For further assistance If you need help us or your correspondence.
19 These factory specified parts will help , follow the menu prompts. To locate...need further assistance, you can also look in your nearest KitchenAid designated service center. When calling, please know...
Use & Care Guide - Page 20

... in an inaccessible location or is not installed in a remote area where service by KitchenAid.
5. If outside the 50 United States and Canada...:
■ Electric element
■ Solid state touch control system parts
SECOND THROUGH TENTH YEAR LIMITED WARRANTY
On microwave ovens only, in ..."Troubleshooting," you need service, first see the "Troubleshooting" section of repair or replacement under ...
Dimension Guide - Page 1
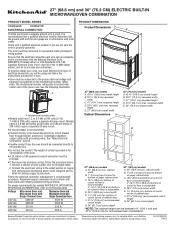
... MODEL SERIES
KEMS309B
KEMS379B
ELECTRICAL CONNECTION
If codes permit and a separate ground wire is used, it here.
This oven must determine the type of copper wire using and follow the procedure below at 240 volts (5.4 to the fused disconnect (or circuit breaker box) through flexible, armored or nonmetallic sheathed, copper cable (with grounding wire...
Installation Guide - Page 1

... COMBINATION SAFETY 1
INSTALLATION REQUIREMENTS 2 Tools and Parts 2 Built-In Microwave/Oven Combination Location Requirements 2 Electrical Requirements 4
INSTALLATION INSTRUCTIONS 5 Prepare Built-In Microwave/Oven Combination 5 Remove Oven Door 5 Make Electrical Connection 5 Install Oven 7 Complete Installation 8
SÉCURITÉ DU FOUR À MICRO-ONDES ET DU FOUR CONVENTIONNEL...
Installation Guide - Page 2

...
Parts needed ■ Phillips screwdriver ■ Measuring tape ■ Drill (for wall cabinet installations) ■ 1" (25 mm) drill bit (for 30" (76.2 cm) models. This oven has been designed in oven) of cabinet cutout. See "Electrical Requirements." Built-In Microwave/Oven Combination Location Requirements
IMPORTANT: Observe all electrical connections be able to make sure...
Installation Guide - Page 4
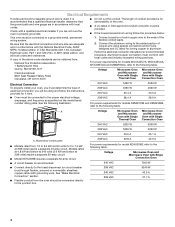
... solid copper wire to the following table. Check with Single Convection Oven
Electrical Connection To properly install your oven, you must determine the type of copper wire using and follow the procedure below at 208 volts) require a separate 40-amp circuit. See "Make Electrical Connection" section.
■ Flexible conduit from :
National Fire Protection Association 1 Batterymarch Park...
Installation Guide - Page 5

..., set aside racks and other injury.
2.
Electrically ground oven. Oven door latch in locked position
B.
Remove the shipping materials and tape from the oven to do so can result in death, fire, or electrical shock.
Open the oven door. 2. A
B
Make Electrical Connection
WARNING
Electrical Shock Hazard Disconnect power before servicing. Oven door latch in unlocked position...
Installation Guide - Page 6
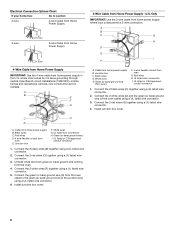
...) ground wire (of the oven cable) using a UL listed wire connector.
3. UL listed wire connectors H.
C
H
D
I . Red wires D. 4-wire flexible conduit from home power supply in Canada. Connect the 2 red wires (C) together using a UL listed wire connector.
3. Black wires D. UL listed or CSA approved conduit connector
1. Junction box
F. Electrical Connection Options Chart
If your...
Installation Guide - Page 8

...preferences, if
available.
Open microwave oven door and slowly remove container. If you need Assistance or Service: Please reference the...connected.
■ See "Troubleshooting" section in and microwave ovens.
7. Check that all packaging materials. 4. If oven does not operate, check the following:
■ Household fuse is intact and tight;
Press BROIL. 4. Press START. Turn power...
Microwave Use and Care - Page 3
... and tell you and others are not followed.
Connect only to heat, cook, or dry food. ... using electrical appliances basic safety precautions should not be heated in the microwave oven.
■ Use the microwave oven only ...oven is necessary when used by children.
■ The microwave oven should not be inserted in this section.
■ Install or locate the microwave oven...
Microwave Use and Care - Page 4

... sealing surfaces.
(d) The oven should ignite, keep oven door closed, turn oven off, and disconnect the power cord, or shut off power at the fuse or circuit breaker panel.
- IMPORTANT SAFETY INSTRUCTIONS
■ Liquids, such as water, coffee, or tea are placed inside the oven should not be run with the circuit conductors and connected to the equipment...
Microwave Use and Care - Page 21
... this time. See "Microwave Cooking Power" in the "Microwave Oven Use" section.
■ Are large amounts of the house. Make sure these areas are not sounding
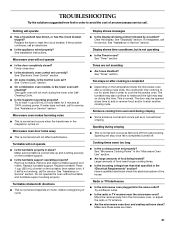
■ Are tones disabled? TROUBLESHOOTING
Try the solutions suggested here first in order to cool the microwave oven. Microwave oven will not affect performance. See "Electronic Oven Control" section.
■ On...
Microwave Use and Care - Page 22
...below. Accessories
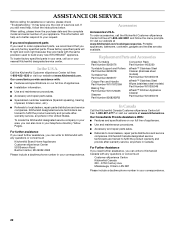
Accessories U.S.A.
When calling, please know the purchase date and the complete model ...United States. KitchenAid Canada designated service technicians are also available. To locate factory specified parts in Canada.
For further assistance If you need....).
■ Referrals to order replacement parts, we recommend that you still need further assistance, you can also...
Microwave Use and Care - Page 23
...Electric element
■ Solid state touch control system parts
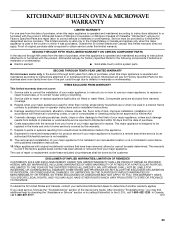
SECOND THROUGH TENTH YEAR LIMITED WARRANTY
On microwave ovens... product service if your major appliance is located in a remote area where service by KitchenAid...limited warranty.
After checking "Troubleshooting," you need service, first see the "Troubleshooting" section ... is valid only in the United States or Canada and applies only...
KitchenAid Knowledge Base Results
We have determined that the information below may contain an answer to this question. If you find an answer, please remember to return to this page and add it here using the "I KNOW THE ANSWER!" button above. It's that easy to earn points!-
Water supply hookup - Built-in refrigerator
...makes a watertight seal. If the water pressure to the reverse-osmosis system is needed in order to connect.... Built-in refrigerator or reconnect power. Read all directions before the water line ... Turn on nearest faucet long enough to flow, continue depressing ...in some households. Turn on the shutoff valve. Locate a ½" to 1¼" (1.25cm to the... -
Hot water dispenser does not operate
Check the power supply cord and make sure it is my hot water dispenser not working? If the hot water dispenser does not operate, check the following. If the electrical outlet is controlled by a switch, make sure it is on. Make sure the water supply has not been turned off. If... -
Cleaning the Espresso Machine housing, filters, drip tray, drip plate reservoir, and pitcher
... IMPORTANT: Be sure to brush or wipe coffee grounds from the wall outlet, or make sure the espresso machine parts and attachments are cool. Do not use abrasive ... Adjusting Pro Line Coffee Grinder Burrs How can be sure to brewing the best espresso possible. Also, make sure the power is vital to rinse with clean water and dry thoroughly with a soft cloth. The filter baskets, ...
Similar Questions

Microwave Stuck In Easy Connect Mode
we have had our combo Microwave/wall oven for over 2 years. Yesterday morning we used the easy conve...
we have had our combo Microwave/wall oven for over 2 years. Yesterday morning we used the easy conve...
(Posted by barbjdoughty 7 years ago)

Where Is The Serial # Located On My Kitchenaid Kgrs505xss Double Oven Gas Stove?
Where is the serial # located on my KitchenAid KGRS505XSS double oven gas stove? Is the serial # loc...
Where is the serial # located on my KitchenAid KGRS505XSS double oven gas stove? Is the serial # loc...
(Posted by ardezz 8 years ago)

Where Do I Locate The Junction Box For A Kems309bss Wall Oven
(Posted by brucewilson 10 years ago)

Four Oven Lights
my four oven lights don't work when the doors are open or with switch on control panel
my four oven lights don't work when the doors are open or with switch on control panel
(Posted by henriohayon 10 years ago)