Kenmore 4689 Support Question
Kenmore 4689 Support Question
Find answers below for this question about Kenmore 4689 - 30 in. Slide-In Electric Range.Need a Kenmore 4689 manual? We have 2 online manuals for this item!
Question posted by rosepeddle744 on October 19th, 2012
My Oven Stays On Pf Shows On Oven Display
oven stays on when I push off model #9578800 and serial #RK3815346, the
Current Answers
Related Kenmore 4689 Manual Pages
Use and Care Guide - Page 2
...date of purchase, call 27=28 Protection Agreements 29 Sears Service 30
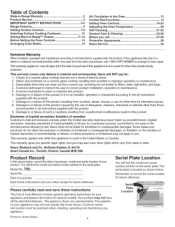
Kenmore Warranty When installed, operated and maintained according to all instructions...model and serial number of your appliance and feature information for a particular purpose, are not a result of thermal shock. 2. Table of Contents
Slide=in Range Warranty 2 Product Record 2 IMPORTANT SAFETY INSTRUCTIONS 3=5 Range...
Use and Care Guide - Page 6
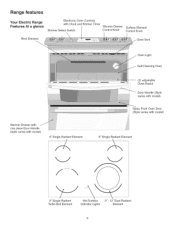
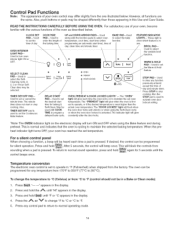
Range features
Your Electric Range Features At a glance
Broil Element
Electronic Oven Controls with Clock and Kitchen Timer
Simmer Select Switch
Warmer Drawer Control Knob
Surface Element Control Knob
Oven Vent
i
,
q
Warmer Drawer with one piece Door Handle (style varies with model)
6" Single Radiant Element
Y
9" Single Radiant Turbo Boil Element
Hot Surface
9"- 12" Dual Radiant
...
Use and Care Guide - Page 11
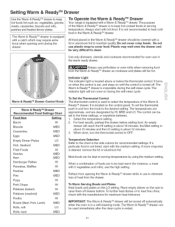
... & Ready TM Drawer
Your range is located above or below ... mode. It is turned off drawer bottom. To set the thermostat, push in use potholders or oven mitts when removing food from opening and closing the drawer. For best results...the LO setting. The temperatures are approximate, and are to be set , and stays on during the self-clean cycle. Setting Warm & Ready TMDrawer
Use the Warm...
Use and Care Guide - Page 13

... will turn "ON" after the range has been turned "OFF", but may also stop immediately and then turn "ON" and "OFF" by itself to keep the electronics cool.
Lift up front of the rack upward and slide the rack back into place. Models with Ceramic Glass Cooktop
The oven vent is located at right...
Use and Care Guide - Page 14
... first set to activate oven door
lockout setting.
*Note: The OVEN indicator light on to set to show which feature is in a Bake or Clean mode):
1. To return to
enter the length of the baking time. "----" appears in the display.
4.
Used to normal sound operation, press and hold
until "HI" appears in this Use...
Use and Care Guide - Page 15

...shows in the display, press and hold the A or V to increase or decrease the time. Jt will count down ).
2. When the minute timer is in use : While the timer is pressed.
Press and hold the A or V until 1 minute remains. The minute timer can be set in use with any other oven...
...ii.i...... To Set the Clock When the range is active. To Cancel the Minute Timer beforethe ...
Use and Care Guide - Page 16

...:
1. h r" will shut off the oven if the control is set to display Celsius).
3. "12hr" will appear in
display indicating that will appear in the display.
2. To Set Control for Oven Lockout The control can be adjusted in display, the "Door Locked" indicator light will flash and the motor driven door lock will show "350°F (177°...
Use and Care Guide - Page 17

... correct time of day. 2. Press
"------ o,, appears in the display.
9. Within 5 seconds, press the,_ or V. Press B_ke. o,, appears in the display. 4. The display will beep 3 times every 60 seconds until the desired start time (Delay Start)•
To Program the Oven to display Celsius). 6. The control will show "350°F (177°C) ''.
Use caution with a delayed start...
Use and Care Guide - Page 19

... position before broiling. 5. Broil on one side until the desired broil setting level appears in the
display. Turn and broil food on the insert (See Fig. 1).
To change the interior oven light, see "Changing the Oven Light" in display. 3. the
exposed grease could ignite. 6. Press B_[i. Press and hold the J_. DO NOT use...
Use and Care Guide - Page 20
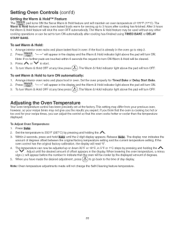
... any other cooking operations or can now be cleared.
3. Set the temperature to indicate that the oven cooks hotter or cooler than the temperature displayed. Release
The display now indicates the
amount of degrees.
5. When lowering the oven temperature, a minus
sign (-) will be adjusted up to step 2.
2. Press A or V to turn Warm & Hold OFF...
Use and Care Guide - Page 22
...shows the correct time of day will flash.
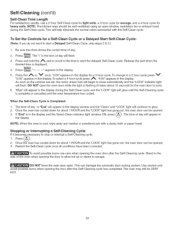
3. To change to start the delayed Self-Clean cycle.
Once the oven has cooled down for about 1 HOUR and the "LOCK" light has gone out, the oven door can be opened . 3.
The oven...or V once. DO NOT open . When the Self=Clean Cycle is displayed.
4. NOTE: When the oven is flashing (it becomes necessary to lock).
6. To avoid possible burns...
Use and Care Guide - Page 23
...oven cleaners, cleaning powders or any part of clear water and ammonia.
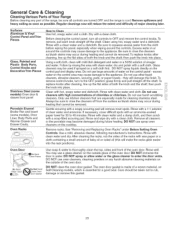
Gentle scouring with clean water; General Care & Cleaning
Cleaning Various Parts of Your Range Before cleaning any harsh abrasive cleaning materials on the control pad and display... damage to 40 minutes. then push the knob into place. Rinse with an ammonia-soaked paper towel for 30 to the appliance. DO NOT ...
Use and Care Guide - Page 24
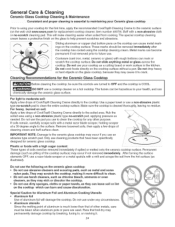
...use harsh cleaners, such as chlorine bleach, ammonia or oven
cleaners, as
needed. Special Caution for replacement cooktop ...non=abrasive cloth or no=scratch cleaning pad. Cleaning Recommendations
Sliding aluminum or copper clad bottom pans on the glass cooktop...soils with a metal razor blade scraper, holding scraper
at a 30 degree angle to clean the entire cooktop surface. General Care &...
Use and Care Guide - Page 27
...are built in this list. Contact your local electric company for range clearance, Contact cabinet maker to correct problem, ...Sliding or scraping of metal utensils on cooktop surface. Do not slide metal utensils on cooktop surface. Use a ceramic-glass cooktop cleaning cream to remove the marks. See "Ceramic Glass Cooktop Cleaning & Maintenance" section under "Entire range or oven...
Use and Care Guide - Page 28
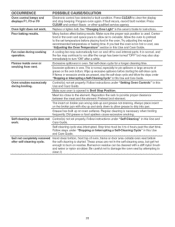
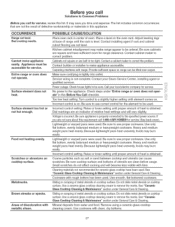
...
POSSIBLE CAUSE/SOLUTION
Oven control beeps and displays F1, F3 or F9 Oven light does not work . Fan noise during broiling. Flames inside oven or smoking from vent. Press CLEAR to clear the display and stop immediately...-clean cycle. If flames or excessive smoke are not in the oven and space pans to allow grease to run after the range has been turned "OFF" but get hot enough to 4 hours...
Installation Instructions - Page 4
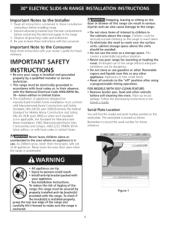
...electrical supply to make sure the range is in the Owner's Guide. Prolonged use of the range and carefully tilt it foward to the range.
3.
Serial Plate Location
You will find the model and serial number printed on the range... use the oven as shown. Children could result.
• Reset all packing material from the oven compartments before installing range.
2.
Remove...
Installation Instructions - Page 5

... supply cord kit. Match wires and terminals by connection of the rear wire cover (access cover) upward to expose range terminal connection block (see Figure 2).
2. To 240 V Receptacle
Figure 3
1 1/8" (2.9 cm) Dia.
NOTE: Electric Slide-in Range is shipped from the frame and cut the other wires to the left terminal) (see Figure 3):
1.
Cord must...
Installation Instructions - Page 8
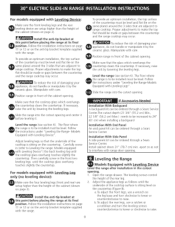
... level.
Install the anti-tip bracket at this point before leveling it before placing the range at its final position. Adjust the appliance legs as not to Leveling the range: Models equipped with range door opening and center it . Slide the range into the cutout opening . O To reduce the risk of damaging your appliance, do not...
Installation Instructions - Page 9
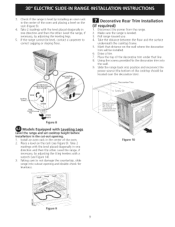
... the floor and the surface underneath the cooktop frame,
Figure 10
Figure 9 9 Install an oven rack in the cut-out opening and double check for levelness. Using the screws provided fix the decorative trim into
the wall.
, Slide the range back into cutout opening . 1. Place a level on the wall where the decorative
trim...
Installation Instructions - Page 10
... red.
Before You Call for baking, the lower element in your range. The list includes common occurrences that are Complete Make sure all packaging from the serial plate on the oven front frame behind the oven door (some models) or behind the drawer (some models) and Clean functions. They may save you have inquiries about your...
Similar Questions

How Much Is A Glass Top For My Kenmore 4689 30 Inch Slide In Stove
(Posted by Jessicasanders2021 8 months ago)


My Kenmore Elite Electric Range Is Displaying An F11 Code. What Does That Mean?
(Posted by roberthwjr 10 years ago)

Kenmore 46893: Does The Oven Of This Range Have A Bottom Heating Element?
No bottom heating element is visible.Oven takes 17 minutes to pre-heat to 350 degrees. Is this norma...
No bottom heating element is visible.Oven takes 17 minutes to pre-heat to 350 degrees. Is this norma...
(Posted by dckline 11 years ago)
I Am Getting An Error Code Eo30 With My Kenmore Elite Slide In Range.
The range has already been replaced once and I am still havingthe same error messagewith the second ...
The range has already been replaced once and I am still havingthe same error messagewith the second ...
(Posted by spletting 14 years ago)