Kenmore 4689 Support Question
Kenmore 4689 Support Question
Find answers below for this question about Kenmore 4689 - 30 in. Slide-In Electric Range.Need a Kenmore 4689 manual? We have 2 online manuals for this item!
Question posted by lrrydig on July 9th, 2011
Kenmore
Would you buy this oven?Please give detailed answer.
Current Answers
Related Kenmore 4689 Manual Pages
Use and Care Guide - Page 2
... 30
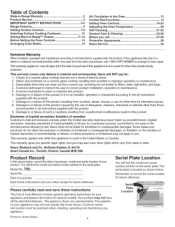
Kenmore Warranty...Slide=in Range Warranty 2 Product Record 2 IMPORTANT SAFETY INSTRUCTIONS 3=5 Range... Features 6 Setting Surface Controls 7=9 Selecting Surface Cooking Cookware 10 Setting Warm & Ready TM Drawer 11=12 Before Setting the Oven Controls 13 Arranging Oven Racks 13
Air Circulation in the Oven 13 Control Pad Functions 14
Setting Oven Controls 15=20 Adjusting the Oven...
Use and Care Guide - Page 3
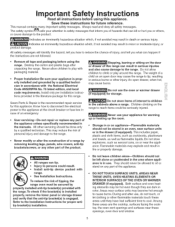
...damage to the product. Never allow
children to climb or play with the range. Know how to disconnect the electrical power to the appliance at the circuit breaker or fuse box in case ... oven or warmer drawer
(if equipped) for this appliance. They should be allowed to sit or stand on the range to reach items could result. • Install anti=tip device packed with the National Electrical ...
Use and Care Guide - Page 4
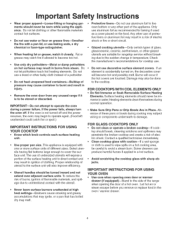
... contact with sharp oh= jects. Only use aluminum foil to line oven bottom or any unused range if it closely. Check the manufacturer's recommendations for rangetop service without ...breaking due to wipe spills on , the decorative cover will expose a portion of electric shock or...
Use and Care Guide - Page 5
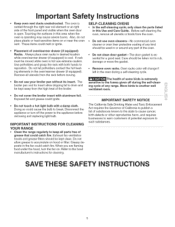
... and grease could catch fire. iMPORTANT iNSTRUCTiONS FOR CLEANING YOUR RANGE • Clean the range regularly to drain and be kept away from the rack before removing and replacing light bulb. Greasy deposits in the oven during a self-cleaning cycle.
_The
health of the oven.
,, Do not clean door gasket--The door gasket is...
Use and Care Guide - Page 6
ven Racks
_- -----..L
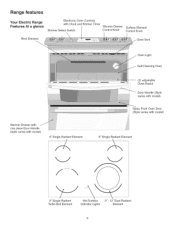
Door Handle (Style varies with model)
Glass Front Oven Door (Style varies with model)
f-, 6" Single Radiant Element
Oven Light Self-Cleaning Oven
(2) adjustable ......i...........O. Range features
Your Electric Range Features At a glance
Broil Element
Electronic Oven Controls with Clock and Kitchen Timer
Simmer Select Switch
Warmer Drawer Control Knob
Surface ...
Use and Care Guide - Page 7
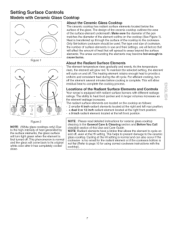
...elements. Locations of the Radiant Surface Elements and Controls
iii!"!il"_iiii iiiiiii_il;_;!i
Your range is equipped with radiant surface burners with Ceramic Glass Cooktop
\ Figure 1
f
About...up through the surface of the surface element underneath.
ratings. NOTE: Please read detailed instructions for using correct cookware instructions with the cooktop).
7 This helps to ...
Use and Care Guide - Page 13

... to keep the electronics cool. Lift up front of the rack upward and slide the rack back into place. Arranging Oven Racks
ALWAYS ARRANGE OVEN RACKS WHEN THE OVEN IS COOL (PRIOR TO OPERATING THE OVEN). It may continue to run after the range has been turned "OFF", but may also stop immediately and then turn...
Use and Care Guide - Page 23
... use large amounts of water on the control panel - Only use oven cleaners, cleaning powders or any part of the range, be sure all cleaners or the porcelain may occur during future heating...dishcloth. Rinse with a soap-filled scouring pad. Be sure to the appliance. The oven door gasket is made for 30 to OFF and remove the control knobs. Remove spillovers and heavy soiling as soon as ...
Use and Care Guide - Page 26
... finger
Right Glide
Electrical Shock Hazard can occur and
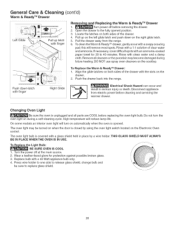
result in place by using the oven light switch located on the Electronic Oven control. DO NOT use spray oven cleaners on both sides...latch with a 40 Watt appliance bulb only.
4. Disconnect appliance from the range.
6.
Changing Oven Light
Be sure the oven is covered with clean water and a damp
cloth. To clean the Warm...
Use and Care Guide - Page 27
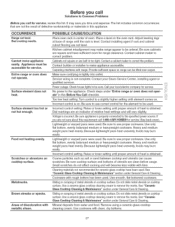
... or installer to make range appear to be lifted over carpet. Make sure cord/plug is obtained. Contact your local electric company for service, review...range until proper amount of heat is not complete. Voltage is properly connected to the specified power source. Lightweight or warped pans were used . incorrect control setting. Sliding or scraping of metal utensils on the oven...
Installation Instructions - Page 2
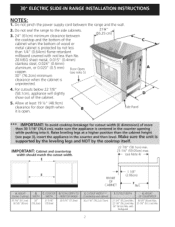
... the cutout width. E
22 7/8" (58.1 cm) min. 23 1/4" (59.05cm)max.
(see note 5)
30" (76.2cm) minimum
clearance when the cabinet is open. Do not seal the range to the side cabinets.
213/_"
3.24" (61cm) minimum clearance between the range and the wall.
2. For cutouts below 22 7/8"
(58.1cm), appliance will slightly show...
Installation Instructions - Page 3
...than cabinet sides as measured in step 1.
Illustration 1
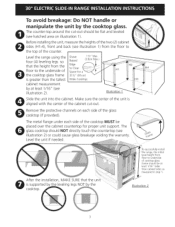
Slide the unit into the cabinet.
Illustration 2
3 by the cooktop glass.
Level the range using the four (4)leveling legs so that the height ... frame is supported by the leveling legs NOT by the cooktop.
.-Tosuccessfully install range, the initial
level height from the floor to Clear
Space for proper unit support...
Installation Instructions - Page 4
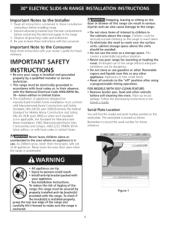
... the room. IMPORTANT SAFETY
INSTRUCTIONS
• Be sure your range for future reference. Never leave the oven door open when the range is located as a storage space. This creates a _otentially... be avoided.
• Do not use of this or any other utensils
before connecting the electrical supply to the "off" position after using a programmable timing operation,
FOR MODELS WITH SELF...
Installation Instructions - Page 5

... appliance may occur,
2. NOTE: Electric Slide-in the literature package, connect the neutral of the copper power supply cord to the connection block located behind the back panel access cover.
Do not loosen the nuts which secure the factory-installed range wiring to expose range terminal connection block (see Figure 2).
2. Electrical failure or loss of...
Installation Instructions - Page 6
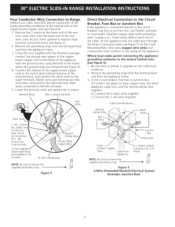
... Punch Out Knockout for 1 3/8" (3.5cm) Dia.
Terminal Block
SilverColoredTerminal
Red .Wire
Direct Electrical Connection to the Circuit
Breaker, Fuse Box or Junction Box If the appliance is supplied on... to remove the supplied grounding strap. Supply a U.L. Four Conductor Wire Connection to Range Where local codes does NOT permit connection of the frame grounding conductor to the neutral...
Installation Instructions - Page 7

... or tile countertop trimmed _A" (1,9 cm) back at the sides and the range rests on page 1.
7
Install base cabinets 30" (76.2 cm) apart.
Cutout countertop exactly as shown on the floor. ...oven door removal instructions. If there is required.
WherelocalcodesDONOTpermit connectingthe appliance-groundingconductorto the neutral (white)wire, or if connectingto 4-wire electrical...
Installation Instructions - Page 8
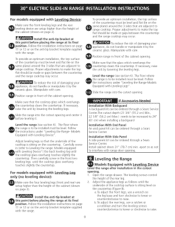
.... Install cabinet doors 31 " (78.7 cm) min. O To reduce the risk of damaging your appliance, do not handle or manipulate it by the ceramic glass. Slide the range into the cutout opening . 1. Carefully screw in the cutout opening .
b.To adjust the rear legs, use a wrench on the countertop. For models equipped with...
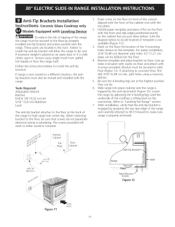
Installation Instructions - Page 9
...).
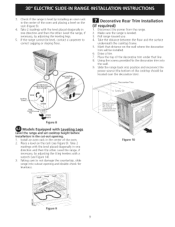
3. Using the screws provided fix the decorative trim into
the wall.
, Slide the range back into cutout opening . 1. Place a level on the wall where the decorative
trim will be... Draw a line. 7. Taking care to not damage the countertop, slide range into position and reconnect the power source (the bottom of the oven.
2.
Screw (3)
Distance betwei the floor and the surface underneath the ...
Installation Instructions - Page 11
... screws do not penetrate electrical wiring or plumbing. Those parts are at the back of the range and carefully attempt to tilt it forward to hold range rear center leg.
Remove... bracket (Figure 12). Slide range into the floor. 4.
Draw a line on the floor (in bracket with the range. Serious injury might result from spilled hot liquids or from the range itself. Tools Required: ...
Installation Instructions - Page 12
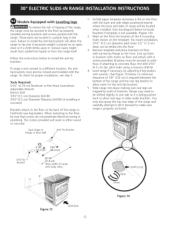
... diameter pilot holes 1/2" (1.3 cm) deep can be sure that screws do not penetrate electrical wiring or plumbing. If range is ever moved to a different location, the antitip brackets must also be moved and ... sides of range will work in the oven. Remove template and place brackets on floor and attach with the range. If attaching to hold both rear leg levelers. Slide range into the ...
Similar Questions

How Much Is A Glass Top For My Kenmore 4689 30 Inch Slide In Stove
(Posted by Jessicasanders2021 9 months ago)

Kenmore 46893: Does The Oven Of This Range Have A Bottom Heating Element?
No bottom heating element is visible.Oven takes 17 minutes to pre-heat to 350 degrees. Is this norma...
No bottom heating element is visible.Oven takes 17 minutes to pre-heat to 350 degrees. Is this norma...
(Posted by dckline 11 years ago)

Cutout Dimension For Kenmore 46893 Electric Range.
Please help to provide cutout dimension for Kenmore 46893 Electric Range. thks James
Please help to provide cutout dimension for Kenmore 46893 Electric Range. thks James
(Posted by bkcjames888 12 years ago)

Kenmore Electric Range Model #911-9389981
after i have the burner on about 2 min. my stove flashes a letter F what could this be
after i have the burner on about 2 min. my stove flashes a letter F what could this be
(Posted by lisadeclemente 12 years ago)

I Am Getting An Error Code Eo30 With My Kenmore Elite Slide In Range.
The range has already been replaced once and I am still havingthe same error messagewith the second ...
The range has already been replaced once and I am still havingthe same error messagewith the second ...
(Posted by spletting 14 years ago)