Kenmore 4102 Support Question
Kenmore 4102 Support Question
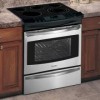
Find answers below for this question about Kenmore 4102 - Elite 30 in. Slide-In Electric Range.Need a Kenmore 4102 manual? We have 2 online manuals for this item!
Question posted by Jchilcoat on November 27th, 2013
Is My Stove Safe
Control board separated from stove top. Is it safe to operate?
Current Answers
Related Kenmore 4102 Manual Pages
Use and Care Guide - Page 2
... : 1.
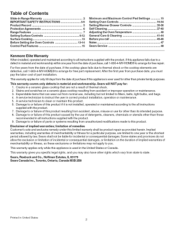
Table of Contents
Slide-in RangeWarranty 2 IMPORTANT SAFETY INSTRUCTIONS 3=5 Product Record 5 Protection Agreements 6 Range Features 7 Setting Surface Controls 8-12 Surface Cooking 13 Before Setting the Oven Controls 13-14 Control Pad Features 15
Minimum and Maximum Control Pad Settings 15
Setting Oven Controls 16-34
Setting Warmer Drawer Controls 35=36
Self Cleaning...
Use and Care Guide - Page 3

... Safety instructions
Read all safety messages. Save these areas
• Install anti=tip device packed with the National Electrical Code ANSI/
Do not store items of personal injury and damage to play around the range. The safety symbol _[_ calls your attention to safety messages that inform you of the product.
• Do...
Use and Care Guide - Page 4
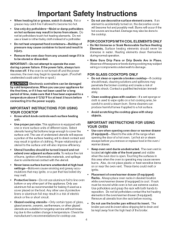
.... Proper relationship of electric shock or fire or short circuit. Only use . Any other part of the appliance.
FOR GLASS COOKTOPS ONLY • Do not clean or operate a broken cooktop--lf...items could catch fire or spoil.)
Electronic controllers can produce harmful fumes if applied to line oven bottom or any unused range if it is operating may also be kept away from the...
Use and Care Guide - Page 5
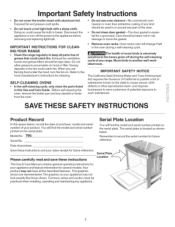
... gasket--The door gasket is extremely
sensitive to break. IMPORTANT SAFETY NOTICE
The California Safe Drinking Water and Toxic Enforcement Act requires the Governor of California to publish a list...a self-cleaning cycle.
_The
health of any range. Exhaust fan ventilation hoods and grease filters should be practiced when installing, operating and maintaining any part of any kind should be...
Use and Care Guide - Page 7
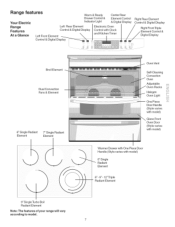
... features
Warm & Ready Drawer Control &
Center Rear Element Control
Your Electric
Range Features At a Glance
Left Front Element
Indicator Light
& Digital Display
Left Rear Element Control & Digital Display
Electronic Oven Control with Clock and Kitchen Timer
Control & Digital Display
Right Rear Element Control & Digital Display
Right Front Triple &
Digital Display
Broil Element
Dual...
Use and Care Guide - Page 12
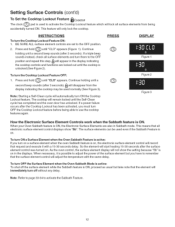
... in Sabbath mode. PRESS
O
0
DISPLAY Figure 1 Figure 2 Figure 3
How the Electronic Surface Element Controls work when the Sabbath feature is unlocked (See Figure 2). So the element will remain locked until a...as usual but you have to remember that the surface element control will adjust the temperature with a 15-30 seconds delay. This feature will automatically turn the Cooktop Lockout ...
Use and Care Guide - Page 13
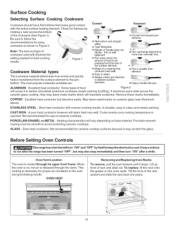
...must be prepared and the size of the surface element.
• Made of rack and slide out. Slow heat conductor.
Some types of cookware used will retain heat very well. ...using cookware as shown in the oven and good baking results. STAINLESS STEEL - Before Setting Oven Controls
_This
range has afan that conducts heat well.
• Easy to clean. • Always match pot ...
Use and Care Guide - Page 16

...in To set the Clock above. Press _ to the range has been interrupted, the timer in the display (Figure 2). 2.
When the range is first plugged in the
display. Press and hold ...time as described in the display and the control beeps once.
2. Changing between the 12 and...the time of clay operation. The clock may be set for 1:30) 1. Press (_ (_) (_ pads to 1:30
(Figure 3). I_1will disappear...
Use and Care Guide - Page 18

... 5
change. The Silent Control
operation feature allows the oven control to silent operation.
18 INSTRUCTIONS
PRESS
DISPLAY
To activate the Oven Lockout feature
1. The "DOOR LOCKED" will show either "SP" (Figure 4) or ":=="(Figure 5).
@
for 3 seconds. The display will flash in the silent operation mode.
. To tell if your range is set for silent operation and later returned...
Use and Care Guide - Page 32
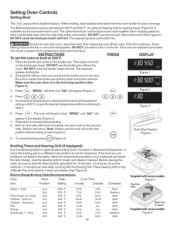
... grease to drain and be reduced 1-2 minutes per side when cooking with foil, The exposed grease could catch fire. Setting Oven Controls
Setting Broil
The _ pad controls the Broil feature. Electric Range Broiling Table Recommendations
Food
Rack
Temp
Cook Time
Item
Position
Setting
1st side
2ndside
Doneness
Steak 1" thick
2nd
2nd
Pork Chops 3/4" thick...
Use and Care Guide - Page 39

...the display (Figure 5). The control will remain in the display (Figure 2). 4. As soon as the control is set with the correct ...The time of clean cycle, controls the Delayed Self-Clean operation. The control will quit flashing and remain ...clean time is Completed 1.
INSTRUCTIONS
PR ESS
DISPLAY
To set the control for approximately 1 HOUR,
and the "DOOR LOCKED" and I_1icon are...
Use and Care Guide - Page 41
... oven during future heating. The oven door gasket is made for 30 to rinse the cleaners off the racks. Dry with an ammonia...; Rinse with a soap-filled scouring pad. Be sure to slide.
...ii.i...... Do not use harsh scrubbing cleaners. To replace ...or around the controls. dry and polish with clean water; General Care & Cleaning
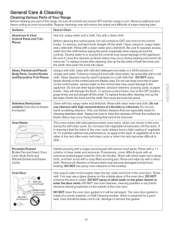
Cleaning Various Parts of Your Range Before cleaning ...
Installation Instructions - Page 1

...35 518" (90.5 cm) -
30"
36 518" (93 cm}
(76,2 cm)
Printed in the cabinet before reading next two pages.
paginas 13-24 iMPORTANT: SAVE FOR LOCAL ELECTRICAL iNSPECTOR'S USE. READ AND SAVE THESE ... shouJd be flat & leveled (hatched area),
30" Min.l(see page 7).
Locate Cabinet Doors 1" (2.5 cm) Min. TOTAL DEPTH
WIDTH
TO FRONT OF
•
RANGE
IE; with
backguard
36 5/8" (93 cm)...
Installation Instructions - Page 4

... and the
drawer compartments before connecting the electrical supply to the Consumer Keep these installation
...range is anchored. To reduce
All ranges the risk of tipping of the
can be connected by the range.
• Before installing the range in use gasoline or other appliance. Important Notes to the "off" position after using a programmable timing operation. Remove all controls...
Installation Instructions - Page 5
... ElectricaJ
eJectricaJ connection may differ). to terminaJ block faiJure or Joss of
Electrical Connection to the Range
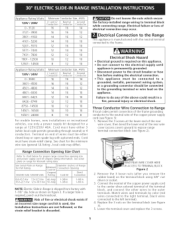
appliance is manufactured with upturned ends.
See Serial Plate on the terminal .... Range Connection Opening Size Chart
Refer to the left terminal).
4. NOTE: Electric Slide-in Range is required, punch out the knockout.
Three Conductor Wire Connection to Range If...
Installation Instructions - Page 7
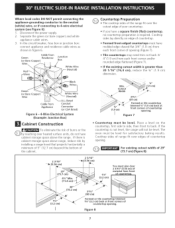
...) beyond the bottom of countertop
opening . Separate the green (or bare copper) and white
appliance cable wires. 3. Cooktop sides of range fit over the cutout edge of 29"
You must be level. Cooktop sides lay directly on the countertop, first side to side, then front to 4-wire electrical
system (see Figure 6): 1. Min.
Black...
Installation Instructions - Page 8
...adjacent to be installed must be made or gaps between the countertop and the range cooktop may occur.
Slide the range into the cutout opening .
If necessary, raise the unit by lowering the leveling... on page 12 or on the floor. Install base cabinets 30" (762 cm) apart. The floor where the range is to range cooktop.
Adjust leveling legs so that the cooktop glass which ...
Installation Instructions - Page 10
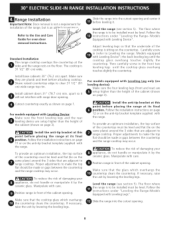
...Operation of the functions has been factory checked before testing.
1. BAKE/ROAST at 350% (177°C), the convection element cycles on the oven front frame behind the oven door (somemodel_ or behind the drawer (some models)-Set the control...and the surface
underneath the cooktop frame. 5. Slide the range back into the wall. 9.
Figure 11
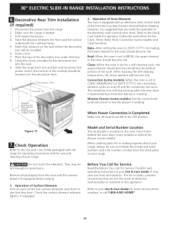
Check Operation
Refer to the Use & Care Guide for ...
Installation Instructions - Page 11
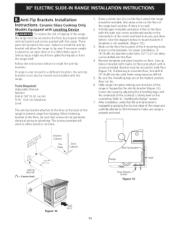
... penetrate electrical wiring or plumbing. These parts are at the highest position they can be . 6. Follow the instructions below to locate brackets if template is sitting level on the floor where the range should be secured to solid floor (Figure 13). Bracket must be installed. pilot holes using masonry drill bit. 5. Slide range into...
Installation Instructions - Page 12
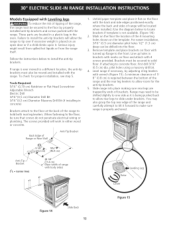
... is being pushed back to allow rear legs to slide under brackets.
If range is not available. (Figure 14))
2. Failure to the floor at the back of
Range or Rear Wall_""-,
,,
i
CL:I
...-.-.. Tools Required: 5/16" (0,79 cm) Nutdriver or Flat Head Screwdriver Adjustable Wrench Electric Drill
3/16"(0,5 cm) Diameter Drill Bit 3/16"(0,5 cm) Diameter...
Similar Questions

Noisy Range While Cooking
What I would assume is a cooling fan while the oven is on , top elements as well, is now sounding li...
What I would assume is a cooling fan while the oven is on , top elements as well, is now sounding li...
(Posted by kenjcrossley 9 years ago)

Range Door Sharp!
I have a stainless steel range. The stainless wraps around to the side from the front. Once whil...
I have a stainless steel range. The stainless wraps around to the side from the front. Once whil...
(Posted by Kklukes 11 years ago)

Cutout Dimension For Kenmore 46893 Electric Range.
Please help to provide cutout dimension for Kenmore 46893 Electric Range. thks James
Please help to provide cutout dimension for Kenmore 46893 Electric Range. thks James
(Posted by bkcjames888 12 years ago)

Removing Sabath Mode From Range
Hi we have a kenmore c970-4409 range and it is locked in Sabath mode. How do you unlock it?
Hi we have a kenmore c970-4409 range and it is locked in Sabath mode. How do you unlock it?
(Posted by karmie13 12 years ago)

I Am Getting An Error Code Eo30 With My Kenmore Elite Slide In Range.
The range has already been replaced once and I am still havingthe same error messagewith the second ...
The range has already been replaced once and I am still havingthe same error messagewith the second ...
(Posted by spletting 14 years ago)