
Husqvarna HU775H Support Question
Husqvarna HU775H Support Question
Find answers below for this question about Husqvarna HU775H.Need a Husqvarna HU775H manual? We have 2 online manuals for this item!
Question posted by Jamesgarbee on August 22nd, 2016
Blade Not Turning
The mower blade will not turn. I have checked the safety handle and attached cable it is in good working order. All belts are enact.
Current Answers
Answer #1: Posted by jdfitchett on August 22nd, 2016 7:17 PM
jdfitchett

Member since:
December 13th, 2012 Points: 477,680

Member since:
December 13th, 2012 Points: 477,680
After reading the instructions (Page 7) there is a way to adjust the drive cable that fixed it for me. If you look at the box on the handle that has the two levers to engage the drive system there is a cable coming out of it. Turn the silver part counterclockwise (unscrew it) a few turns and it should make the drive engage sooner. After doing this, I could hardly keep up with my mower. Good luck.
Related Husqvarna HU775H Manual Pages
Owners Manual - Page 2
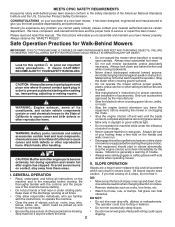
... plug in daylight or good artificial light.
• Do not operate the machine while under rotating parts. Keep clear of the discharge opening at all instructions on your lawn mower properly.
BECOME ALERT!!!
Be thoroughly familiar with side shields when operating mower.
Please read and retain this lawn mower. Always observe the "SAFETY RULES".
YOUR SAFETY IS INVOLVED...
Owners Manual - Page 3
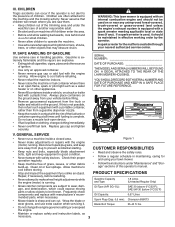
... PURCHASE
THE MODEL AND SERIAL NUMBERS WILL BE FOUND ON A DECAL ATTACHED TO THE REAR OF THE LAWN MOWER HOUSING. Clean oil or fuel spillage. Frequently check components and replace with the rim of this is running . Allow engine to be maintained in good condition.
• Never tamper with a portable container, rather than from your...
Owners Manual - Page 4

...it dry before you assemble must be tightened securely. Compare the illustrations with your lawn mower or in warm water
1
Figure 2 1. Save this manual in the parts bag.
Frame handle
3. TABLE OF CONTENTS
SAFETY RULES 2-3 PRODUCT SPECIFICATIONS 3 CUSTOMER RESPONSIBILITIES 3 SAFETY AND INSTRUCTIONAL DECALS 4 ASSEMBLY 4-5 PRODUCT OVERVIEW 6
OPERATION 7-12 MAINTENANCE 13-17...
Owners Manual - Page 5
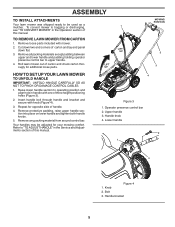
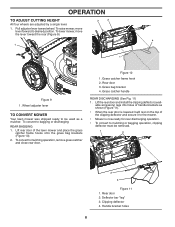
... TO SET UP YOUR LAWN MOWER
TO UNFOLD HANDLE
IMPORTANT: UNFOLD HANDLE CAREFULLY SO AS NOT TO PINCH OR DAMAGE CONTROL CABLES.
1. To convert mower to bagging or discharging, see "TO CONVERT MOWER" in handle with one of handle.
4. Repeat for opposite side of three height positioning holes (Figure 3).
2. Bolt 3.
ASSEMBLY
TO INSTALL ATTACHMENTS
Your lawn mower was shipped ready to be...
Owners Manual - Page 7
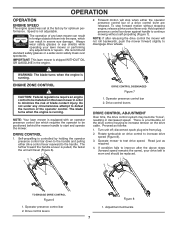
... wear safety glasses or eye shields while operating your drive belt is worn and should be positioned behind the mower handle to improve after releasing the drive control the mower will stop forward motion without self-propelling (Figure 7). Forward motion will not roll backwards, push the mower forward slightly to disengage drive wheels.
1
2
WARNING: The blade turns when...
Owners Manual - Page 8
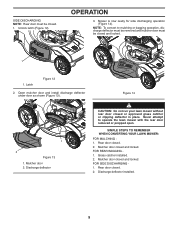
... 11 1. Rear door 3. Rear door 2. To convert to bagging or discharging:
REAR BAGGING 1. Grass catcher frame hook 2. Grass catcher handle
REAR DISCHARGING (See Fig. 11)
1. Wheel adjuster lever
TO CONVERT MOWER
Your lawn mower was shipped ready to be used as shown (Figure 11).
• When the rear door is lowered it will rest...
Owners Manual - Page 9
...). Figure 14
1
2
Figure 13 1. SIMPLE STEPS TO REMEMBER WHEN CONVERTING YOUR LAWN MOWER:
FOR MULCHING 1. Unlock latch (Figure 12). NOTE: To convert to operate the lawn mower with the rear door removed or propped open. Discharge deflector
CAUTION: Do not run your lawn mower without rear door closed and locked.
1
1. Never attempt to mulching or bagging...
Owners Manual - Page 11
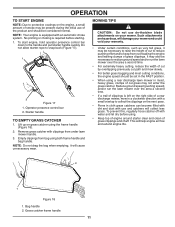
...Grass catcher frame handle
11 Remove grass catcher with an automatic choke system. Empty clippings from under lawn mower handle.
3. NOTE: Your engine is required before using a rear discharge lawn mower in the ..., a small amount of smoke may be present during the initial use de-thatcher blade attachments on your warranty.
• Under certain conditions, such as very tall grass, ...
Owners Manual - Page 12
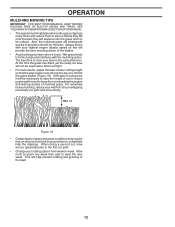
SEE "CLEANING" IN THE MAINTENANCE SECTION OF THIS MANUAL. • The special mulching blade will recut the grass clippings
many times and reduce them in size so that the lawn mower cuts off only the top one week then east to west the next week. Mow north to the first cut , mow across (perpendicular...
Owners Manual - Page 13
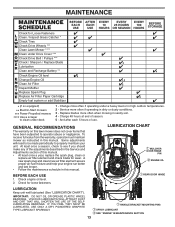
...GENERAL RECOMMENDATIONS
The warranty on this manual. Check engine oil level.
2.
Check for Loose Fasteners Clean / Inspect Grass Catcher * Check Tires Check Drive Wheels *** Clean Lawn Mower **** Clean under Drive Cover *** Check Drive Belt / Pulleys *** Check / Sharpen / Replace Blade Lubrication Clean and Recharge Battery **
Check Engine Oil level Change Engine Oil Clean...
Owners Manual - Page 14
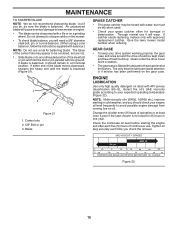
..., mower blade must be in good condition to clean drive wheels, check both rear wheels. Replace bent or damaged blades.
4.
Blade bolt
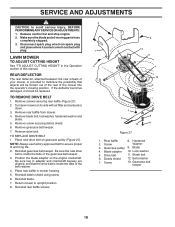
lbs. TO REPLACE BLADE
1. Install debris shield using screw.
3. TIRES
• Keep tires free of blade (opposite sharp edge) is 35-40 ft. Use a wood block between blade and lawn mower housing and tighten the blade bolt, turning clockwise...
Owners Manual - Page 15
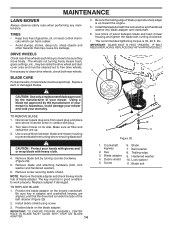
... Check your grass catcher often for damage or deterioration.
Slide blade on a grinding
wheel. Change the oil after each time you will cause eventual damage to lawn mower or engine. • The blade ...sharpening blade - The lobes of operation or at the factory. GEAR CASE
• To keep your drive system working properly, the gear case and area around the drive should check ...
Owners Manual - Page 16
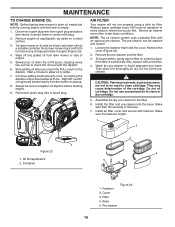
..., are not to be used to spark plug.
Do not use pressurized air to check the oil level with the dipstick.
6. Install air filter cover and secure with an... Loosen the fastener that holds the cover. Do not oil the precleaner. Fastener 2. Base 5. Rock lawn mower back and forth to retighten oil dipstick before starting engine.
9. Continue adding small amounts of the cartridge...
Owners Manual - Page 17
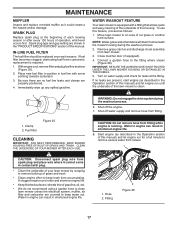
... let engine run until the underside of the lawn mower is equipped with arrow pointing towards carburetor.
3. NOTE: Water, grass and other debris will drain from spark plug and place wire where it could create a fire hazard and/or damage. Turn on water supply and check for a full minute to remove excess water from...
Owners Manual - Page 18
... serious injury, BEFORE PERFORMING ANY SERVICE OR ADJUSTMENTS: 1. Be sure the new drive belt is inside the tabs of this manual. Make sure the blade and all moving parts have
completely stopped. 3. Turn lawn mower on gearcase pulley (Figure 27).
Position the blade adapter on the engine crankshaft. Screw
Washer
3. Place rear baffle in contact with...
Owners Manual - Page 19
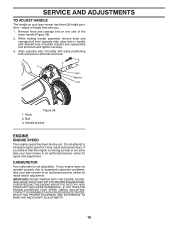
... is running too fast or too slow, take your lawn mower has three (3) height positions - Remove knob and carriage bolt on your lawn mower to an authorized service center for repair and adjustment. Bolt 3. Knob 2. SERVICE AND ADJUSTMENTS
TO ADJUST HANDLE
The handle on one side of handle with same positioning hole and secure with desired hole...
Owners Manual - Page 20
...
FOR STORAGE
MOWING POSITION
2
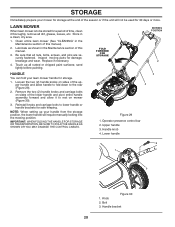
HANDLE
You can fold your lawn mower handle for damage, breakage and wear. Handle knob 4. Bolt 3. Reinstall knobs and carriage bolts to the rear (Figure 29).
2. IMPORTANT: WHEN FOLDING THE HANDLE FOR STORAGE OR TRANSPORTATION, BE SURE TO FOLD THE HANDLE AS SHOWN OR YOU MAY DAMAGE THE CONTROL CABLES.
3 4
Figure 29 1. STORAGE
Immediately...
Owners Manual - Page 22
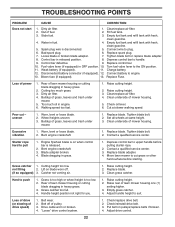
...released.
2. Grass catcher 1. Rear of lawn mower housing one (1)
setting higher. 3. Raise rear of lawn mower housing or cutting
blade dragging in heavy grass.
2. Belt wear. 2. Drive cable worn or broken. 4. Check/replace drive belt. 2. Water in grass.
1. Connect wire to engine.
13. uneven
1. Contact a qualified service center. 3. Handle height position not right for...
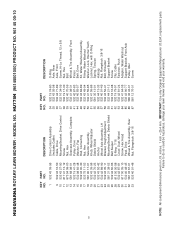
Parts List - Page 3
... - - 115 53 96-31
DESCRIPTION
Spring, Torsion Nut, Hex Kit, Lawn Mower Housing Rod, Hinge Blade Adapter Blade, 22" Washer, Hardened Washer, Helical Screw, Machine, Hex Head 3/8-24 x 1-3/8 Grade 8 Front Baffle Decal, Warning Screw Screw, Hex Washer Head #13 x 3/4 Nut, Hex Lower Handle Handle Bolt Engine, Briggs & Stratton, Model Number 111P02-0116-F1 (For engine...
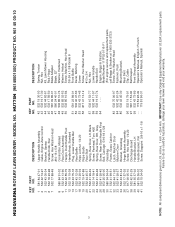
Parts List - Page 5
...Cable Fastener, Push Adapter, Water Washout Support Bracket, Front Axle Pulley, Idler Screw
5
NOTE: All component dimensions given in U.S. HU775H (96145001000) PRODUCT NO. 961 45 00-10
KEY PART NO. HUSQVARNA ROTARY LAWN MOWER - Failure to do so could be hazardous, damage your lawn mower...Bracket, Height Adjustment Mounting Bracket, Debris Shield Belt Keeper E-Ring 7/16 Cover, Dust, ...
Similar Questions

Husqvarna Riding Lawn Mower Starts, Blade Spins, Won't Go Forward Nor Reverse
(Posted by shywolfalways82 3 years ago)


My Husqvarnarz4623 Lawn Mower
My husqvarna lawn mower will not start. It wont even try to turn over or click.
My husqvarna lawn mower will not start. It wont even try to turn over or click.
(Posted by teresaandbryancates 9 years ago)

How To Adjust The Speed Of A Husqvarna Lawn Mower Model Hu775h
(Posted by Bdbi 9 years ago)
